Taking a web page screenshot seems easy on the surface. For a quick grab, your browser's built-in tools work just fine. If you need to automate a few repetitive captures, a script can do the trick. But for developers who need rock-solid, production-ready screenshots, a dedicated API is really the only way to go. It sidesteps all the common headaches like cookie banners and lazy-loading images right out of the box.
Why a Perfect Screenshot Is Harder Than It Looks
Anyone can hit a button and get a screenshot. But for developers, QA engineers, and marketers, that simple snap often isn't good enough. The real world of web development is messy, filled with dynamic and interactive sites that make a simple capture unreliable. The challenge isn't just taking the shot; it's getting a consistent, clean, and accurate image every single time, especially when you need to do it at scale.
This is where you see the huge gap between a quick manual capture and a programmatic approach. Manual methods are fine for a one-off bug report, but they just can't keep up when you need to:
- Guarantee consistency across different machines, browsers, and times of day.
- Capture dynamic content like animations or images that only load as you scroll.
- Block interruptions like cookie popups, newsletter modals, and ads that clutter the final image.
- Automate the entire process for things like visual regression testing, website archiving, or generating social media previews.
Choosing Your Screenshot Method
The right tool for the job really depends on what you're trying to accomplish. A simple, one-time task has very different needs than a complex, automated workflow that runs thousands of times a day. This decision guide helps lay out the best path—manual tools, headless automation, or a production API—for your specific situation.
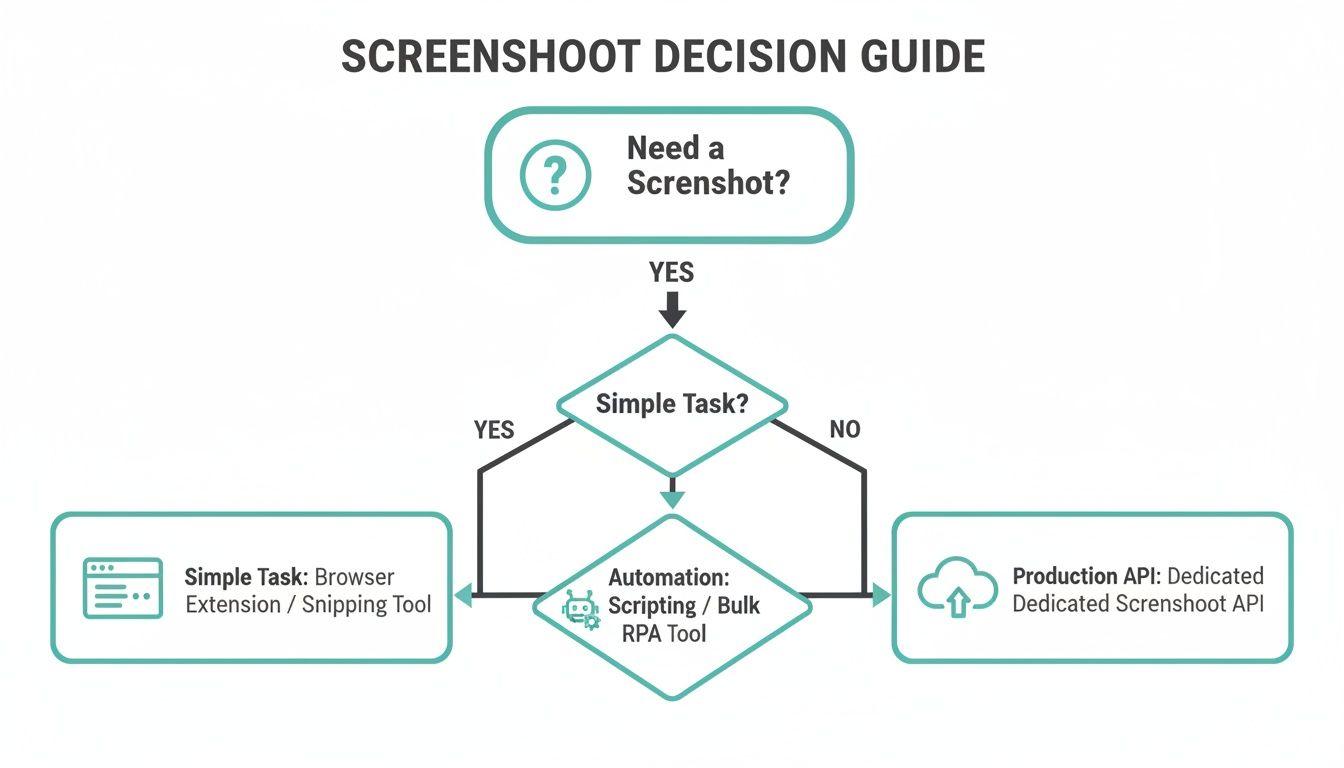
As you can see, simple needs can be met with simple tools. But once reliability and scale become important, you really need a more robust solution like an API. It's no surprise that the website screenshot software market, currently valued at USD 500 million, is expected to more than double. You can read the full research on the screenshot software market to see just how fast this space is growing. This trend points to one clear thing: businesses are moving toward programmatic solutions for accuracy and efficiency.
To help you decide, here's a quick breakdown of the methods we'll be covering.
Screenshot Methods At a Glance
| Method | Best For | Complexity | Scalability |
|---|---|---|---|
| Manual (Browser DevTools) | Quick, one-off captures for bug reports or personal use. | Low | Not Scalable |
| Headless (Puppeteer/Playwright) | Automated tasks in a controlled environment; visual testing. | Medium | Moderate |
| Dedicated API (ScreenshotEngine) | Production use cases; high-volume, reliable captures. | Low | High |
Each approach has its place, but as your needs grow, the limitations of manual and self-hosted solutions become much more apparent.
For any serious application, from SEO monitoring to legal compliance, a screenshot isn't just a picture; it's a piece of data. Its value is directly tied to the accuracy and reliability of the process used to capture it.
Quick Captures with Browser Developer Tools
Sometimes you just need a quick, high-quality screenshot without writing a single line of code. For those moments, your browser's own developer tools are a surprisingly powerful ally. While most of us use DevTools for debugging, there's a handy command menu hidden inside that makes capturing any part of a web page simple and precise.
This built-in method is my go-to for grabbing a quick visual for a bug report, sharing design feedback with the team, or for simple documentation. It's perfect when setting up an automated script would be total overkill.
Getting to these features is easy. In a browser like Chrome or Edge, just right-click anywhere on the page and hit "Inspect." You can also use a keyboard shortcut: Cmd+Option+I on a Mac or Ctrl+Shift+I on Windows.
Unlocking the Screenshot Commands
With DevTools open, it's time to bring up the Command Menu. Press Cmd+Shift+P (Mac) or Ctrl+Shift+P (Windows), and a search bar will pop up, giving you direct access to hundreds of browser functions.
Just start typing "screenshot" into the search bar. The list will instantly filter to show you several powerful options, each for a different kind of capture.
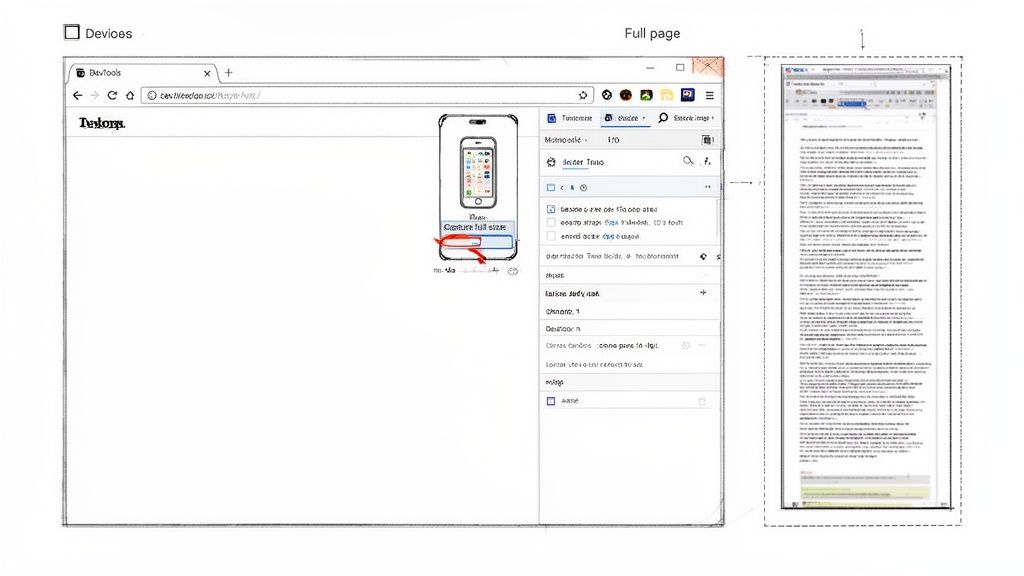
As you can see in the image above, the DevTools interface puts these commands right at your fingertips. Let's break down what each one does and when to use it.
- Capture full size screenshot: This is the one I use most often. It automatically scrolls the entire page and stitches it into one long, seamless PNG. It's fantastic for archiving a whole landing page or analyzing a competitor's site from top to bottom.
- Capture node screenshot: This is a lifesaver for frontend developers and designers. You first select an element in the "Elements" panel—say, a specific
divorimg—and then run this command. It produces a perfectly cropped image of just that HTML node and its contents. - Capture screenshot: This command simply snaps a picture of what’s currently visible in your browser window, also known as the viewport. Think of it as a standard screenshot, but it only captures the web content, not your entire desktop.
Pro Tip: Before you take a screenshot, click the small phone/tablet icon in DevTools to open the Device Toolbar. This lets you see and capture exactly how a page renders on a specific device, like an iPhone 14 Pro or a Google Pixel. It's incredibly useful for getting mobile-specific visuals for testing or presentations.
While these built-in browser tools are great, there are even more tricks for capturing full pages. For a more detailed walkthrough, check out our guide on how to take a full-page screenshot in Chrome.
These manual methods are fantastic for one-off tasks, but they don't scale. If you need to take screenshots regularly or in large volumes, you'll quickly find yourself needing an automated solution.
Automating Screenshots with Headless Browsers
When you need to take screenshots over and over again, doing it by hand just isn't an option. That’s where automation comes in, and for most developers, the tool of choice is a headless browser. This is basically a way to control a real browser using code, without ever seeing a graphical interface.
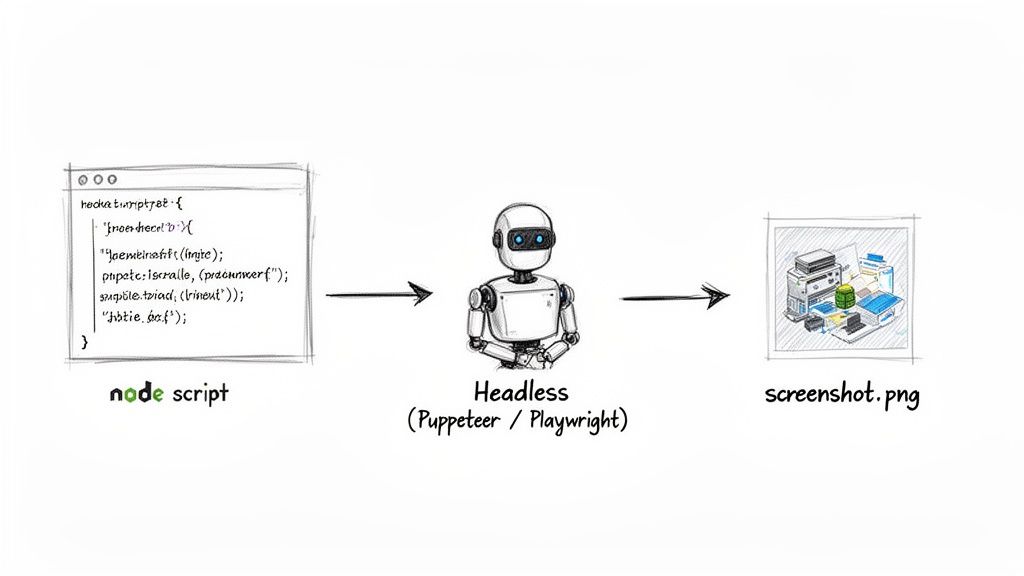
Think of a headless browser as the engine of Chrome or Firefox running on a server, completely stripped of its visual shell. You can write scripts to tell it what to do—go to a specific URL, click a button, fill out a form, and, of course, take a screenshot. It's the foundation of modern web automation and testing.
Two of the biggest players in this space are Puppeteer and Playwright. Both are powerful JavaScript libraries that provide a high-level API for controlling headless versions of Chrome, Firefox, and WebKit.
Getting Started with Puppeteer
Puppeteer is Google's project, and it's often the first stop for developers who need to automate Chrome. Getting a basic script up and running is surprisingly simple. Once you install it in your Node.js project, you can launch a browser, navigate to a page, and save a screenshot with just a handful of code.
Here's a quick example of how you’d capture a full-page screenshot:
import puppeteer from 'puppeteer';
(async () => { const browser = await puppeteer.launch(); const page = await browser.newPage();
// Set the viewport to a common desktop size await page.setViewport({ width: 1920, height: 1080 });
// Navigate to the target page and wait for network activity to settle await page.goto('https://www.example.com', { waitUntil: 'networkidle0' });
// Take a full-page screenshot await page.screenshot({ path: 'example-puppeteer.png', fullPage: true });
await browser.close();
})();
One detail worth pointing out is waitUntil: 'networkidle0'. This little option is crucial. It tells Puppeteer to hold off on taking the shot until there have been zero network connections for at least 500ms. This is a great way to make sure all those dynamic elements and lazy-loaded images are actually on the page before you capture it.
A Look at Playwright
Playwright is Microsoft’s answer to Puppeteer and has quickly become a favorite for its fantastic cross-browser support and rock-solid feature set. The API feels very familiar if you've used Puppeteer, so moving between them isn't a big leap. If you’re curious about the nitty-gritty, we have a whole article comparing Playwright vs Puppeteer that gets into the key differences.
Here's how you'd do the same thing with Playwright, but this time, let's pretend we're on a mobile device:
import { chromium, devices } from 'playwright';
(async () => { const browser = await chromium.launch(); // Emulate an iPhone 13 Pro for the screenshot context const context = await browser.newContext({ ...devices['iPhone 13 Pro'] }); const page = await context.newPage();
// Navigate and wait for the page to fully load await page.goto('https://www.example.com', { waitUntil: 'load' });
// Save the resulting screenshot await page.screenshot({ path: 'example-playwright-mobile.png' });
await browser.close(); })();
This example shows just how easy Playwright makes it to simulate specific devices. It’s an incredibly powerful feature for checking responsive designs and getting a mobile-first perspective of a web page.
While headless automation is incredibly powerful, it's not a "set it and forget it" solution. Managing server resources, keeping browser dependencies updated, and dealing with anti-bot measures from sophisticated websites are real-world challenges that require ongoing maintenance.
The Hidden Complexities
Scripting your own screenshots means you're now on the hook for the entire setup. This introduces some operational overhead you need to be aware of.
- Dependency Management: Headless browsers are huge. Making sure the right versions are installed and playing nicely with your OS and libraries can be a real headache, especially inside a Docker container.
- Resource Consumption: Firing up a browser instance, even one without a UI, eats up a lot of memory and CPU. If you try to scale up to handle dozens of concurrent screenshots, you can easily bring a server to its knees without careful management.
- Fighting Anti-Bot Systems: Lots of websites use tools to sniff out and block automated traffic. Your scripts can get tripped up by CAPTCHAs, IP rate limits, or browser fingerprinting, forcing you to build complex and brittle workarounds.
For smaller, internal projects, these issues are usually manageable. But as soon as you need reliability and scale for a real application, the time spent maintaining this setup can become a major distraction from what you should be focused on: building your product.
Scaling Your Workflow With a Screenshot API
While headless browsers are powerful for automating screenshots, they bring their own baggage. You're suddenly responsible for maintenance, resource management, and a whole lot of complexity. For any team building a real-world product, this quickly becomes a major distraction from what you're actually trying to build.
This is where a dedicated screenshot API like ScreenshotEngine comes in. It’s a much more practical and efficient way to handle screenshots at scale.
The API-first approach flips the script entirely. Instead of running your own browser farm, you hand off the entire rendering and capture process to a service built for that one job. No more wrestling with server configs, updating browser versions, or trying to decipher cryptic error messages.
All you do is make a secure API call with the URL you want to capture and a few parameters. In return, you get a perfect image. This frees up your team to focus on your core product, not on building and maintaining a fragile, in-house screenshot system.
The Immediate Payoff: What You Get Right Away
Switching from a self-hosted script to an API delivers some serious benefits right out of the gate. The biggest one? Zero infrastructure management. The service handles all the browser instances behind the scenes, scaling them up or down to meet your demand without you ever lifting a finger.
Another huge win is how a good API automatically handles common website annoyances. These services are engineered to intelligently block intrusions before the screenshot is even taken:
- Cookie Banners: Most of those consent popups are detected and dismissed, giving you a clean shot of the actual content.
- Advertisements: Intrusive ads that can break your layout or cover up important info are blocked by default.
- Newsletter Modals: Forget about those "subscribe now" popups that ruin automated captures; they're simply gone.
A dedicated screenshot API abstracts away the most painful parts of web automation. It turns a complex, multi-step process into a single, reliable function call, saving you countless hours of development and maintenance time.
There’s a reason this market is taking off. The global market for full-screen website screenshot software—essential for capturing an entire page—hit USD 0.15 billion and is expected to nearly double with an 8% growth rate. This boom reflects how much businesses now rely on dependable visual data for everything from compliance archives to A/B testing. You can read more on the full-screen capture market trends to see just how critical this technology has become.
Fine-Grained Control Through Simple Parameters
Using an API doesn't mean you give up control. It’s actually the opposite. You get powerful customization through simple, clear parameters. In fact, a single API call can replace dozens of lines of messy Puppeteer or Playwright code.
Let's look at a quick cURL example. Here, we're capturing a full-page, high-quality WebP screenshot of a specific URL.
curl "https://api.screenshotengine.com/v1/screenshot?url=https://example.com&full_page=true&format=webp&quality=90"
-H "Authorization: Bearer YOUR_API_KEY"
--output example-api-capture.webp
This one command does a lot of work that would otherwise require a much more involved script. The beauty is its simplicity. If you want to dive deeper into this model, check out our post on the concept of a screenshot as a service.
Beyond the basics, you can get incredibly specific results with other parameters:
| Parameter | Description | Use Case Example |
|---|---|---|
selector |
Targets a specific CSS selector on the page. | Capturing just a chart (#sales-chart) or a pricing table (.pricing-tier-pro). |
dimension |
Sets a custom viewport width and height. | Simulating a specific tablet or desktop resolution (1366x768). |
dark_mode |
Renders the page using prefers-color-scheme: dark. |
Testing the dark mode version of your web application. |
This level of control makes it incredibly easy to bake high-quality, programmatic screenshots into any application, whether you're using Node.js, Python, or any other language that can make an HTTP request. It’s the smart move for any developer who values reliability, speed, and efficiency.
Advanced Techniques for Flawless Captures
A truly great screenshot isn't just a static image; it's a perfect snapshot of a web page exactly as a real user would see it. But the modern web is messy and complex. To get that perfect capture, you often have to go beyond the basics, especially when dealing with sites that are anything but static.
These strategies will help you tackle the tricky scenarios that can completely ruin an automated capture. For instance, many sites use lazy loading to speed things up, which means images and other elements only pop into view as you scroll. A simple, one-shot capture would completely miss all that out-of-view content.
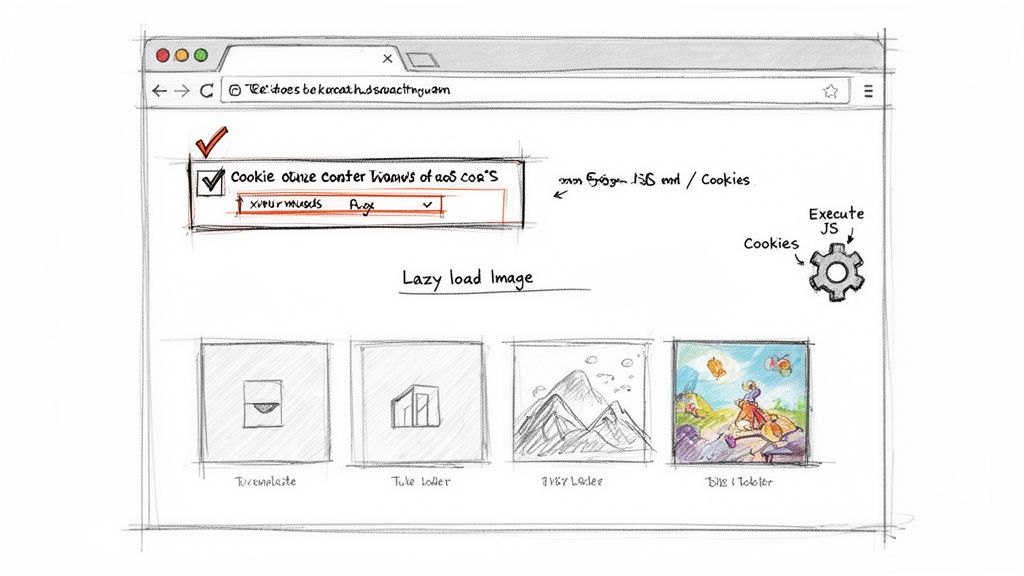
Handling Dynamic Web Content
If you need a perfect full-page capture, you have to make sure the entire page has actually rendered first. Sometimes a simple delay before snapping the shot is enough, but a far more reliable method is to programmatically scroll the page. This forces all those lazy-loaded elements to trigger and load properly.
And then there are the cookie banners. We've all seen them. While a good API can often dismiss these for you, a custom headless script needs specific instructions to find and click that "accept" button. It's another small but crucial layer of complexity you have to account for in your code.
A screenshot is only as valuable as its accuracy. If it doesn't reflect the final, fully rendered state of the page—including all dynamic content—it can lead to flawed testing results and misleading analysis.
Once you have a clean capture, you can think about how to present it. Learning how to make great YouTube thumbnails can teach you a lot about crafting compelling visuals that boost engagement, a skill that translates well beyond video.
Pro-Level Capture Scenarios
In many professional situations, you need to interact with a page before you can even think about taking a screenshot. Getting content from behind a login wall is the classic example. This means passing authentication details along with your request, a job that's perfectly suited for a powerful API.
Here are a few other techniques I've found indispensable:
- Passing Custom Headers: You can send a custom user-agent string to see how a site renders on different browsers, or pass along authorization tokens to get at protected content.
- Injecting Custom Cookies: This is your key to maintaining a session across multiple requests. It lets you capture a series of pages as if you were a logged-in user navigating the site.
- Executing Custom JavaScript: Some pages require you to run your own JavaScript before the screenshot. Maybe you need to close a specific pop-up modal or trigger a particular UI state to get the exact shot you need.
Modern screenshot APIs have become essential developer tools, with the best services handling thousands of captures every day. We've seen a clear shift away from clunky, manual Puppeteer setups and toward APIs that render pages in milliseconds, all while automatically sidestepping ads, CAPTCHAs, and geoblocks.
Answering Common Screenshot Questions
Once you start automating screenshots, you'll inevitably run into the same handful of questions that trip up most developers. Nailing down the answers early can save you a ton of headaches and help you pick the right tools for the job.
Let's dive into the most common issues I see people grapple with.
What's the Best Image Format to Use?
This is one of the first decisions you'll have to make, and the right answer really hinges on what you're trying to accomplish.
For something like visual regression testing, where pixel-perfect accuracy is non-negotiable, PNG is your best bet. It’s a lossless format, so you get an exact replica of the rendered page without any compression artifacts.
But if you're more worried about file size and page load times, WebP strikes an incredible balance. It delivers fantastic compression with surprisingly high visual quality, making it a great all-around choice for web use.
How Do I Handle Cookie Banners and Popups?
Ah, the bane of every automated capture script: cookie consent banners, promotional popups, and other random modals that get in the way. If you're rolling your own headless browser setup, you're on the hook for writing code to find and click these away. This approach is notoriously fragile and breaks the moment a website redesigns its popup.
This is where a dedicated screenshot API really shines. A professional service is built to anticipate and automatically handle these interruptions for you. It intelligently dismisses things like:
- Cookie consent modals
- "Subscribe to our newsletter" popups
- Annoying ad overlays
This means you get a clean shot of the actual page content every single time, with zero extra work on your end. For a broader look at the topic, this resource offers some great general information on screenshots that can add more context.
How Can I Capture Just One Part of a Page?
More often than not, you don't actually need a full-page screenshot. You might just want an image of a specific chart, a product card, or a user comment.
In browser DevTools, you can find the element in the inspector, right-click it, and hit "Capture node screenshot." If you're using a headless library like Puppeteer or Playwright, you'd target the element with a selector and then call the screenshot() function on that specific element.
An API makes this even easier. You just include the CSS selector—like
#main-chartor.user-card—as a parameter in your API request. The service handles the rest, returning a perfectly cropped image of only that element.
This is super practical for generating dynamic images for social media posts, creating visual assets for reports, or even monitoring specific UI components for changes. It completely cuts out any need for manual cropping or post-processing.
Tired of wrestling with flaky scripts? ScreenshotEngine offers a robust API that handles all the messy parts for you, from blocking popups to capturing specific elements on the fly. Start for free and get your first screenshot back in minutes.