Trying to take a full page screenshot in Chrome is a common headache. We’ve all been there: you hit print-screen, and it only captures the tiny part of the page you can see. To get the whole thing, you need a method that can intelligently scroll and capture everything, stitching it together into one clean image. Luckily, you've got options, from Chrome's own developer tools to specialized extensions.
Why Bother With a Full Page Screenshot?
Ever tried to show a designer what's wrong with a long landing page by sending them five different, slightly overlapping images? It’s a mess. The standard 'print screen' is fine for a quick grab, but it fails the moment you need to show anything that requires scrolling.
This isn't just about convenience; it's about clarity and having a complete record. A full-page screenshot provides a single, cohesive document that preserves the entire context of a webpage. It’s absolutely essential for tasks like:
- Design Feedback: Sharing an entire webpage with a client so they can see the full layout and flow, not just bits and pieces.
- Bug Reporting: Sending developers a complete picture of a bug, showing how elements far down the page might be affected.
- Competitive Analysis: Archiving a competitor’s entire sales page or feature list for later review.
- Compliance and Archiving: Keeping a time-stamped, complete record of a site for legal or historical purposes.
Choosing the Right Tool for the Job
Picking the right method really comes down to what you need to do. Are you just grabbing a quick snapshot? Do you need to add notes and annotations? Or are you trying to automate screenshots for hundreds of pages?
This flowchart can help you decide which path makes the most sense.
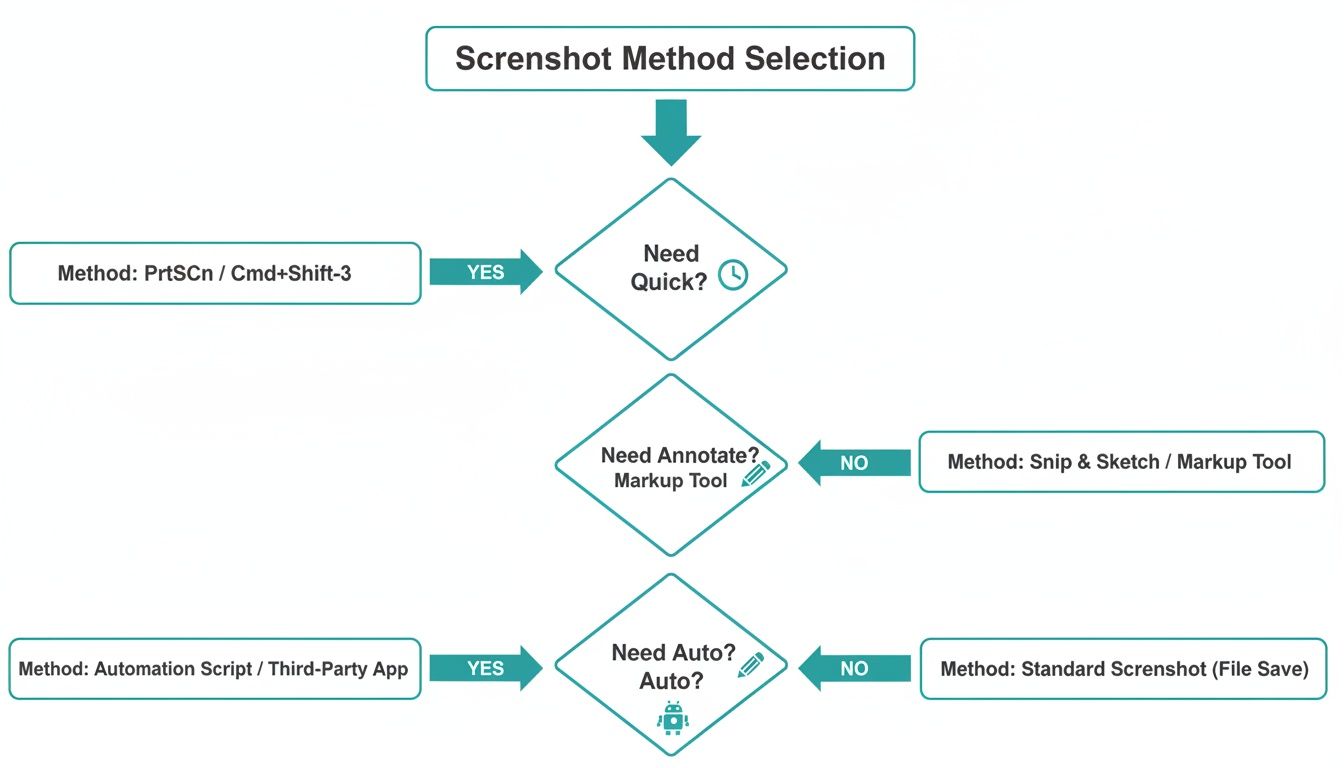
As you can see, a quick and simple capture is easily handled by Chrome's built-in tools. But for anything more involved, like automation or adding detailed markups, you’ll want to look at extensions or even code-based solutions.
There's a good reason we're focusing on Chrome. With a massive 64.86% of the global browser market share, it's the primary tool for over 3.45 billion people. Knowing how to work efficiently within Chrome is a fundamental skill for anyone on the web.
A full-page screenshot transforms a dynamic, scrolling webpage into a static, shareable, and analyzable asset. It's the difference between showing someone a single puzzle piece and giving them the complete picture.
In the end, it's about finding a reliable workflow that fits what you do, whether you're a developer running tests or a marketer grabbing inspiration. Having a few different methods in your back pocket means you're ready for anything. For developers, this can even lead to more advanced uses, like the automated workflows covered in our guide to the best visual regression testing tools.
Quick Guide to Chrome Full Page Screenshot Methods
To help you decide at a glance, here’s a quick breakdown of the methods we'll be covering in this guide. Each has its own strengths, so you can pick the one that's right for the task at hand.
| Method | Best For | Technical Skill Required | Speed |
|---|---|---|---|
| Chrome DevTools | Quick, no-install captures for developers and tech-savvy users. | Basic | Fast |
| Chrome Extensions | Adding annotations, editing, and easy sharing. | None | Very Fast |
| Chrome Headless | Automated, server-side captures via command-line. | Intermediate | Blazing Fast |
| Puppeteer/Selenium | Complex automation, testing, and capturing dynamic content. | Advanced | Varies |
| Screenshot API | High-volume, reliable screenshots without managing infrastructure. | Basic to Intermediate | Very Fast |
This table should give you a solid starting point. Now, let's dive into the specifics of each method so you can start capturing full-page screenshots like a pro.
Using Chrome DevTools for a Native Screenshot
Before you go hunting for a browser extension, you should know that Chrome has a fantastic full-page screenshot tool built right in. It’s tucked away inside the Developer Tools (or DevTools, as you'll often hear it called), and it's my first choice when I need a clean, pixel-perfect capture without installing anything extra.
Don't let the "Developer" name scare you off. You don't need to know a line of code to use this. Think of it as your browser's secret weapon for high-fidelity screenshots. It captures the page exactly as the browser's engine sees it, which is perfect for accurate documentation or design reviews.
Accessing the DevTools Command Menu
First things first, you need to open the DevTools panel. The fastest way is with a keyboard shortcut.
- On a Mac, press
Command + Option + I. - On Windows, press
Ctrl + Shift + I.
You can also just right-click anywhere on the webpage and choose "Inspect" from the menu that pops up.
Once the panel is open, the real magic happens in the Command Menu. This is essentially a search bar for every function inside DevTools, letting you skip hunting through different tabs and menus.
Just press Ctrl + Shift + P (Windows) or Command + Shift + P (Mac) to bring it up.
The image above gives you a peek into the DevTools environment. It's a powerful workspace that gives you direct access to a site's code, performance tools, and, of course, the screenshot commands we're about to use.
Capturing Your First Full Page Screenshot
With the Command Menu open, start typing "screenshot." A short list of options will filter in real-time. The one you're looking for is "Capture full size screenshot."
Select it, and that's it! Chrome instantly processes the entire page—from the very top to the very bottom—and prompts you to save the image. The result is a crisp PNG file, created without any of the weird scrolling animations that some extensions rely on, which can often mess up sites with sticky headers or parallax effects.
The big advantage here is quality. Since DevTools captures the page directly from the rendering engine, you get a pristine, uncompressed PNG without the artifacts or glitches that can plague third-party tools.
More Specific Screenshot Options
Sometimes you don't need the whole page. DevTools has you covered there, too. Back in that same Command Menu, you'll see a few other handy options.
- Capture node screenshot: This is a lifesaver for developers and designers. You can use the "Elements" tab in DevTools to click on a specific part of the page's HTML—say, a
<div>for a particular content block or an entire<table>—and this command will screenshot just that piece. It's incredibly precise. - Capture screenshot: This one does exactly what it sounds like. It's a standard screen grab that captures only the currently visible part of the webpage in your browser window.
Emulating Different Devices for Mobile Views
Here’s where the DevTools method really shines. You can take screenshots of how a site looks on different mobile devices. Before you run the screenshot command, just click the small "Toggle Device Toolbar" icon (it looks like a little phone and tablet).
This switches the view to a simulated mobile screen. You can pick from presets like an iPhone 14 Pro, a Google Pixel, or even an iPad. Once you've set your device, run the "Capture full size screenshot" command again. You'll get a perfect, full-length screenshot of the page's mobile or responsive view, which is invaluable for testing and reporting.
Now, this method isn't foolproof. It sometimes has trouble with sites that use a lot of "lazy loading"—where images and content only load as you scroll down the page. Because the DevTools capture is instantaneous and doesn't simulate a user scrolling, it can sometimes miss that lazy-loaded content. For those particularly tricky pages, a dedicated extension might be a better bet.
The Best Chrome Extensions for Full Page Screenshots
While Chrome's built-in DevTools can get the job done, let's be honest—it's not the most intuitive process for a quick, everyday task. If you need a smoother workflow with more creative control, browser extensions are the way to go. The Chrome Web Store is packed with tools designed to make it dead simple to take a full page screenshot in Chrome.
These aren't just one-trick ponies. The best extensions bundle features like annotation, smart scrolling that can handle tricky dynamic websites, and multiple export formats into a single click. For anyone who regularly captures, edits, and shares web content, this level of convenience is a total game-changer.
What Makes a Great Screenshot Extension?
Not all screenshot tools are created equal. I've found that the best ones blend powerful features with a lightweight footprint, so they don't bog down your browser. When I’m vetting a new extension, I look for a few key things that really separate the good from the great.
A top-tier extension absolutely needs:
- Intelligent Scrolling: It has to reliably capture pages with sticky headers, parallax effects, and lazy-loaded images without leaving weird stitches or cutting off content.
- Built-in Annotation Tools: The ability to immediately add arrows, text, highlights, or blur sensitive info saves a massive amount of time. No more opening a separate image editor.
- Versatile Export Options: It should let you save your shot as a high-quality PNG, a smaller JPG, or even a multi-page PDF for reports and documentation.
- Privacy and Performance: The extension shouldn't demand excessive permissions or slow your browsing to a crawl. Always check what data it's accessing.
The real value of an extension isn't just capturing the page; it's what you can do immediately after. The best tools build an entire workflow around editing and sharing, turning a simple screenshot into a powerful communication tool.
The demand for these features is huge. Just look at an extension like GoFullPage, which has over 9 million active users. With a near-perfect rating from tens of thousands of people, its success shows just how critical this functionality is for so many. You can discover more insights about top-rated screenshot tools and what sets them apart.
Top Recommendations for Capturing Full Pages
The Chrome Web Store can feel like a maze, so I've picked a couple of my personal favorites that excel in different ways. Each one offers a unique mix of simplicity and power.
GoFullPage - The One-Click Wonder
This is the gold standard for pure simplicity and reliability. As the name implies, it does one thing exceptionally well: capture an entire webpage with a single click. There's no learning curve. You click the camera icon, it smoothly scrolls and captures the page, and then opens your screenshot in a new tab, ready to download as a PNG, JPG, or PDF.
It's my go-to recommendation for anyone who just needs a fast, dependable tool without the clutter of extra features. I've found its smart scrolling algorithm to be one of the best out there, consistently handling complex pages that make other extensions stumble.

The Chrome Web Store is where you'll find these tools. Its layout makes it easy to search, read user reviews, and check an extension's permissions before you install it.
Nimbus Screenshot & Screen Video Recorder - The All-in-One Powerhouse
If you need more than just a static image, Nimbus is your tool. It’s a complete capture suite that not only grabs full-page screenshots but also lets you capture specific areas, record screen videos, and even include your webcam feed.
Its real magic is in the post-capture editor. You can:
- Annotate with precision: Add detailed notes, arrows, and shapes.
- Blur sensitive data: Easily hide personal info or confidential details.
- Crop and resize: Fine-tune the dimensions of your final image.
- Add watermarks: Protect your work with a custom watermark.
Nimbus is perfect for creating tutorials, detailed bug reports, or professional documentation where context is key. It even integrates with cloud services like Google Drive and Dropbox to make sharing a breeze.
Choosing the Right Extension for You
So, which one is best? It all comes down to what you need to do.
If your goal is to quickly save a webpage with zero fuss, you can't beat GoFullPage. Its simplicity is its greatest asset.
But if your work involves creating guides, giving detailed feedback, or collaborating with a team, the rich feature set of an all-in-one tool like Nimbus will serve you much better. You’ll spend far less time jumping between different apps to get the job done.
Before you install any extension, take a second to read recent reviews and check the permissions it requests. A great tool should provide immense value without compromising your privacy or browser performance. Find that balance, and you'll have the perfect tool for mastering the full-page screenshot.
Automated Screenshots for Developers and Power Users
When you need to capture screenshots at scale, manual methods just don't cut it. Browser extensions are great for one-off tasks, but they hit their limits pretty quickly. This is where automation comes in—it’s an absolute game-changer for developers, QA engineers, and anyone running large-scale web monitoring projects.
Programmatic screenshots let you take a full page screenshot in Chrome without ever touching a mouse. You can bake this functionality right into your scripts and workflows. We're talking about running visual regression tests overnight, archiving hundreds of competitor sites every morning, or auto-generating social media preview images. This is where screenshots stop being just images and start becoming powerful data.
Capturing Screenshots with Headless Chrome
Your first step into automation is usually with headless mode. Think of it as running Chrome from your command line without any of the visual interface. It’s all browser, no window. It renders HTML, CSS, and JavaScript just like the real thing, but it does it entirely in the background, making it incredibly fast and efficient for server-side tasks.
You can fire off a simple command right from your terminal to get started. This one-liner tells Chrome to launch in headless mode, go to a URL, and save a full-page screenshot.
Here’s the basic command:
chrome --headless --disable-gpu --screenshot=full_page_screenshot.png https://www.example.com
That single line is surprisingly powerful. --headless runs it without a GUI, --disable-gpu is a common requirement in server environments, and --screenshot does the rest. It's a fantastic shortcut for a quick capture within a simple script.
Diving Deeper with Puppeteer for Node.js
For anything more complex, you'll want finer control. That's where a library like Puppeteer shines. Developed by Google, Puppeteer is a Node.js library that gives you a high-level API to boss Chrome around. You can automate pretty much anything a human can do in a browser.
Puppeteer really earns its keep when dealing with modern, dynamic websites. Got a page with lazy-loaded images that only pop in as you scroll? Or content that takes a few seconds to appear after an API call? Puppeteer can be told to wait for all that to finish, ensuring your screenshots are always complete.
Here's a practical script you can copy and paste. It uses Puppeteer to navigate to its own documentation site and snap a full-page screenshot.
The Puppeteer documentation is actually a great resource, packed with examples that make it easy to get started.
Let's look at the code:
const puppeteer = require('puppeteer');
(async () => { // Launch a new browser instance const browser = await puppeteer.launch(); const page = await browser.newPage();
// Set the viewport to a common desktop resolution await page.setViewport({ width: 1920, height: 1080 });
// Navigate to the target page and wait until the network is idle await page.goto('https://pptr.dev/', { waitUntil: 'networkidle0' });
// Take the full page screenshot await page.screenshot({ path: 'pptr_dev_full.png', fullPage: true });
// Close the browser await browser.close(); })();
The magic here is waitUntil: 'networkidle0'. It tells Puppeteer to hang tight until network activity has been quiet for at least 500 milliseconds—a solid way to make sure everything has loaded. Then, the fullPage: true option handles the full-page capture automatically.
Leveraging Selenium for Python Users
If you're in a Python environment, Selenium is your go-to tool. It's the long-standing champion of browser automation and works perfectly with Chrome through ChromeDriver. It offers the same fine-grained control as Puppeteer, letting you build seriously robust scripts for testing and data gathering.
A QA engineer, for example, could write a Selenium script to click through a multi-step checkout flow, taking a full-page screenshot at each step to visually confirm the UI is behaving as expected.
Here’s a Python example that does the same thing as our Puppeteer script:
from selenium import webdriver from selenium.webdriver.chrome.options import Options
Set up headless Chrome options
chrome_options = Options() chrome_options.add_argument("--headless") chrome_options.add_argument("--window-size=1920,1080")
Initialize the driver
driver = webdriver.Chrome(options=chrome_options)
Navigate to the page
driver.get("https://www.example.com")
The trick for full-page screenshots in Selenium is to get the total height
height = driver.execute_script("return document.body.scrollHeight") driver.set_window_size(1920, height) # Resize window to full scroll height
Save the screenshot
driver.save_screenshot("selenium_full_page.png")
Clean up
driver.quit()
The Selenium approach is a bit different. It doesn't have a built-in fullPage flag. Instead, we run a bit of JavaScript to find the page's total height, then resize the browser window to that exact dimension. This forces the entire page to render in the viewport at once, giving you a complete capture.
The real power of automation lies in its scalability. A manual screenshot takes a few seconds, but an automated script can capture thousands of pages in a controlled, repeatable, and error-free way. You can turn a tedious chore into a valuable data pipeline.
For developers who want this power without managing the underlying infrastructure, a dedicated screenshot API offers a more direct route, handling all the complexities of headless browsers behind a simple API call.
Solving Common Full Page Screenshot Problems
Taking a full-page screenshot in Chrome should be straightforward, but often it feels like a bit of a gamble. You fire up your favorite tool, capture a long landing page, and open the file only to find a sticky header plastered down the entire image like a broken record. Or maybe that infinite scroll page just… stops, leaving you with a half-captured mess.
These are the kind of nagging problems that can throw a wrench in your workflow, but thankfully, they’re almost always fixable once you know what’s going on behind the scenes.
Most screenshot tools work by scrolling the page and stitching multiple images together. This process gets tripped up by modern web features—things like fixed headers, lazy-loaded images, and content that appears as you scroll. It’s a lot like taking a panoramic photo with your phone; if something moves while you're panning, you get a weird glitch in the final picture. The same principle applies here.
Let's break down how to handle these common headaches so you can get a perfect screenshot every single time.
Taming Sticky Headers and Footers
The number one villain of full-page screenshots is the sticky header or footer. These elements are coded to stay visible as a user scrolls, which is great for site navigation but a complete disaster for screen captures. Your tool sees the header in every "frame" it captures and dutifully includes it over and over, leaving you with that ugly, repeating pattern.
The fix is usually just a quick bit of temporary surgery with Chrome DevTools.
- Right-click the pesky header or footer and hit Inspect.
- The DevTools panel will pop up with the element's HTML highlighted.
- Right-click that highlighted code and simply select Hide element.
Poof! The header is gone. Now you can run your screenshot tool without any interference. When you're done, just refresh the page, and everything will be back to normal. Some advanced extensions try to handle this automatically, but knowing how to do it manually is a foolproof backup plan.
Capturing Dynamic and Lazy-Loaded Content
Another common snag is content that simply isn't there when the page first loads. To speed things up, many websites use lazy loading, which means images and other media only load as you scroll them into view. Infinite scroll pages do something similar, pulling in more content as you hit the bottom. A fast screenshot tool can easily outrun the page, capturing a snapshot before everything has had a chance to appear.
The secret to capturing dynamic content is patience. Your capture tool needs to mimic human behavior by scrolling slowly and deliberately, giving the website enough time to load everything before the final image is stitched together.
Most good extensions are smart enough to simulate a real user’s scroll, but if you find content is still missing, take matters into your own hands. Manually scroll all the way to the bottom of the page before you hit the capture button. This forces all the lazy-loaded assets to load, ensuring they’re present for the final shot.
If you’re automating this with a script like Puppeteer, you’ll need to code in some explicit waits or tell the script to listen for network activity to die down before it snaps the picture.
Choosing the Right Format and Resolution
Once you have a clean capture, saving it correctly is the final step. The choice between PNG and JPG isn't just a minor detail—it has a huge impact on your image quality and file size.
- PNG (Portable Network Graphics): This is your go-to format for anything with sharp lines, text, or user interface elements. PNG uses lossless compression, which means the quality is pixel-perfect, but the files can get pretty big.
- JPG (Joint Photographic Experts Group): Best for screenshots that are mostly photos. JPG uses lossy compression to create much smaller files, but it can make text and sharp lines look a bit fuzzy if you look closely.
For most web design and documentation work, PNG is almost always the better choice for clarity. As for resolution, most tools just capture at your screen's native resolution. If you need a much sharper image for a high-quality print or a detailed design review, you'll need to look into methods for generating high-resolution screenshots. This typically involves more advanced tools or services that can render the page on a much larger virtual display.
Common Questions and Quick Fixes
As you start using these different methods to take a full page screenshot in Chrome, you'll likely run into a few common sticking points. Let's tackle the most frequent questions I hear to get you past those little hurdles and back to work.
Can I Take a Full Page Screenshot in Chrome on Mobile?
Absolutely. The good news is that you don’t need a special app; the feature is usually baked right into your phone’s operating system. The exact steps just vary a bit between platforms.
- On Android: Snap a screenshot the usual way (typically Power + Volume Down). A small preview will pop up, and you should see an option labeled "Capture more" or "Scroll." Tapping that will let you extend the screenshot down the entire page.
- On iPhone: After you take a screenshot, tap the thumbnail that appears in the corner. In the editor view, you'll find a "Full Page" tab at the top. Select it, and your phone will capture the whole webpage, saving it as a clean PDF.
It's a surprisingly handy native feature for saving articles or long conversations when you're away from your desk.
Why Does My Full Page Screenshot Look Blurry?
Nine times out of ten, a blurry screenshot is the result of file compression. When you save an image as a JPG, it gets compressed to reduce file size, which can make text and sharp lines look fuzzy. It’s a trade-off between size and quality.
For the best clarity, especially if you're capturing something for a design mockup or technical documentation, always save your screenshot as a PNG. PNG files use lossless compression, which means every single pixel is preserved perfectly. If your PNG is still blurry, the issue might be the website itself—it could be serving up low-resolution images to begin with.
Pro Tip: I've found that the Chrome DevTools method consistently produces the sharpest captures. Because it grabs the image directly from the browser's rendering engine, it sidesteps the compression issues that can sometimes pop up with third-party extensions.
How Do I Screenshot a Page That Requires a Login?
This is easier than it sounds. For any of the manual methods we've covered, like DevTools or an extension, the tool simply operates within your current browser session. If you're logged in and can see the page, the screenshot tool can see it too. Simple as that.
Things get a little more involved with automated solutions like Puppeteer or Selenium. In that case, your script has to mimic the login process. You'll need to code it to navigate to the login page, find the username and password fields, type in the credentials, and click the "submit" button before it can move on to the page you want to capture.
What Is the Best Way to Capture Dynamic Content?
Ah, the classic challenge. Capturing dynamic content—like charts that animate, lazy-loaded images, or data that streams in after the page first appears—can be a real headache. A standard screenshot tool is often too quick on the draw and snaps the picture before everything has finished loading.
For this, automation tools like Puppeteer or Selenium are your most reliable allies. They give you granular control over when the screenshot is taken. You can program your script to:
- Wait for a set time: Tell the script to pause for a few seconds to give everything a chance to load.
- Wait for a specific element: Instruct the script to hold off until a particular chart
<div>or data table is visible. - Wait for network quiet: Have the tool wait until all background data requests have completed.
This kind of control is the only way to guarantee you capture the page in its final, fully-rendered state every single time.
For developers who need a robust, scalable way to automate screenshots without managing their own infrastructure, ScreenshotEngine offers a powerful API that handles all these complexities. You can block ads, dismiss cookie banners, and take pixel-perfect full-page screenshots with one simple API call. Get started for free at https://www.screenshotengine.com.