
Let's be honest: manually taking a screenshot is a clunky, slow process that just doesn't cut it for modern development. When you need to capture web pages systematically, the only real solution is a programmatic one. Using an API transforms screenshotting from a mind-numbing chore into a powerful, automated workflow for testing, monitoring, and even data collection.
Why Automated Screenshots Are a Developer's Superpower
Forget right-clicking and saving images one by one. Automating screenshots is a fundamental shift that turns a simple picture into a strategic asset. In the worlds of development and QA, this isn't just about convenience—it's about achieving reliability and scale that are flat-out impossible to get by hand.
Think about it: manual captures are riddled with inconsistencies. Different screen sizes, random cookie banners, and shifting ad placements mean no two manual screenshots are ever really the same. This inconsistency makes them useless for anything that requires precision, like visual regression testing, where you need pixel-perfect comparisons to catch UI bugs before your users do.
Real-World Use Cases
Once you start automating, you can plug screenshots into all sorts of critical workflows:
- Visual Regression Testing: This is a big one. You can integrate screenshot captures directly into your CI/CD pipeline. The system automatically compares a new build's UI against a baseline image, instantly flagging any unintended visual changes.
- SEO and SERP Monitoring: Programmatically capture search engine results pages to keep an eye on your keyword rankings. This lets you monitor competitors and see exactly how your meta descriptions and titles appear in the wild.
- Compliance and Archiving: For some industries, this is a must. You can maintain a time-stamped visual record of your website, ensuring you have a perfect archive of what users saw on a specific date for legal or compliance reasons.
The demand for reliable visual data is exploding. The global website screenshot software market was valued at USD 500 million in 2024 and is on track to hit USD 1.2 billion by 2033. This growth is largely driven by industries like e-commerce, where visual consistency is everything—especially when a staggering 88% of online consumers say they won't return after a bad user experience. For a deeper dive into these numbers, check out the full analysis from Verified Market Reports.
A programmatic approach elevates a simple screenshot from a static image into a dynamic piece of data. It becomes a verifiable source of truth for your application's visual state at any given moment.
In the end, automating this process with a dedicated tool like the ScreenshotEngine API isn't just about saving a few clicks. It's about building more resilient applications, gathering smarter data, and protecting your brand's visual integrity at any scale.
Choosing Your Webpage Screenshot Strategy
When you need to capture a webpage programmatically, you're at a crossroads. The path you choose depends heavily on your goal—are you grabbing a quick one-off image, or are you building a system that needs to take thousands of screenshots reliably? Each method has its own set of trade-offs, balancing raw control against sheer convenience.
Let’s be clear: for a single, simple capture, the built-in developer tools in Chrome or Firefox are perfectly fine. You can pop open the inspector, find the command, and get a decent full-page or element-specific screenshot. But the moment you need to repeat that process, you’ve hit a dead end. It’s a manual-only approach that doesn't scale.
The DIY Route: Headless Browsers
For developers who need automation, the first instinct is often to reach for a headless browser library. Tools like Puppeteer (for Chrome) and Playwright (which handles Firefox, WebKit, and Chromium) give you direct, powerful control over a real browser, all through code.
But this power comes with a significant catch: you're now in the business of managing browser infrastructure. It's more than just writing a script. You’re responsible for:
- Server Setup & Maintenance: Installing and configuring browser environments, keeping them updated, and ensuring they run smoothly.
- Wrangling Dynamic Pages: Your code has to be robust enough to wait for JavaScript to render, deal with cookie banners, and navigate pesky popups before taking the shot.
- Staying Under the Radar: Many sites have bot detection that can easily block a standard headless browser. This means you'll spend time tweaking your scripts to appear more "human" just to get a clean screenshot.
While headless browsers are fantastic for highly specific, custom tasks, the ongoing maintenance can easily become a time sink. If you're weighing your options here, our deep dive comparing Playwright vs Puppeteer is a great resource.
The Managed Approach: Screenshot APIs
The third path is to use a dedicated screenshot API, which is by far the most streamlined solution. This approach offloads all the tricky browser management work to a specialized service. Instead of fighting with server configs or bot detectors, you just send a simple HTTP request and get an image back.
This decision tree helps frame the choice between manual and automated methods.
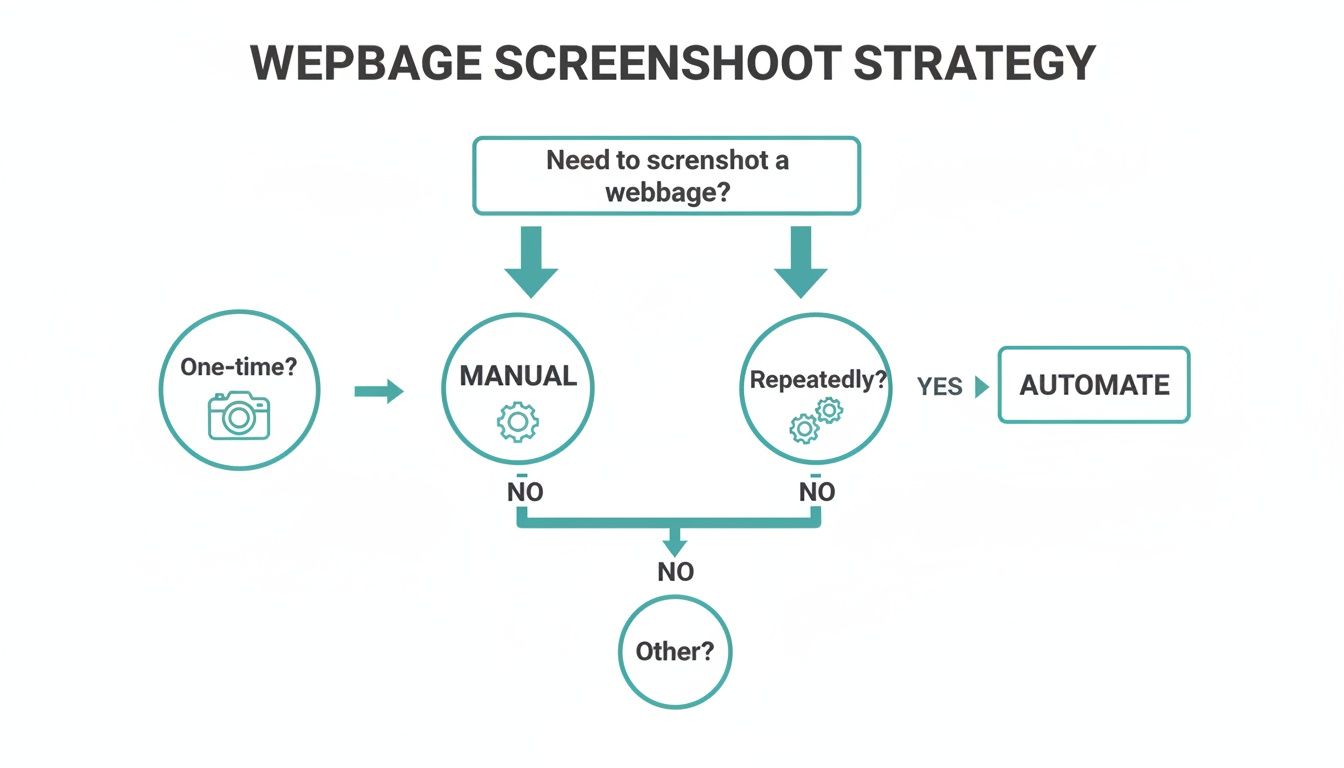
As the flowchart shows, if you need consistency for a recurring task, automation is the clear winner.
Services like ScreenshotEngine are built for this. They manage entire fleets of browsers, automatically handle common website interruptions like ads and consent popups, and are designed to scale instantly. You get a perfect, pixel-clean screenshot every single time without ever touching a line of browser automation code.
To make the decision clearer, here's a quick comparison of the different techniques.
Comparison of Webpage Screenshot Techniques
| Method | Ease of Use | Scalability | Maintenance | Best For |
|---|---|---|---|---|
| Browser Dev Tools | Very Easy | None | None | Quick, one-off captures for personal use or debugging. |
| Headless Browsers | Difficult | Moderate | High | Custom internal tools where you control the environment; complex, specific automation tasks. |
| Screenshot APIs | Very Easy | High | None | Production applications, scalable systems, and any project needing reliable, high-volume screenshots. |
Ultimately, choosing the right tool comes down to your project's scope. For a quick check, developer tools are great. For a niche internal project where you have full control over the target website and infrastructure, a headless browser can work. But for any serious, production-level application that needs to capture the public web reliably and at scale, a dedicated API is the most efficient and robust choice.
Your First Programmatic Screenshot with an API
Talking about APIs is one thing, but seeing one work its magic is where it really clicks. Let's jump right in and capture a webpage programmatically. The whole point here is to show you just how fast this can be—you can get your first screenshot in a couple of minutes without writing a single line of application code.
First things first: authentication. Any professional screenshot API will require an API key to process your requests. With a service like ScreenshotEngine, you can grab a free key from your dashboard right after signing up.
Think of this key as your private password for the service. You'll want to keep it safe and never, ever expose it in frontend code or a public repository.
Making Your First API Call
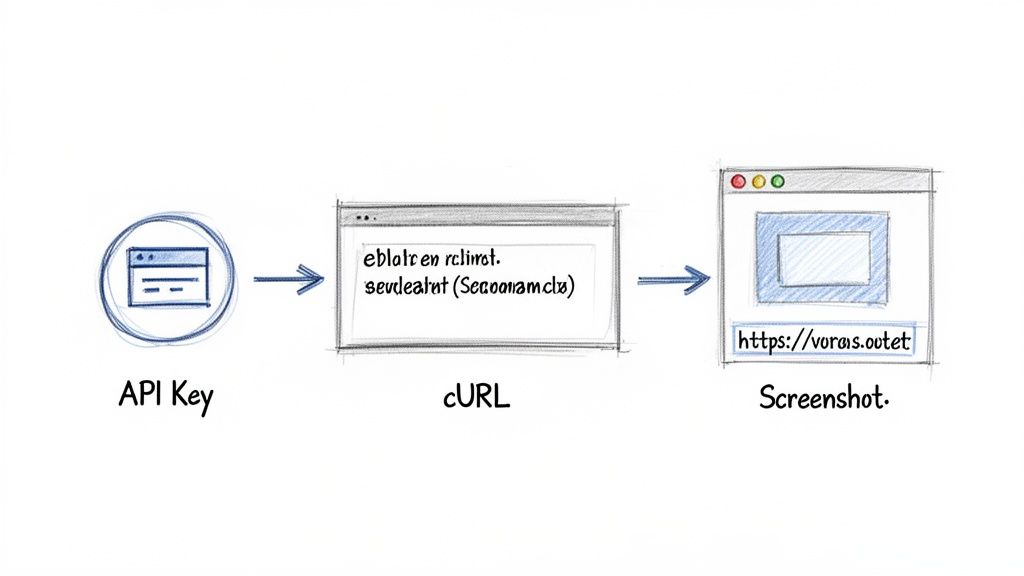
Once you have your API key, the quickest way to test the service is with a command-line tool like cURL. It’s a fantastic way to poke at an API and see what happens without spinning up a whole development project. You get instant feedback.
The request itself is pretty simple and breaks down into three key pieces:
- API Endpoint: This is the URL you're sending the command to.
- Authentication: You'll send your API key in the request's headers, usually with an
x-api-keyheader. - Target URL: This is the most important part—the URL of the website you want to capture.
Here’s what that looks like in a real cURL command. Just swap out YOUR_API_KEY with the one you just got and change the URL to whatever site you want to capture.
curl "https://api.screenshotengine.io/v1/screenshot?url=https://screenshotengine.io"
-H "x-api-key: YOUR_API_KEY"
--output screenshot.png
Run that in your terminal. The command tells the API to take a screenshot and then saves the image it sends back as screenshot.png in whatever folder you're in. That one line does the work of what could easily be dozens of lines of messy headless browser code.
The result is a clean, pixel-perfect image of the target page.
You'll notice it’s a clean capture, free from the cookie banners, pop-ups, or ads that so often ruin automated screenshots. The API handles all of that for you.
Integrating into Your Code
While cURL is great for a quick test, the real power comes from building this into your own applications. Since it’s just a standard REST API, you can call it from pretty much any programming language that can make an HTTP request.
Here are a couple of practical, copy-and-paste examples to show you how clean the integration is.
JavaScript (Node.js) Example
This snippet uses node-fetch to call the API and the native fs module to save the image file.
import fetch from 'node-fetch'; import fs from 'fs';
const apiKey = 'YOUR_API_KEY';
const targetUrl = 'https://screenshotengine.io';
const apiUrl = https://api.screenshotengine.io/v1/screenshot?url=${targetUrl};
const response = await fetch(apiUrl, { headers: { 'x-api-key': apiKey } });
const buffer = await response.arrayBuffer(); fs.writeFileSync('screenshot.png', Buffer.from(buffer)); console.log('Screenshot saved!');
Python Example
For Python developers, the popular requests library makes this incredibly simple.
import requests
api_key = 'YOUR_API_KEY' target_url = 'https://screenshotengine.io' api_url = f'https://api.screenshotengine.io/v1/screenshot?url={target_url}'
headers = {'x-api-key': api_key} response = requests.get(api_url, headers=headers)
if response.status_code == 200: with open('screenshot.png', 'wb') as f: f.write(response.content) print('Screenshot saved!') else: print(f'Error: {response.status_code}')
These examples get to the heart of why an API is often the better choice. All the heavy lifting—launching a browser, navigating to a page, waiting for content to load, and handling the capture—is handled by the service. You just make one clean HTTP call and get back an image, letting you focus completely on what your application needs to do.
Advanced Screenshot Customization and Control
Capturing a basic, visible-area screenshot is just scratching the surface. The real magic happens when you start tailoring the image to fit your exact needs, turning a simple capture into a precise piece of data. Using API parameters, you can move far beyond the default view and gain total control over the final output.
This level of precision is absolutely critical for jobs like visual testing and content monitoring. Think about it: how would you verify the layout of an infinitely scrolling social media feed or a massive e-commerce product page? A standard, above-the-fold screenshot would miss almost everything, making it useless for any kind of thorough review.
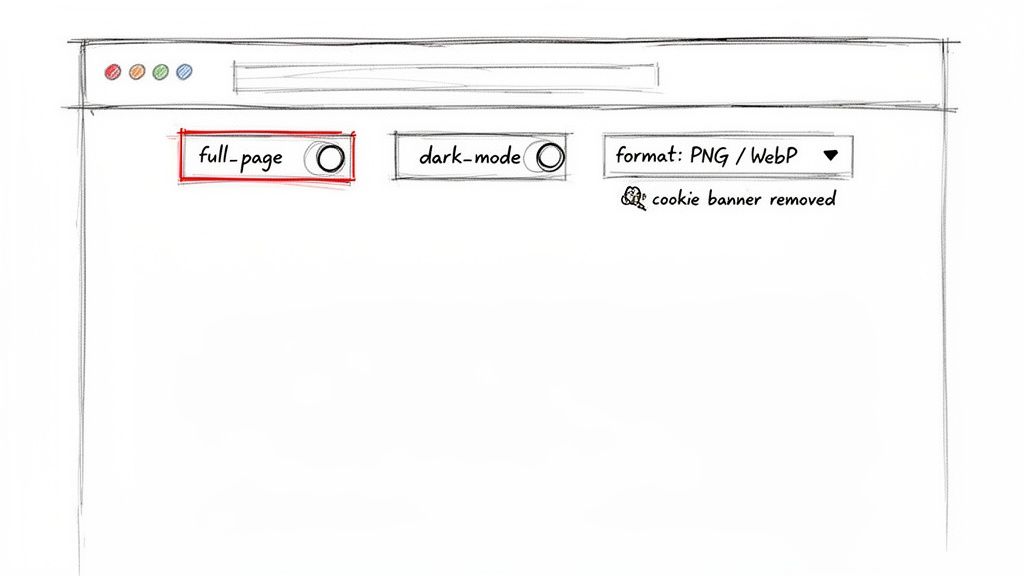
Capturing the Full Page
One of the most powerful features you'll use is the ability to grab a full-page screenshot. This is usually as simple as adding a full_page=true parameter to your API call. The service then handles the heavy lifting, automatically scrolling down the entire page and stitching everything together into one seamless image, from the header all the way to the footer.
It's a feature that's driving huge growth. The market for full-page website screenshot software was already valued at USD 516.40 million in 2024 and is expected to rocket to USD 1,927.95 million by 2033. A big reason for this is the dominance of mobile browsing, which now makes up over 60% of global web traffic and makes full-page captures an absolute necessity for testing responsive designs.
Isolating Specific Elements
Sometimes, the whole page is just noise. You might only care about a specific stock chart, a user comment, or a product image. This is where element-specific captures come in, letting you use CSS selectors to target the exact piece of the page you need.
By passing an element parameter with a value like #main-chart or .user-profile-card, you're telling the API to find that specific HTML element and capture only its contents.
Here are a few real-world scenarios where this is a lifesaver:
- Monitoring Competitor Pricing: Target the price element on a product page (
.price-tag) to keep a daily record of changes. - Archiving User-Generated Content: Capture a specific user review or forum post (
#post-12345) for moderation or record-keeping. - Validating Dynamic Data: Automatically screenshot a data dashboard's main graph (
div.dashboard-graph) to verify it's rendering correctly with live data.
This targeted approach doesn't just give you cleaner images; it also cuts down on processing time and file size, making your entire workflow leaner and more efficient.
The ability to isolate elements with a CSS selector is a game-changer for automated testing. It lets you focus your visual regression tests on the components that matter most, ignoring irrelevant dynamic content elsewhere on the page.
Controlling Visuals and Formats
Beyond just what you capture, you also have fine-grained control over how the screenshot looks and its technical specs. This ensures the output is perfectly suited for its final destination, whether that's a high-fidelity archive or a lightweight image for a web dashboard.
- Dark Mode: Many modern websites offer a dark theme, and you need to test it. You can typically trigger this with a
dark_mode=trueparameter, which signals the browser to render the page in its dark theme if one is available. - Image Formats: The right format really depends on the job. A good API will let you specify the output, like PNG for pixel-perfect quality, JPEG for a solid balance of quality and size, or WebP for top-tier compression and web performance. Learning how to capture high-res screenshots can take the quality of your visual assets to the next level.
- Popup and Ad Blocking: One of the unsung heroes of using a dedicated API is what you don't see. Services like ScreenshotEngine automatically block cookie banners, ads, and other popups, giving you a clean, consistent capture every time without any extra work.
If you find yourself needing even more control over the output, it's worth exploring tools with more granular options. For example, Copycat247's advanced features might offer deeper control over resolution, capture delays, and more. Mastering these parameters is what allows you to build sophisticated, reliable systems that know exactly how to take a webpage screenshot for any scenario you can dream up.
Building a Reliable Screenshot Workflow
Making the leap from a single, successful API call to a full-blown production system is all about strategy. A truly reliable workflow isn't just about getting screenshots; it's about what happens when things go wrong. You have to build a system that anticipates problems before they bring everything to a halt.
This starts with bulletproof error handling. Think about it: what’s your plan if a target website is down or just takes forever to load? Your code needs to gracefully handle non-200 status codes and use smart timeouts. These safeguards are what separate a fragile script from a stable, professional application.
Optimizing for Speed and Efficiency
Performance is the other side of the coin. Constantly re-capturing a webpage that rarely changes is just a waste of resources. This is where a simple caching layer can be a game-changer. Before you fire off a new API request, just check if you already have a recent, valid version stored somewhere.
That one check can dramatically cut down on unnecessary API calls, saving you money and speeding up your app's response time. You can also fine-tune performance by picking the right image dimensions and formats, striking a balance between quality and file size for faster delivery. If you need to pull text from these images, integrating tools like Software Optical Character Recognition (OCR) can add a powerful layer of automation.
The goal is to build a resilient system that functions like an assembly line, not a series of one-off tasks. Each step, from request to storage, should be efficient, predictable, and fault-tolerant.
Security and Automation Fundamentals
Finally, let’s talk security—something you can't afford to get wrong. Hardcoding your API key directly into your application code is a huge security risk. Instead, always store sensitive credentials like your API key in environment variables. This simple practice keeps your keys out of source control and makes managing different environments (like development versus production) much safer.
The need for this kind of automation is exploding. The website screenshot market is on track to hit USD 1.2 billion by 2033, fueled by a digital marketing industry projected to surpass $1.5 trillion by 2030. With 70% of marketers already using screenshots for tracking performance, automation is no longer a luxury—it’s a necessity. You can dive deeper into these numbers in Market Research Intellect's detailed report.
If you’re ready to put this on autopilot, you might find our guide on how to schedule website screenshots to run automatically helpful.
Frequently Asked Questions About Webpage Screenshots
Even with a great API, you're bound to hit a few tricky situations when you start automating screenshots. Knowing how to sidestep these common pitfalls from the get-go will save you a ton of debugging headaches and help you build a much more resilient system.
How Do You Screenshot Pages Behind a Login?
This is probably the first question everyone asks. How do you get past a login wall? You could try to script a browser to fill in the username and password fields, but that approach is notoriously brittle. The moment a developer tweaks the login form's UI, your script shatters.
A much smarter, more stable way is to use an API that lets you pass session cookies in the request headers. This effectively tells the rendering browser, "Hey, I'm already logged in," allowing it to load the protected page directly without ever touching the login form.
What About Dynamic Content and Lazy Loading?
Another classic challenge comes from modern websites that load content as you scroll. If your script captures the page too quickly, you'll get a screenshot full of blank spaces where images and other elements should be. It completely defeats the purpose.
This is where a dedicated screenshot service really earns its keep. A good one will have built-in intelligence to wait for the page to fully settle and can even simulate scrolling down to trigger all the lazy-loaded content before snapping the picture. Trying to guess the right delay yourself is a losing game because load times are never consistent.
The best image format really depends on what you're doing with it. PNG is lossless and perfect for visual testing where every pixel counts. JPEG is a fantastic all-rounder for archiving, and WebP offers the best compression, making it ideal for web performance.
How Can I Get Consistent, Clean Screenshots Every Time?
For any kind of automated visual monitoring, consistency is everything. If the screenshots look different every time, you can't trust them. So, how do you make sure every capture is a perfect clone of the last?
First, always define a fixed viewport size (both width and height) in your API call. This ensures the virtual browser window is the same size for every single request, which stops responsive design from mucking up your results.
Second, lean on an API that cleans up the noise for you. Look for built-in features that automatically block ads, dismiss cookie banners, and hide other pop-ups. This is the key to getting a predictable, clean shot every time and establishing a stable baseline for your visual tests.
Ready to stop wrestling with headless browsers and start getting clean, reliable screenshots in seconds? ScreenshotEngine provides a powerful, developer-first API that handles all the complexity for you. Sign up for a free API key and take your first perfect screenshot in under five minutes.