
If you want to capture high res screenshots, the built-in snipping tool on your computer just won't cut it. To get truly sharp, professional images, you need to use tools that give you control over technical details like the Device Pixel Ratio (DPR). This is the secret to making sure your images look crisp and clean on modern high-resolution screens, not a blurry, pixelated mess.
Why Pixel-Perfect Screenshots Are Non-Negotiable
In a world where visuals are everything, a fuzzy, low-resolution screenshot can do more harm than you think. For anyone in development, quality assurance (QA), or marketing, the clarity of an image can be the difference between solving a problem in minutes or wasting hours in a confusing email chain. High-resolution screenshots aren't a luxury anymore; they're a must-have for clear communication and professional work.
Think of them as hard evidence. They're perfect for bug reports, providing crystal-clear visuals for marketing, and making sure every tiny detail of a user interface is captured perfectly. A blurry screenshot just looks unprofessional and can even hurt your brand's credibility. I've personally seen teams go back and forth for hours over a UI bug simply because the screenshot was too low-quality to show the actual problem—an issue a high-res capture would have prevented immediately.
The Business Case for Clarity
Getting this right goes way beyond just looking good. Sharp, clean screenshots have a direct impact on how users perceive and trust your product. If you're putting together a tutorial, a knowledge base article, or a sales demo, clear images make your content much easier to follow. This leads to happier users and fewer support tickets.
This level of detail is especially critical for:
- Developer and QA Workflows: Pinpointing UI bugs, catching visual regressions, and documenting design flaws with undeniable accuracy.
- Marketing and Sales Content: Building professional-looking product tours, social media graphics, and presentations that show off the quality of your product.
- Compliance and Archival: Keeping a precise, unassailable visual record of web pages for legal or historical documentation.
This need for pixel-perfect accuracy is particularly important when conducting thorough user interface design testing.
A Growing Market for Precision Tools
The shift toward better screenshot tools isn't just something a few of us have noticed; it's a massive market trend. The website screenshot software market is on track to blow past $1.2 billion by 2033, growing at a healthy 12% every year. What's driving this? A massive demand for automation, API integrations, and smart visual analysis that basic snipping tools simply can't offer.
A high-resolution screenshot isn't just an image; it's a form of precise communication. It eliminates ambiguity, accelerates problem-solving, and upholds a standard of quality that users can see and feel.
Just look at the difference a high-resolution capture makes. It’s night and day.
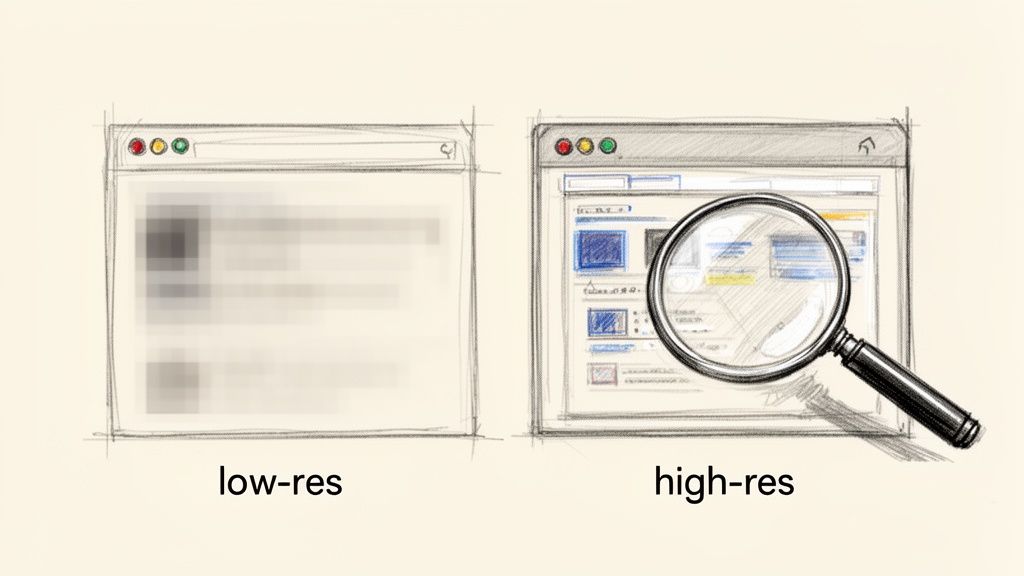
You can immediately see how the text and icons on the right are perfectly sharp, while the image on the left is a pixelated mess where small details get lost. That's the kind of clarity this guide will show you how to achieve every single time.
Getting the Fundamentals of Image Quality Right
To get consistently crisp, high-res screenshots, you need to look beyond just clicking a button. The real magic happens when you understand and control the technical details that separate a sharp, professional image from a blurry, unusable one. Once you nail these fundamentals, building a reliable, automated workflow becomes so much easier.
It all starts with something called Device Pixel Ratio, or DPR. Think of this as the secret ingredient for getting razor-sharp images on modern high-density screens, like Apple's Retina displays. A DPR of 1 means one CSS pixel maps directly to one physical screen pixel. That was fine for older monitors, but on today's screens, it leads to fuzzy text and blurry icons.
By setting the DPR to 2 or even 3, you’re telling the browser to render the page with four or nine times the pixel data. This massive boost in information is what produces incredibly sharp, detailed captures that look pristine on any high-resolution device. From my experience, forgetting to adjust the DPR is the single most common reason developers end up with blurry results.
Choosing Your Capture Area
With pixel density sorted, your next decision is what part of the page you actually need to capture. The right choice here depends entirely on your end goal. You've basically got three options, each suited for different jobs.
- Visible Viewport: This grabs only what a user sees on their screen without scrolling. It's perfect for quick snapshots of a UI or for documenting the "above the fold" content of a landing page.
- Specific HTML Element: Sometimes you don't need the whole page, just one specific piece. Maybe it's a data visualization chart, a user profile card, or a product image. Targeting a specific element with its CSS selector lets you isolate exactly what you need, creating clean, focused images for bug reports or component libraries.
- Full Page: For archival purposes, design reviews, or comprehensive UI testing, nothing beats a full-page capture. This method stitches together the entire scrollable length of a webpage into one tall, seamless image, making sure not a single detail gets missed.
Capturing the right area is just as important as getting the resolution right. A full-page screenshot is invaluable for a complete design review, but a targeted element capture is far more effective for a focused bug report.
Selecting the Right Image Format
The final piece of the quality puzzle is picking the right file format. This choice directly impacts your file size, image quality, and even features like transparency. The three main contenders are PNG, JPEG, and WebP, and each has its own strengths. For a closer look at fetching and managing these files, our guide on how to retrieve a screenshot offers some great practical advice.
PNG (Portable Network Graphics) is your best bet for maximum quality. It uses lossless compression, meaning no image data is thrown away when you save the file. This makes it the perfect choice for screenshots filled with sharp lines, text, and UI elements where every pixel has to be perfect. It’s also the only classic format that supports a transparent background.
JPEG (Joint Photographic Experts Group), on the other hand, uses lossy compression. It cleverly gets rid of data the human eye is less likely to notice, which results in much smaller file sizes. This is great for photos or when you're worried about bandwidth, but it can create noticeable fuzziness (artifacts) around text and sharp edges.
Then you have WebP, a modern format from Google that really gives you the best of both worlds. It supports both lossless and lossy compression, often creating files 25-34% smaller than a JPEG of similar quality. Plus, it supports transparency and even animation.
Here's a quick look at how well browsers support the WebP format today.
As you can see, WebP has near-universal support across modern browsers, making it a safe and highly efficient choice for almost any web project.
Choosing the Right Image Format for Your Screenshots
This quick comparison of PNG, JPEG, and WebP should help you decide which format best suits your screenshot needs, balancing quality, file size, and features.
| Feature | PNG | JPEG | WebP |
|---|---|---|---|
| Best For | UI elements, text, logos | Photographs, complex images | A versatile mix of both |
| Compression | Lossless | Lossy | Lossless & Lossy |
| Transparency | Yes | No | Yes |
| File Size | Large | Small | Smallest |
Ultimately, choosing the right format is a balancing act. For something like visual regression testing where every pixel matters, PNG is the safest bet. But for generating social media preview images where file size impacts loading speed, a well-compressed WebP or JPEG is almost always the smarter move. By mastering these fundamentals—DPR, capture area, and file format—you gain total control over your final output, ensuring every screenshot you take is a perfect representation of your web content.
How to Automate Screenshots with a Developer API
When you need to capture high res screenshots consistently and at scale, manual tools just won't cut it. The real efficiency comes from automation, and that's where a developer API shines. Instead of trying to wrangle your own, often fragile, headless browser setup, you can hand off the entire process to a dedicated service. This boils your workflow down to a simple, reliable HTTP request.
A good screenshot API, like ScreenshotEngine, is essentially a managed headless browser that lives in the cloud. You feed it a URL and a few parameters, and it sends back a perfect, high-resolution image. No more wrestling with browser updates, server maintenance, or debugging bizarre rendering glitches yourself.
Your First Automated Screenshot
Let's jump right into a practical example. Say you need to grab a shot of a website's homepage. With an API, this takes just a few lines of code. The basic idea is to build a URL that includes your API key and the target website, then make a simple GET request.
Here’s a quick look at how you'd do it in JavaScript with fetch:
const apiKey = 'YOUR_API_KEY';
const targetUrl = 'https://example.com';
const screenshotApiUrl = https://api.screenshotengine.com/v1/screenshot?url=${encodeURIComponent(targetUrl)}&token=${apiKey};
fetch(screenshotApiUrl) .then(response => response.blob()) .then(imageBlob => { // Now you can do something with the image, like display it or save it. const imageUrl = URL.createObjectURL(imageBlob); console.log('Screenshot URL:', imageUrl); }) .catch(error => console.error('Error capturing screenshot:', error));
And if you're a Python person, the requests library makes it just as easy:
import requests
api_key = 'YOUR_API_KEY' target_url = 'https://example.com' api_url = f"https://api.screenshotengine.com/v1/screenshot?url={target_url}&token={api_key}"
response = requests.get(api_url)
if response.status_code == 200: with open('screenshot.png', 'wb') as f: f.write(response.content) print("Screenshot saved as screenshot.png") else: print(f"Error: {response.status_code}")
These basic calls will get you a standard screenshot of whatever is visible in the browser's viewport. But the real magic happens when you start layering on parameters to customize the output.
Adding High-Resolution and Full-Page Parameters
Now, let's tweak our request to get those crisp, detailed images we're really after. We'll add parameters for Device Pixel Ratio (DPR) and a full-page capture. A DPR of 2 or 3 is the secret sauce for generating sharp visuals that look great on high-density displays.
We can also tell the API to scroll down the entire page and stitch it together into one long image. This is a lifesaver for archiving website designs or doing a complete visual audit.
Here’s how we’d modify our API call URL with a few key parameters:
dpr=2: This doubles the pixel density, giving you that Retina-quality look.full_page=true: Tells the browser to capture the entire scrollable page.format=webp: Specifies the modern, efficient WebP format for the final image.
This flow diagram breaks down how these crucial parameters work together to fine-tune the final image.
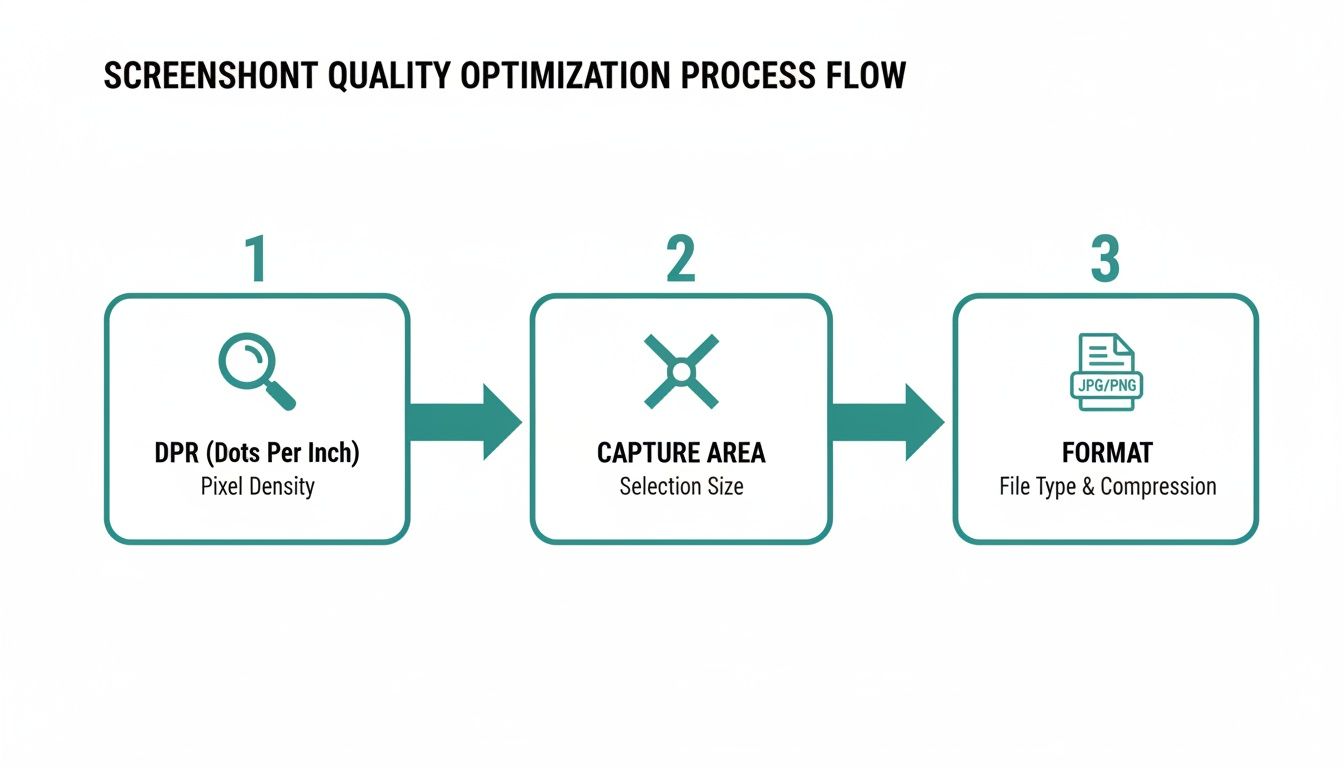
The process is straightforward but powerful: dial in the resolution with DPR, define what you want to capture, and pick an optimized format. It's that simple.
Targeting Specific Elements with CSS Selectors
But what if you don't want the whole page? A very common task is capturing just one specific component—maybe a user profile card, a pricing table, or an interactive chart. A solid screenshot API lets you do this just by providing a CSS selector. The service renders the page and then neatly crops the final image to that element's bounding box.
For instance, to grab an element with the ID #main-chart, you'd just add element=#main-chart to your API request. This is fantastic for building component libraries, tracking visual changes to UI elements, or generating focused images for documentation.
By targeting specific elements, you can automate the creation of clean, perfectly cropped, and context-rich images without any manual intervention. It’s a genuine game-changer for UI testing and documentation workflows.
The demand for specialized tools like this is part of a much larger trend. The global Application Programming Interface market was valued at $10.10 billion in 2025 and is expected to skyrocket to $87.55 billion by 2035—a compound annual growth rate of 24.1%. This explosion shows just how vital API-driven solutions have become for developers.
Handling Modern Web Challenges Automatically
Today's websites are full of little obstacles for screen capture tools, from cookie banners and ads to content that loads dynamically. A professional-grade API handles these headaches for you. For example, you can use parameters to automatically dismiss popups, ensuring your screenshots are clean and focused on the content you actually want.
Here are a few more practical parameters you can use:
block_cookie_banners=true: Automatically detects and hides most GDPR and cookie consent dialogs.dark_mode=true: Renders the page using its dark color scheme, if one exists.delay=2000: Pauses for 2 seconds before taking the shot, giving animations time to finish or lazy-loaded content to appear.
By handing these details off to a developer-focused API, you replace a mountain of potential maintenance and custom code with a single, elegant solution built for reliability and scale.
Advanced Techniques for Complex Websites
Snapping a high-resolution screenshot of a simple, static webpage is one thing. But let's be honest, modern websites are rarely that straightforward. They're dynamic, interactive, and often personalized, which throws a whole new set of challenges into the mix. To reliably capture high res screenshots of these complex sites, you have to go beyond basic API calls and start thinking like a pro.
Dealing with Dynamic Content and Lazy Loading
Ever take a full-page screenshot only to find big, empty white spaces where images should be? That's a classic sign of lazy loading, a common trick websites use to speed up initial load times. Content, especially images, only loads as you scroll down the page. A standard screenshot tool might be too fast and miss it all.
The fix is to tell your screenshot service to be patient. Give the page a moment to breathe and fully render before taking the shot.
- Try a simple
delay: Instructing the service to wait for a fixed period, like 2-3 seconds, after the initial load is often enough. This gives most lazy-loaded elements the time they need to pop into view. - Wait for the network to go quiet: A more reliable method is to wait until all network activity has stopped. This ensures every script has run and every asset has been fetched before the shutter clicks, so to speak.
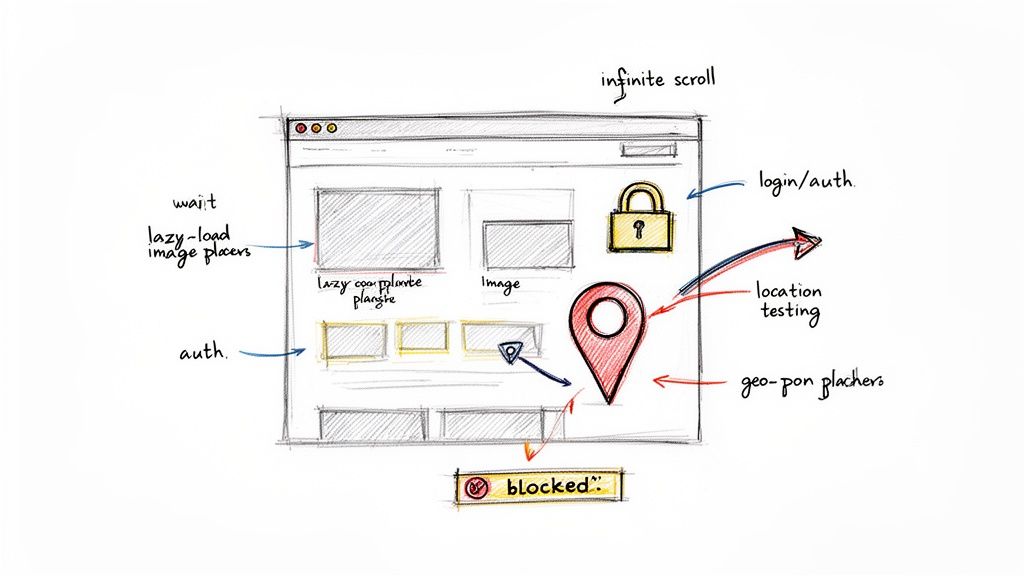
As you can see, modern web concepts like delayed content and user authentication require a more sophisticated approach to get a complete and accurate picture.
Handling Logins and Authenticated Sessions
What about pages locked behind a login, like a customer dashboard or a members-only section? Manually logging in for every screenshot just isn't an option when you're trying to automate. Thankfully, this is exactly what developer APIs are built for. You can pass authentication credentials right along with your request.
Most services let you include an Authorization header with a bearer token or a Cookie header with a valid session ID. The screenshot service then presents these credentials to the website, getting access just like a real logged-in user would. This is a game-changer for QA teams needing to verify user-specific UI or for monitoring internal dashboards.
If you want to go deeper on this topic, it's worth reading up on other common website screenshot challenges and how to solve them.
Capturing Geo-Targeted and Responsive Views
A website can look completely different depending on where you are in the world or what device you're using. Advanced screenshot services let you simulate both of these variables, unlocking some incredibly powerful testing workflows.
For geo-targeted captures, you can simply specify a country code in your API request. The service then routes its request through a proxy server in that country, showing you exactly what users in the UK, Japan, or Brazil see. It's an indispensable tool for checking localized content, verifying currency symbols, and making sure regional promotions are live.
For example, a global e-commerce brand could automate screenshots every hour to verify that their Black Friday deals are correctly localized across ten different countries. This ensures consistency and catches errors before customers do.
Likewise, testing for responsive design is non-negotiable. Instead of sitting there manually resizing a browser window, you can programmatically define the viewport dimensions in your API call. This makes it possible to generate a complete set of screenshots for various devices—all in one go.
You could easily set up a workflow to capture your homepage at these common breakpoints:
| Device Type | Viewport Width | Viewport Height |
|---|---|---|
| Mobile (Portrait) | 375px | 812px |
| Tablet (Portrait) | 768px | 1024px |
| Desktop | 1920px | 1080px |
By automating captures across different viewports, a QA engineer can instantly spot layout bugs on mobile that might have gone unnoticed during desktop development. What was once a tedious manual task becomes an efficient, repeatable part of your testing pipeline, helping you deliver a flawless experience on any screen.
Putting Your Automated Screenshots to Work
So, you've mastered the technical side of capturing perfect, high-resolution screenshots. Now for the fun part: putting them to work. This is where the real value kicks in. Once you can grab a perfect snapshot of any webpage on demand, those images stop being just pictures. They become a powerful source of data that can sharpen your decisions, squash bugs, and even drive more traffic.
Let's dig into a few real-world scenarios where automated screenshots become an indispensable part of the workflow.
Catch UI Bugs with Visual Regression Testing
This is one of the biggest wins for any development team. In a world of continuous integration and deployment (CI/CD), code gets pushed constantly. While your functional tests might pass, a small CSS change could easily knock a button out of alignment, break a layout on a specific viewport, or cause a font to render incorrectly. These are the kinds of visual bugs that drive users crazy and often slip right past automated checks.
By plugging a screenshot API into your testing pipeline, you can solve this problem elegantly. The process is simple: automatically capture key pages or components before and after every single deployment. An algorithm then compares the two images pixel by pixel.
If the difference is more than a tiny, predefined threshold, the test fails. Your team gets an immediate alert before the visual bug ever makes it to production. This simple, proactive step saves an incredible amount of manual QA time and acts as a guardian for your brand's user experience.
Monitor SEO and Competitor Strategies
The world of SEO is constantly in flux. To stay competitive, you can't just track your own rankings; you have to keep an eye on the entire search engine results page (SERP). This is a perfect job for an automated screenshot workflow. Imagine setting up a job that, every single day, captures the Google search results for your most important keywords, even from different countries or cities.
Suddenly, you have a visual, historical archive that shows you things raw data can't:
- How your ranking positions have trended over weeks or months.
- The evolution of SERP features like featured snippets, knowledge panels, or "People Also Ask" boxes for your niche.
- The exact ad copy and promotions your competitors are running.
This isn't just tracking; it's competitive intelligence. You can literally see how rivals are positioning themselves and react with a much more informed strategy.
Automated SERP tracking transforms SEO from a guessing game into a data-driven science. It provides the visual evidence needed to understand market dynamics and make smarter, faster decisions.
Generate Dynamic Social Media Previews
You know when you share a link on X (formerly Twitter), LinkedIn, or Slack, and a preview card pops up? That's usually powered by Open Graph (OG) meta tags. A generic, static image is fine, but you can do so much better. A dynamic, context-rich image is infinitely more compelling.
With a screenshot API, you can generate these custom OG images on the fly for every page. For a blog post, you could automatically generate an image with the article's title and the author's headshot on a branded template. For an e-commerce product, it could be a clean shot of the item with its current price stamped on it. This small enhancement can dramatically boost click-through rates from social shares.
Archive Web Content for Compliance and Research
For some industries—think finance, law, or journalism—keeping an accurate historical record of web content is more than just a good idea; it's often a legal necessity. Trying to do this manually is a nightmare and incredibly error-prone.
An automated system that takes a daily or weekly full-page screenshot of key pages provides a reliable, time-stamped visual record. It’s the perfect, unimpeachable archive for any compliance or auditing needs.
The flexibility of screenshot APIs is a huge part of their appeal. Developers are using them for everything from monitoring Google SERPs and capturing A/B test variations to archiving news sites during major events. The best screenshot API solutions are built to handle challenges like IP blocks and CAPTCHAs, making them incredibly robust tools for data gathering.
Collect Clean Data for AI and Machine Learning
High-quality visual data is the fuel for modern AI, especially in computer vision. If you're training a model to identify products, parse document layouts, or spot phishing websites, you need a massive dataset of clean, consistent images. A screenshot API is the ideal tool for building that dataset.
You can write a script to programmatically capture thousands of web pages, all rendered at the exact same resolution and with annoying distractions like cookie popups or ads automatically blocked. This lets data science teams build huge, high-quality training datasets way more efficiently than they ever could by hand, directly speeding up the development of new AI models.
Common Screenshot Questions Answered
Once you start automating high-res screenshots, a few practical questions almost always pop up. Shifting from grabbing screenshots by hand to using an API opens up a ton of new possibilities, but it also comes with its own set of puzzles. Here are some quick answers to the most common issues developers run into.
How Do I Handle Websites with Complex Animations?
This is a classic problem. You try to grab a screenshot, but the page's cool fade-in animations or pop-ups aren't finished yet, leaving you with a half-loaded image.
The trick is to tell your screenshot service to wait. Most solid APIs give you a parameter for this, often called delay. A better, more reliable option is something like wait_for_selector. This tells the API to hold off on taking the shot until a specific element you know loads last—like a footer or a chat widget—is fully visible. This way, you get a complete, stable image every single time.
Can I Capture Screenshots of Pages Behind a Login?
Absolutely. This is a must-have for things like internal dashboards, user account pages, or QA testing authenticated user flows.
Professional screenshot APIs are built for this. They let you pass along custom headers with your request, just like a browser would. You can include an Authorization header with a bearer token or a Cookie header containing an active session ID. This lets the service authenticate itself and see the page exactly as a logged-in user would.
One of the biggest wins of using a dedicated screenshot API is that the performance hit on your own systems is basically zero. The service does all the heavy lifting—firing up headless browsers, rendering complex pages, and processing the final images.
All your application has to do is make a simple HTTP request. These services are designed to handle thousands of captures at once without you having to manage a single server, which is a massive advantage over trying to build and maintain this yourself.
Ready to automate your screenshot workflow without the headache? ScreenshotEngine offers a developer-first API that delivers clean, reliable, high-resolution images in milliseconds. You can get started for free and see just how easy it is to capture any website perfectly.