At its core, automated website screenshotting is just what it sounds like: using a tool, often an API or a headless browser, to capture images of web pages programmatically. No human clicking required. This is absolutely critical for things like visual regression testing, monitoring website uptime and appearance, or even generating all those social media preview images at scale. It takes a tedious, error-prone manual task and turns it into a fast, reliable, and consistent workflow.
Why Automated Screenshots Are a Game Changer
Let's be honest, taking screenshots manually is a soul-crushing task. It's slow, inconsistent, and completely impossible to scale. Can you imagine your team having to manually check 50 key pages of your app for visual bugs before every single deployment? It would be a massive bottleneck, chewing up developer time and still missing the subtle rendering glitches that users always seem to find.
Automating this process completely changes the game. It’s not just about convenience; it’s a strategic shift toward speed, accuracy, and reliability in your development pipeline. When you hand this job over to a dedicated system, you guarantee that every capture is pixel-perfect and consistent, no matter who runs the test or when.
Beyond Simple Bug Catching
The use cases here go way beyond just QA. I've seen teams get incredibly creative with this.
Think about these real-world scenarios where automation is a lifesaver:
- Compliance and Archival: If you're in a regulated industry like finance or law, you often need an indisputable visual record of your site at specific moments for audits. Automation builds that complete, timestamped archive for you, no questions asked.
- Brand Consistency: Marketing teams can use it to automatically keep an eye on campaign landing pages, partner sites, and ad placements, making sure brand guidelines are being followed everywhere.
- SEO and SERP Monitoring: SEO pros will often automate captures of search engine results pages (SERPs) to track how their own listings, knowledge panels, and competitors' snippets are changing over time.
This isn't some niche tech anymore; it's becoming a core part of how modern digital businesses operate. The market for website screenshot software was recently valued at around USD 450 million and is expected to hit USD 1.2 billion by 2033, growing at a 12.5% compound annual rate. That kind of growth tells you just how much businesses are relying on visual data to make important decisions. If you're curious about the numbers, you can dig into the full market report.
By treating visual testing as an automated quality gate, you stop thinking of screenshots as a chore and start seeing them as a safety net. It’s the difference between hoping your website looks right and knowing it does.
Ultimately, bringing in automated website screenshots frees up your team from a mind-numbing task. It lets your developers get back to building features instead of managing browser infrastructure, and it gives stakeholders the timely visual proof they need to do their jobs well.
Choosing Your Screenshot Automation Toolkit
When you're ready to start automating website screenshots, you’ll hit a fork in the road right away: Do you build the solution yourself, or do you plug into a dedicated API?
The do-it-yourself route, typically using powerful open-source libraries like Puppeteer or Playwright, gives you total control. For teams with deep in-house expertise and very specific, one-of-a-kind requirements, this can be an appealing option.
But let's be realistic—the DIY path is loaded with hidden costs. You aren't just writing a script; you're signing up to be the full-time administrator for a fleet of headless browsers. That means you're on the hook for managing servers, hunting down memory leaks from zombie Chrome processes, and constantly patching the browser engine to close security holes.
This flowchart breaks down the decision process in the simplest terms.
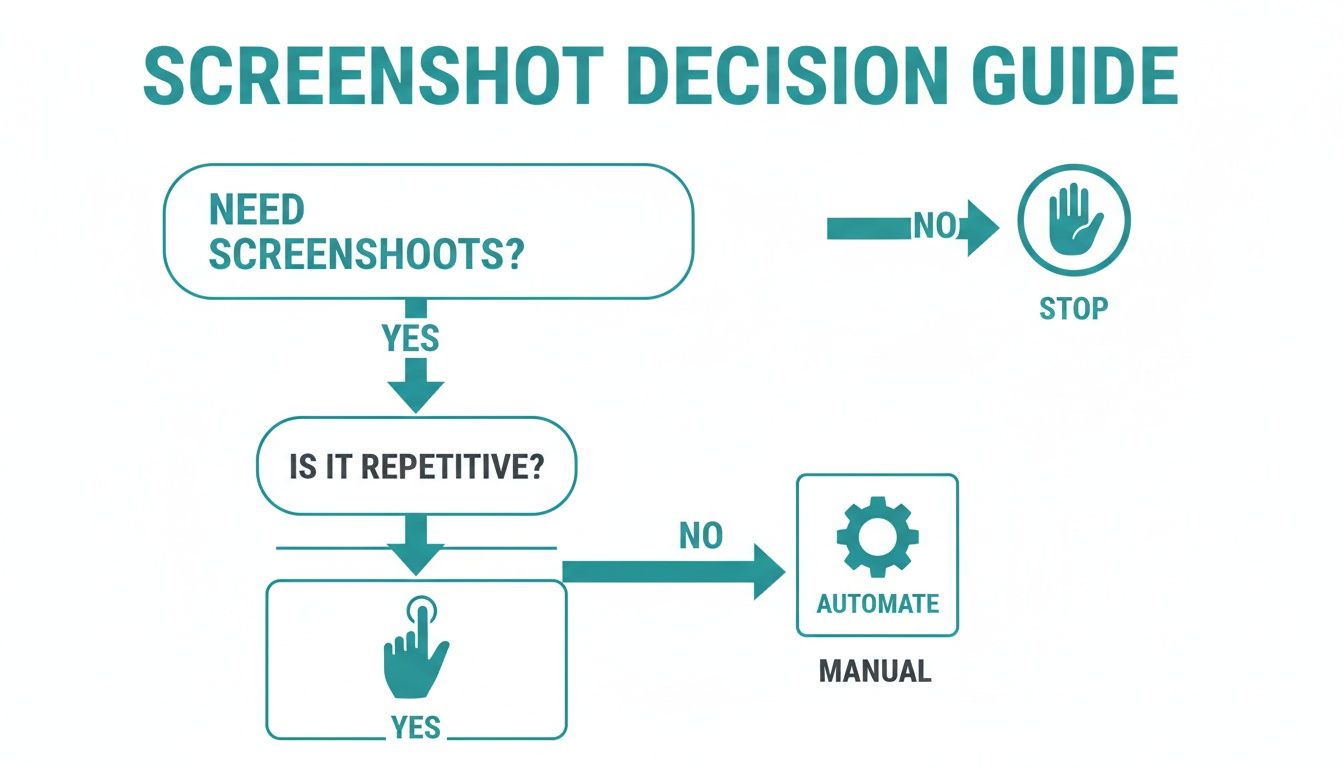
The core idea is simple: if a visual task is repetitive, automation is almost always the smarter, more efficient way forward.
The Plug-and-Play Alternative: Dedicated APIs
This is where a dedicated screenshot API comes into play. Instead of building and babysitting complex infrastructure, you hand off the entire process to a service that does this one thing exceptionally well. A service like ScreenshotEngine handles all the heavy lifting—browser management, scaling, security—so you can stay focused on what your application actually does.
DIY Screenshot Automation vs Dedicated API
Deciding between a home-grown solution and a specialized API involves weighing control against convenience and long-term maintenance. Here's how the two approaches stack up.
| Factor | DIY (e.g., Puppeteer/Playwright) | Dedicated API (e.g., ScreenshotEngine) |
|---|---|---|
| Initial Setup | High. Requires server provisioning, dependency management, and script development from scratch. | Low. Usually just a few lines of code to call an HTTP endpoint. |
| Maintenance | Significant. You're responsible for updates, security patches, and debugging browser quirks. | Zero. The service provider handles all infrastructure maintenance and updates. |
| Reliability | Variable. Prone to random failures, memory leaks, and environment-specific bugs. | High. Purpose-built for stability and consistent performance at scale. |
| Features | Build-your-own. Features like ad/cookie blocking must be manually coded and maintained. | Built-in. Often includes advanced features like element capture and geo-targeting out-of-the-box. |
| Scalability | Complex. Requires building and managing a scalable architecture (load balancers, auto-scaling). | Effortless. Scales automatically to handle any volume, from one to a million screenshots. |
| Cost | Deceptive. Low initial software cost but high operational and engineering time costs. | Predictable. Clear, usage-based pricing that's often more cost-effective in the long run. |
Ultimately, a dedicated API lets you get high-quality automated website screenshots without the operational headaches that come with a DIY setup.
Making the Right Call for Your Team
So, which path should you take? The decision really boils down to your team's resources and the scale of your project.
- Go DIY (Puppeteer/Playwright) if: Your team has serious DevOps experience, your screenshot needs are simple and infrequent, and you have a unique requirement that no existing API can meet.
- Choose a Dedicated API if: Your team needs to move fast, reliability is non-negotiable, and you want to avoid the long-term maintenance nightmare of managing your own browser infrastructure.
When you’re weighing your options, looking at other automation tools—even those outside of screenshots—can give you a good sense of what separates a decent tool from a great one.
For a much deeper dive into this exact topic, our guide on choosing the best screenshot API will help you evaluate all the options on the table.
Capturing Pixel-Perfect Screenshots Every Time
Let's be honest: getting a clean, accurate screenshot isn’t as simple as just pointing a browser at a URL. Modern websites are a minefield of dynamic content, lazy-loaded images, and pop-ups that can easily ruin an automated capture. This is where we get into the practical, battle-tested techniques for getting the perfect shot, every single time.
The biggest hurdle is almost always timing. If your screenshot tool captures the page too early, you'll end up with blank spaces where your content and images should be. Most headless browsers and good screenshot APIs try to solve this by waiting for network activity to settle down, but that's often not enough.
For pages with complex animations or content that fetches data after the initial page load, introducing a small, deliberate delay can be a lifesaver. A simple delay parameter of a few seconds is often the secret ingredient to a complete, fully-rendered capture.
Managing Popups and Dynamic Content
Nothing wrecks an automated screenshot faster than an unexpected cookie banner or a "Subscribe to our newsletter!" modal. Trying to code custom workarounds for these is a brittle and frustrating game of whack-a-mole. Fortunately, any high-quality screenshot API is built to handle this chaos for you.
- Automatic Ad and Cookie Blocking: The best services will automatically block common ad network scripts and dismiss GDPR/cookie consent banners before the capture even happens. This gives you a clean, uncluttered image without you having to write a single line of custom logic.
- Waiting for Specific Elements: Got a custom loader or some dynamic content? You can often tell the service to wait until a specific CSS selector (like
#dashboard-chart) is actually visible on the page before taking the shot. - Executing Custom Scripts: For really unique situations, some APIs let you inject a snippet of JavaScript to run just before the screenshot. You could use this to close a custom-built promotional popup or interact with the page in a very specific way.
This kind of clean visual capture is also a foundational part of learning how to automate software testing for visual regressions. You can't verify that your UI looks right if the initial screenshot is covered in junk.
A great screenshot service doesn't just render a page—it intelligently prepares it for capture. It acts like a savvy user, clearing away distractions to get to the content that actually matters.
AI has also started to play a bigger role here. Some providers now offer AI-powered visual change detection, which can automatically spot layout shifts and inconsistencies, saving your team from hours of manual review.
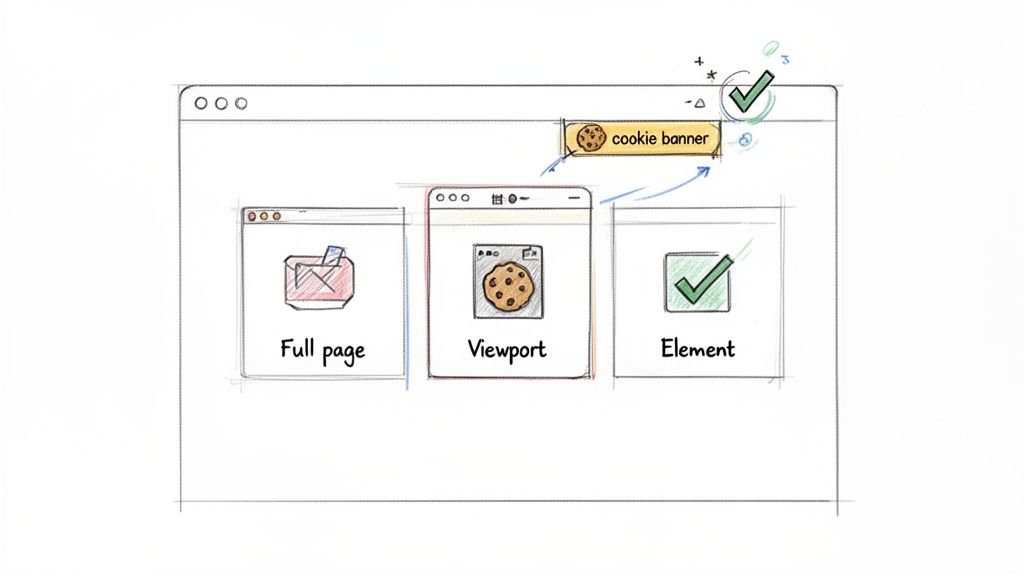
Choosing the Right Capture Area
Not all screenshots serve the same purpose. Your goal should dictate the type of capture you need. Understanding the difference is key to building an efficient workflow. For a deeper dive, check out our guide on how to https://www.screenshotengine.com/blog/capture-high-res-screenshots with precision.
| Capture Type | Description | Best For |
|---|---|---|
| Full Page | Captures the entire scrollable length of the webpage, from the header to the footer. | Archiving articles, compliance records, and full-site visual regression testing. |
| Viewport | Captures only the visible area of the browser window at a specific resolution (e.g., 1920x1080). | Seeing exactly what a user sees on a specific device, like a desktop or tablet, without scrolling. |
| Element | Targets and captures a single HTML element on the page using its CSS selector. | Monitoring dynamic components like charts, user comments, or ad placements. Perfect for generating social media cards. |
For example, capturing just a pricing table using its selector (#pricing-tier-pro) is far more efficient than taking a full-page screenshot and cropping it later. This targeted approach gives you the exact visual you need with less processing overhead and smaller file sizes. It makes your whole automation process faster and more reliable.
Integrating Screenshots into Your CI/CD Pipeline
Let's be real: true automation isn't about running a script now and then. It's about weaving these tasks directly into your development lifecycle. When you plug automated website screenshots into your Continuous Integration/Continuous Deployment (CI/CD) pipeline, they stop being a chore and become an always-on quality gate for your UI.
This means every single code push or pull request can trigger a visual regression test. The whole point is to catch those sneaky UI bugs—a broken layout, a button that vanished, a wonky font—long before they ever see the light of day in production.
Setting Up a Visual Regression Workflow
The concept behind this is simple, but its impact is huge. You start by capturing a set of "baseline" images, which are essentially the gold-standard, approved versions of your key pages and components. From that point on, whenever new code is committed, your CI/CD pipeline automatically spins up a job to take new screenshots of those same pages.
Then, a pixel-diffing tool gets to work comparing the new images against their baselines.
- Establish a Baseline: Your first run captures and stores this "golden" set of screenshots. This collection becomes the single source of truth for what your UI is supposed to look like.
- Trigger on Pull Requests: Set up your pipeline in GitHub Actions, GitLab CI, or Jenkins to kick off the screenshot job with every new pull request.
- Compare and Diff: A library like
pixelmatchcan compare the new captures with the baseline. If the difference goes over a tolerance you've set (say, 0.1%), the test fails. - Flag and Review: The CI pipeline then flags the pull request, letting the developer know their change broke something visually. This stops the faulty code from ever getting merged.
By making visual testing a required check, you're essentially creating an automated backstop against visual regressions. It's like having a meticulous QA engineer inspect every pixel of every change, but without the manual effort.
A Practical Example with GitHub Actions
This might sound complicated, but it's more straightforward than you think. In GitHub Actions, for instance, your workflow file would define a job that runs on each pull_request. That job would check out the code, spin up a local server, and then fire off a script that hits your screenshot API for a list of critical URLs.
The diagram below shows how this fits into a typical CI/CD flow, from commit to a pass/fail result.
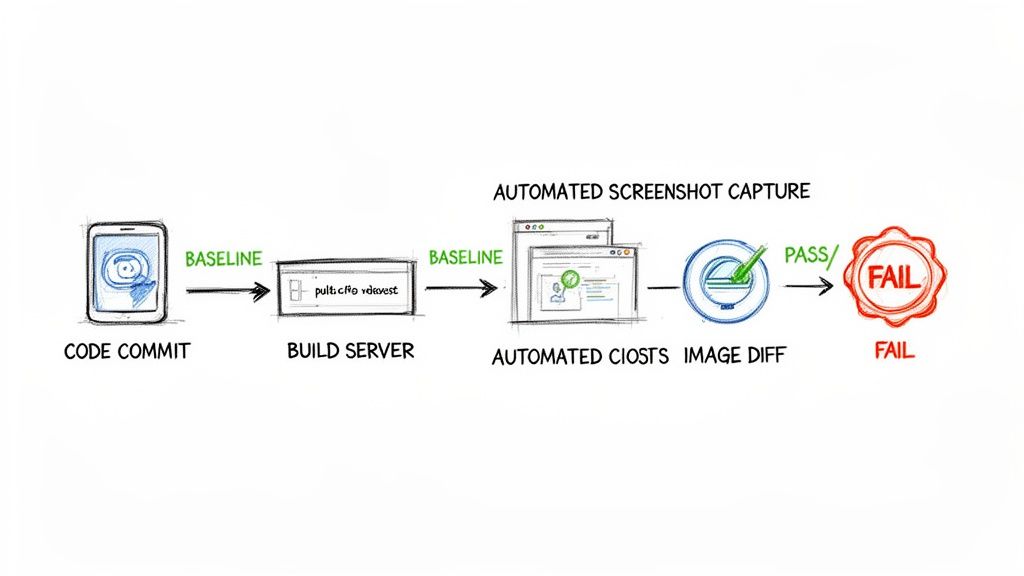
The workflow handles all the boring stuff—building, testing, and deploying—which is the perfect place to slot in screenshot-based testing.
The best part? The results from the pixel comparison can be uploaded as build artifacts. This lets developers see a "diff" image that highlights exactly what changed, giving them immediate, actionable feedback right inside their pull request.
If you want to keep your testing environment consistent (and you definitely do), learning how to use a Playwright Docker image is a game-changer. It ensures your screenshots are always captured in a clean, reliable environment, free from any quirks on a local machine.
Optimizing for Performance and Cost
When you start taking website screenshots at scale, you'll quickly notice it can be a real resource hog. This isn't just a technical problem; it directly hits your speed and your budget. The good news is that a few smart optimizations can make a massive difference, helping you build an efficient and cost-effective system without compromising on quality.
The single biggest win? Choosing the right image format. PNG is fantastic for pixel-perfect UI testing because it's lossless, but the file sizes can be huge. For most scenarios, switching to a compressed format like JPEG or WebP can cut your file sizes by 70% or more. That's a huge reduction in storage costs and a big boost to transfer speeds.
This isn't just a minor tweak; it's a strategic decision. As more teams work remotely, the reliance on visual documentation is skyrocketing, and keeping operational costs in check is crucial for any growing system. You can find more insights about this trend and its market impact.
Trimming Down the Payload
Beyond just the output format, think about what the headless browser has to render in the first place. Every third-party script, analytics pixel, and embedded video adds to the page load time, pushing back the moment you can actually take the screenshot.
A really effective technique here is to block unnecessary network requests before they even start. Most screenshot APIs and libraries let you intercept and cancel requests for resources that have zero impact on the final visual layout.
- Block Tracking Scripts: Kill requests for Google Analytics, marketing pixels, and other trackers.
- Exclude Heavy Media: Stop videos and large background images from ever downloading.
- Disable Custom Fonts: If precise typography isn't essential for your screenshot, falling back to system fonts can shave off precious milliseconds.
The fastest screenshot is one that captures a page with less to render. By blocking non-essential resources, you're not just speeding up a single capture; you're reducing the computational load across your entire system.
Caching for Efficiency
Finally, let's talk about avoiding redundant work. If you're monitoring a homepage that only gets updated once a day, there's absolutely no reason to recapture it every five minutes. This is where a smart caching strategy comes in.
By caching the screenshot based on the URL and your capture settings, you can serve the existing image until it's time for a fresh one. This simple step saves countless unnecessary API calls and processing cycles, ensuring your automated website screenshots workflow stays lean and sustainable as it grows.
Troubleshooting Common Screenshot Automation Snags
Even when you've got the right tools, you're bound to hit a few weird edge cases when automating website screenshots. Let's walk through some of the most frequent questions I see from developers and get you some practical answers to push past those sticking points.
How Do I Handle Websites That Require a Login?
Ah, the classic authentication puzzle. This is where professional screenshot APIs really earn their keep. Most of them have a built-in way to pass along session cookies or even local storage data with your API request.
You can essentially inject the authenticated state directly into the browser instance before it navigates to the target URL. This means you can grab content from behind a login wall without having to script a fragile, multi-step login sequence every single time. If you were building this yourself with something like Puppeteer, you'd be on the hook for coding that entire login flow and then figuring out how to manage the session for every follow-up request.
What’s the Best Way to Compare Screenshots for Visual Testing?
The go-to method here is pixel-diffing. You start with a "baseline" screenshot—your source of truth for what a component should look like. Then, you snap a "test" screenshot from your latest code build. A pixel-diffing library compares them, creating a "diff" image that highlights any changes, usually in a bright, impossible-to-miss red.
A pro tip: to prevent your tests from failing over tiny, meaningless rendering glitches (like a single pixel shifting), you can set a tolerance threshold. Allowing a small percentage of pixels, say 0.1%, to differ helps eliminate false positives and keeps your build from breaking unnecessarily.
Once you wire this up in your CI/CD pipeline, you've got an automated quality check that makes visual validation a seamless part of every deployment.
Can I Capture Just One Specific Element on a Page?
Absolutely. This is a must-have feature for targeted monitoring, and it saves a ton of processing time and bandwidth. Both dedicated APIs and DIY libraries let you target a specific element using its CSS selector, like #main-chart or .user-profile.
The tool still renders the whole page behind the scenes, but it cleverly crops the final image to the exact dimensions of that one element. This is incredibly useful for things like:
- Keeping an eye on dynamic data visualizations or charts.
- Verifying that ad placements are rendering correctly.
- Snapping shots of user-generated content for social media previews.
It's a much cleaner and more efficient way to work than capturing a massive full-page image and then trying to crop it yourself.
Ready to stop wrestling with headless browsers and start getting clean, reliable screenshots in seconds? ScreenshotEngine provides a powerful, developer-first API that handles all the complexity for you. Get your free API key and start automating today. Learn more at https://www.screenshotengine.com.