Think of an Open Graph template as your secret weapon for social media. It's essentially a reusable design, often baked into your codebase, that automatically cranks out the preview images (og:image) for every single one of your web pages. This system ensures that whenever a link is shared, it shows up with a consistent, on-brand, and genuinely eye-catching visual—all without you lifting a finger.
Why Your Open Graph Template Is Mission-Critical
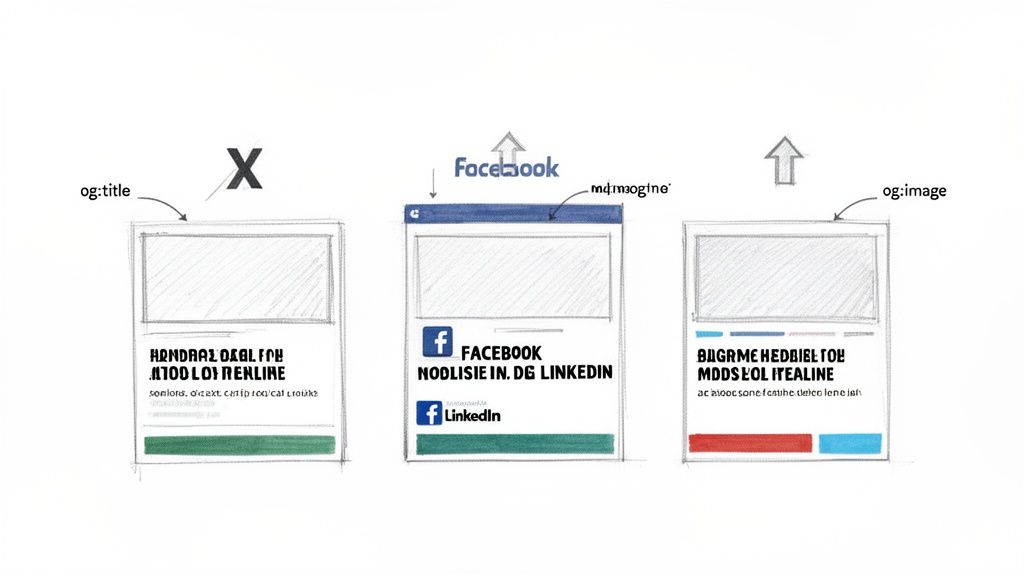
On platforms like X, Facebook, or LinkedIn, first impressions are everything. That little preview card that pops up when someone shares your link is your one shot to grab a user's attention in a crowded feed. That entire preview—the title, the description, and most importantly, the image—is dictated by a few lines of code called Open Graph (OG) meta tags in your page’s HTML.
This makes an Open Graph template far more than a simple "nice-to-have." It’s a core part of your content strategy. When you automate the creation of these images, you're guaranteeing brand consistency across potentially thousands of pages. Leave it to chance, and the social platform might just grab a random, awkward image from your page—a tiny logo, an ad banner, or worse, nothing at all. The result is a broken-looking, unprofessional share that nobody is going to click.
The Direct Impact on Engagement
Let's be real: social media is a visual game. A sharp, well-designed OG image can be the difference between a user scrolling right past your content and them stopping to click. This is a direct line from visual appeal to user action, which is why engineering a solid OG template is one of the highest-leverage things you can do for your social traffic.
The process is simple on the surface. When a URL gets shared, a crawler from the social network visits the page and scans its <head> section for those OG tags. These tags are its instructions on what to display.
To make sure everything works as intended, here are the core tags you need to get right.
Essential Open Graph Tag Specifications
This quick reference table breaks down the tags you absolutely need for a polished and effective social media preview.
| OG Tag | Purpose | Best Practice / Specification |
|---|---|---|
og:title |
The main headline of the content. | Keep it concise and compelling, ideally under 60 characters. |
og:description |
A short, enticing summary of the page. | Aim for around 1-2 sentences, under 155 characters. |
og:image |
The URL of the preview image. | Use a high-quality image with a 1.91:1 ratio (1200x630px is ideal). |
og:url |
The official, canonical URL for the page. | Ensures all shares point to the same source of truth. |
Getting these four tags right is the foundation for a share that not only looks good but also performs well.
A well-formed OG preview directly influences click-through behavior. We've seen teams fix their missing or poorly designed OG images and metadata and see click-through rate increases of 20–50%. That's a massive gain.
Why Automation Is Non-Negotiable
This all sounds great when the tags are present and correct. But what happens in the real world? Audits often reveal that missing og:image tags are a top reason for sloppy link previews, sometimes affecting thousands of pages on a single site.
By 2025, social platforms will depend on these tags to generate previews for billions of people, making them absolutely critical for visibility. Just look at a platform like Facebook, which has over 3 billion active users—the scale is staggering. You can dig into current social media demographics to get a better sense of that reach.
Manually designing a unique social card for every blog post, product page, or article just isn't sustainable. This is where an open graph template comes in. By automating the process, you ensure every piece of content gets a custom, on-brand visual without creating a bottleneck for your team.
Designing Your OG Image Templates (Static and Dynamic)
Think of your Open Graph image as the visual handshake for your content. It’s what makes someone stop scrolling and click. The design of that image is everything, and it generally boils down to two paths: static or dynamic.
A static template is the straightforward choice. You design one consistent, branded image that you can use across broad categories—say, for all your blog posts or every product page. It’s a low-effort way to maintain brand consistency and a fantastic starting point.
A dynamic template, on the other hand, is where things get really interesting. It programmatically generates a unique image for every single page. It can pull in the article's headline, the author's picture, or even key stats from the content itself. This approach gives users a super relevant preview, but it does take a bit more technical work to set up.
Core Design Principles for Any Template
Whether you go static or dynamic, some design rules are universal. You're aiming for an image that’s not just eye-catching but also perfectly readable on any device it pops up on.
Optimal Dimensions: Stick to 1200x630 pixels. This 1.91:1 aspect ratio is the gold standard and prevents platforms from awkwardly cropping your design. It's always a good idea to stay current on standard image sizes for social media, as things can change.
Clear Text Hierarchy: The page title needs to be the hero. Use a big, bold font that’s legible even when the image is shrunk down to a tiny thumbnail. Any secondary info, like an author's name, should be noticeably smaller.
Strong Branding: Your logo and brand colors are essential, but they shouldn’t steal the show. Let them act as a familiar frame around the content, not the main event.
Ample White Space: Resist the temptation to fill every last pixel. Giving your text and key elements room to breathe makes them stand out and dramatically improves readability.
The best OG image templates strike a perfect balance between information and a clean, uncluttered look. Treat it like a mini-billboard for your page—every single element has to earn its spot.
Building a Flexible HTML and CSS Foundation
Here's where the real magic happens. By building your template with simple HTML and CSS, you create a flexible foundation that works for both static and dynamic generation.
For dynamic images, you can pass data like a title directly into the HTML using URL query parameters. A screenshot service can then take that URL, render the page, and snap a perfect image. Taking the time to build a clean HTML structure pays off; it's the secret to getting crisp, professional results every time. We actually have a whole guide on why this matters for capturing high-res screenshots.
Ultimately, this HTML-first approach is what enables you to create stunning, scalable, and automated OG images for your entire site.
Let's be honest, manually creating a unique Open Graph image for every single page is a soul-crushing bottleneck. It’s exactly the kind of repetitive task that grinds content teams to a halt and simply doesn't scale. This is where a screenshot API comes in, turning a tedious manual job into a completely hands-off, automated workflow.
The whole concept revolves around a simple but powerful idea: using an HTML and CSS open graph template as your canvas. Instead of opening up a design tool to slap a title on your template, you construct a special URL. This URL points to your template and uses query parameters to dynamically inject data like the page title, author name, or anything else you need.
You then feed this dynamic URL to a screenshot API. The service takes it from there—it renders the HTML just like a browser, captures a pixel-perfect image of your beautifully styled template, and gives you back a final image URL. Just like that, you have a custom og:image ready to go.
This simple flowchart breaks down the decision between sticking with static, pre-made images and generating them dynamically from a template.
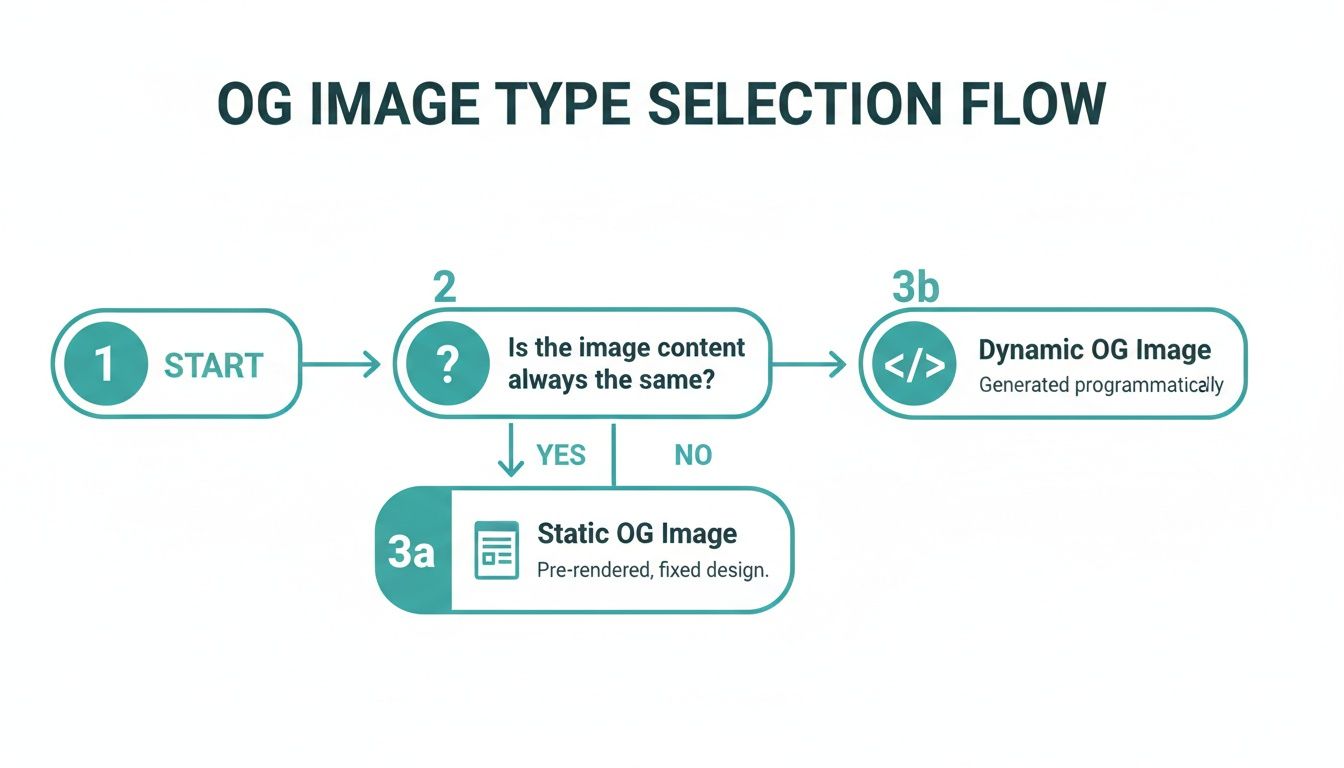
As you can see, a dynamic approach opens the door to creating unique, context-rich images for every piece of content, which is a massive step up from a one-size-fits-all solution.
Building a Dedicated API Endpoint
To really nail this workflow and keep it clean, a great move is to build a dedicated endpoint within your own application. Think of it as a small proxy service, maybe built with Node.js and Express. It receives a request, assembles the dynamic URL for your HTML template, makes the call to the external screenshot API, and then passes the generated image URL back to your application.
This approach brings a few key benefits to the table:
- Abstraction: Your frontend code stays simple. It just needs to call your internal endpoint without worrying about the specifics of the screenshot service.
- Security: Your API key for the screenshot service stays safely on the server-side, never exposed in client-side code.
- Control: This gives you a central hub to manage all the logic. You can easily add caching, handle errors, or even swap out screenshot providers down the road without a major rewrite. A dedicated website screenshot API is built for exactly this kind of task, offering the reliability and features you need for automation.
For any developer-focused screenshot service, rendering a perfect Open Graph preview is mission-critical. I've seen firsthand how a single missing og:image can tank social click-through rates by an estimated 10–40% on platforms that prioritize rich media. It's why engineering teams I've worked with who run thousands of automated checks will only use APIs with dead-simple endpoints and rock-solid SLAs. Even a 1% failure rate at that scale means ten broken tests every single day, which is just noise nobody wants in their CI pipeline.
By creating your own endpoint, you're essentially turning a manual design chore into a straightforward, programmatic function call. This is the secret to scaling up your content production without ever sacrificing visual quality or brand consistency.
Ultimately, the goal is to shift from a "one-off" manual process to a fully automated system. When you start treating your OG images as a product of your code, you gain an incredible amount of control and efficiency, ensuring every single page shared from your site looks professional and compelling.
Implementing Smart Caching and Deployment Strategies
Let's be blunt: generating a custom OG image from an open graph template for every single page request is a terrible idea. It’s a recipe for slow load times and a surprisingly high bill from your screenshot service. The real key to a fast, efficient, and cost-effective system is smart caching.
The philosophy is simple: once an image is generated, you should never have to generate it again unless the underlying content actually changes. This means the initial load for a new article might trigger the image creation, but every subsequent share and visit benefits from that one-time effort. Our goal is to create the image once and serve it instantly from a cache forever after.
Choosing Your Generation Trigger
The first big decision you'll face is when to kick off the image generation. You have a few solid options, each with its own pros and cons.
- On-Save Generation: This is my personal favorite and often the most robust approach. The moment a user saves or publishes a new post in your CMS, a webhook fires off the image generation process. The resulting image URL is then saved directly to the database right alongside the post's other metadata. It’s clean and predictable.
- On-First-Request Generation: Alternatively, you can take a "lazy" approach and generate the image the very first time it's requested. This avoids any upfront processing but can introduce a slight delay for the first user—or, more importantly, the first social media crawler—that hits the page.
For most content-driven sites, I strongly recommend generating the image on-save. It guarantees the og:image is ready to go before the content ever sees the light of day.
Your caching strategy isn't just a performance tweak; it's a core architectural decision. A good cache setup means your OG images are served globally with millisecond latency, drastically reducing the load on your servers and your screenshot API usage.
Deciding when to generate your image is a critical first step. Each method has its place, depending on your specific needs for performance and resource management.
Below is a quick comparison to help you decide which strategy fits your project best.
Comparison of OG Image Generation Strategies
| Strategy | Pros | Cons | Best For |
|---|---|---|---|
| On-the-fly Generation | Simple to implement initially; no storage needed. | Very slow for users; high API costs; poor performance. | Prototyping or very low-traffic internal tools only. (Not Recommended) |
| On-Save Generation | Image is ready before the page goes live; best performance; predictable. | More complex setup with webhooks/background jobs. | Most production applications, especially blogs, news sites, and e-commerce. |
| Hybrid (First-Request) | Simpler than on-save; avoids upfront processing. | First request is slow; can cause issues with social media crawlers. | Sites where immediate availability is less critical and you want to defer processing. |
Ultimately, for a professional and scalable solution, the on-save method provides the best user experience and reliability.
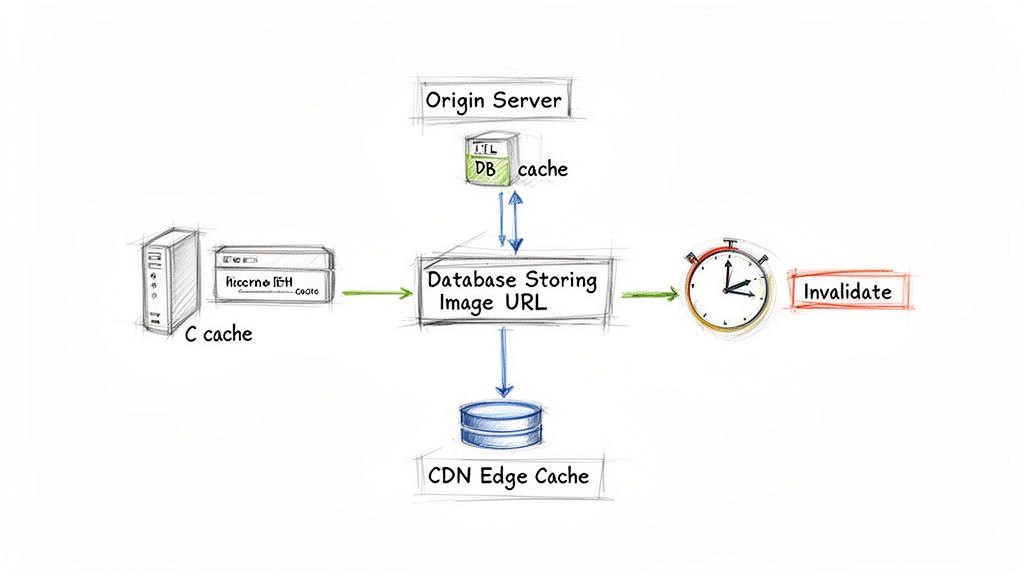
Leveraging Multi-Layer Caching
A truly resilient system uses more than one layer of caching. The first layer is simple: store the generated image URL in your own database. When a page is requested, your application just fetches this pre-generated URL and injects it into the og:image meta tag. This completely bypasses the expensive generation step.
The second, and arguably most important, layer is a Content Delivery Network (CDN). By serving your generated images through a CDN like Cloudflare or AWS CloudFront, you get two huge benefits:
- Global Speed: The image is cached on edge servers all over the world. A user in Tokyo gets the same lightning-fast load time as a user in New York.
- Origin Shielding: The CDN absorbs the vast majority of traffic, protecting your server from getting hammered with requests for the same image file over and over.
Handling Cache Invalidation
So, what happens when an editor fixes a typo in a headline? Suddenly, your cached OG image is out of date. This is where cache invalidation comes into play. When content is updated, you need a way to signal that a new image must be generated.
This is usually handled by the same on-save webhook. When a post is updated, the system simply re-runs the generation process, overwrites the old image URL in your database, and—crucially—purges the old image from the CDN's cache. This ensures the very next request fetches the fresh, updated version.
Building a killer open graph template is a great start, but it's only half the job. All that effort can go to waste if a single broken tag or caching hiccup makes your link previews look bland and unbranded. That’s why you absolutely have to make rigorous, proactive testing a standard part of your workflow. It's non-negotiable.
Thankfully, the major social media platforms give us the tools to see our pages exactly as their crawlers do. Think of these debuggers as your first line of defense. They're essential for getting your previews pixel-perfect before anyone even thinks about hitting that share button.
Using Official Platform Debuggers
Your go-to toolkit should be the official validators from the big social networks. These aren't just for seeing a preview; they give you a ton of diagnostic feedback to hunt down errors in your metadata.
- Facebook Sharing Debugger: The OG of OG debuggers, and still the most thorough. It fetches your URL, shows you the preview, and spits out every tag it finds, along with any warnings or errors.
- LinkedIn Post Inspector: Works much like Facebook's tool. It scrapes your page and shows you what it's collected for the preview.
- X Card Validator: This one is just for validating X Cards, which pull from both standard OG tags and a few X-specific ones.
The most valuable feature on these tools? The "Scrape Again" button. If you just pushed a new image but the old one is still showing up, it's almost always a caching problem. Forcing a re-scrape tells the platform to dump its old cache and grab the latest version of your tags.
Troubleshooting Common Pitfalls
Even with the right debuggers, you’ll still hit some frustrating issues that aren’t immediately obvious. In my experience, most problems come down to a few usual suspects. The trick is to check for them systematically.
A super common one is when social crawlers can’t see your tags at all. This is a classic issue with client-side rendered apps. You have to remember that most social bots do not execute JavaScript. If your OG tags are being injected on the client side, the bot just sees an empty <head>. Server-side rendering (SSR) is your best friend here.
Image performance is another biggie. If your dynamic og:image takes too long to generate and load, crawlers will time out and fall back to a random image from your page, or worse, no image at all. Your image needs to be served fast, which brings us back to why a solid CDN and caching strategy is so important.
A broken or missing
og:imageis more than a cosmetic flaw; it directly impacts user trust and click-through rates. Treat your Open Graph implementation with the same rigor you apply to your core application code.
Ultimately, testing your Open Graph setup should be a routine part of your pre-deployment checklist. Building these checks into your process can save you the headache of seeing your carefully crafted content shared with a busted preview.
For a deeper dive, you can even automate these checks with visual regression testing tools that spot inconsistencies automatically. To really master the process and ensure your images look great everywhere, check out this excellent Open Graph preview and debugging guide.
How Open Graph Actually Impacts SEO and AI
We used to think of Open Graph tags as a simple tool for making our links look good on Facebook. Those days are long gone. Now, they're a crucial source of structured data that both search engines and AI models are paying close attention to.
When a search crawler hits your page, it doesn't just read the <h1>. It looks at your OG tags as strong, explicit signals about the page's topic, title, and most representative image. This can absolutely influence how your content gets indexed and where it shows up in search results.
Think about it from an AI perspective. Large language models are constantly being trained on massive datasets scraped from the web. Your Open Graph tags provide a clean, human-curated summary of your page's content. By creating a solid open graph template, you're essentially feeding these models high-quality, structured information, making your content a more valuable and understandable training resource.
OG tags have become a structural signal used by crawlers and, indirectly, by large-scale AI training corpora. Ensuring this metadata is accurate is now part of robust SEO and data hygiene practices.
This brings us to a critical technical point: your OG tags must be server-rendered. Many bots, whether they're from Google or an AI company, don't execute client-side JavaScript. If your tags are only rendered by JavaScript in the user's browser, they're completely invisible to these crawlers.
Without server-side rendering (SSR), all your hard work is for nothing. For a deeper dive into how this metadata plays a role in the modern web, check out this guide on how OG tags impact LLM training.
Common Questions and Quick Fixes
When you start working with Open Graph templates, a few questions pop up time and time again. Let's tackle the most common ones I've run into over the years.
What's the Best Size and Format for an OG Image?
The magic numbers here are 1200x630 pixels. This gives you a nice 1.91:1 aspect ratio that looks fantastic on pretty much every social platform. Stick to that, and you'll avoid weird cropping issues that can ruin an otherwise great share card.
As for the file format, you’ve got options:
- PNG: Go with this for any image that has sharp lines, text, or logos. Its lossless compression keeps everything looking crisp.
- JPEG: This is your best friend for photographs. You can get a much smaller file size without a noticeable drop in quality, which is great for page speed.
- WebP: The modern choice. It delivers excellent quality with smaller file sizes than PNG or JPEG, but just double-check that your main target platforms support it fully.
Why Is My Old OG Image Still Showing Up?
This is a classic. Ninety-nine percent of the time, it's a caching problem. Social platforms scrape your page once to get the metadata and then store it to speed things up. When you push an update to your og:image tag, they're still holding onto the old version.
The fix is simple: force a refresh. Every major platform has a tool for this. Just plug your URL into the Facebook Sharing Debugger or the LinkedIn Post Inspector and hit the "Scrape Again" button. This tells their bots to dump the cache and grab the fresh metadata.
Is Server-Side Rendering (SSR) Really Necessary for OG Tags?
Honestly, yes. Most social media crawlers are pretty basic—they read the initial HTML and don't bother executing JavaScript. If you're using a framework like React and your OG tags are added on the client-side, the crawlers will probably see an empty <head> tag.
That means no preview, no image, no nothing.
By using Server-Side Rendering (SSR) or a pre-rendering service, you make sure the full HTML, including all your shiny new OG meta tags, is there from the very first byte the server sends. It's the only reliable way to guarantee that crawlers see exactly what you want them to see.
Ready to automate your Open Graph images? ScreenshotEngine provides a developer-first API to capture any HTML template as a clean, high-quality image without managing headless browsers. Start for free at https://www.screenshotengine.com.