Snapping a quick screenshot in Linux is often as simple as hitting Shift+PrtSc. That familiar key combo brings up a selection crosshair, letting you grab exactly what you need. But that's just the tip of the iceberg. Linux offers a whole arsenal of tools, from dead-simple shortcuts to powerful automation scripts.
Your Ultimate Guide to Taking Screenshots on Linux
Knowing your way around screenshots is a core skill for anyone using Linux, whether you're a developer squashing bugs, a support specialist creating guides, or just someone sharing a cool desktop customization. A good screenshot gets the point across instantly.
And more people are using Linux than ever. The desktop market share recently hit an all-time high of 4.44% as of July 2024, a clear sign that it's no longer just a niche OS for developers. If you're curious about the numbers, Tom's Hardware has a great analysis of Linux's growing market share. As the community grows, mastering these fundamental tools becomes even more valuable.
Choosing Your Screenshot Method
The best tool for the job really depends on what you're trying to accomplish. Need a quick grab for a chat message? Or do you need to automate capturing thousands of web pages for a data project? Your goal will point you to the right solution.
Here’s a breakdown of the main approaches:
- Desktop Shortcuts: The quickest method. No installs, no fuss—just instant captures built right into your desktop environment.
- GUI Applications: These are your visual workhorses. They give you more options like delayed captures, window selection, and, crucially, annotation tools to mark up your images.
- Command-Line Tools: For the scripters and automators. These tools let you integrate screenshotting into any workflow you can dream up.
- Screenshot APIs: The go-to for professionals who need to capture websites at scale. They handle the heavy lifting of browser rendering and infrastructure so you don't have to.
This flowchart can help you decide which path to take based on your immediate need.
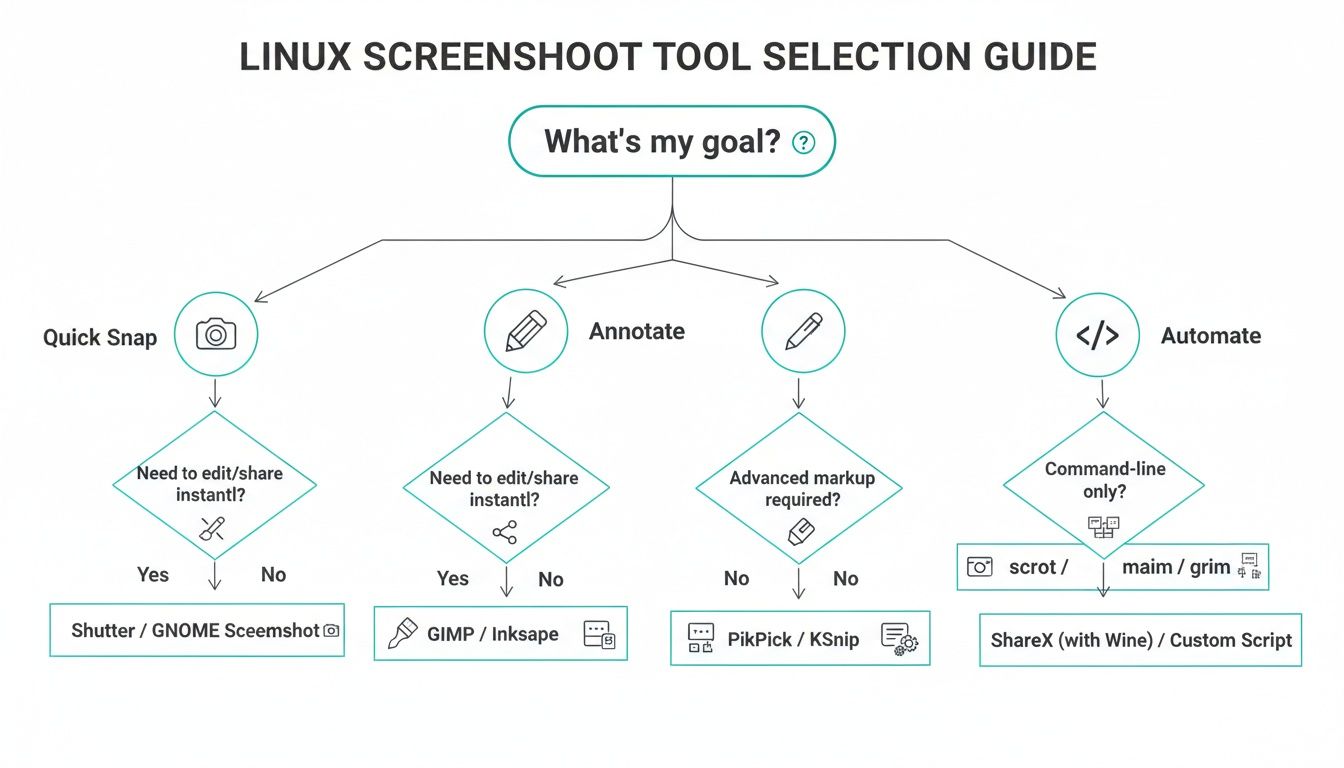
As you can see, what you want to do with the screenshot—grab it, mark it up, or automate it—is the key to picking the right tool.
For developers and QA teams, the challenge often goes way beyond simple screen grabs. When you're dealing with tasks like visual regression testing or SERP tracking, you might need to capture thousands of websites reliably. Manual tools just won't cut it. That's precisely where a dedicated screenshot API for developers comes in, taking care of all the tricky parts like rendering, ad blocking, and scaling.
This guide will walk you through all of these methods. We'll cover practical examples and share some tips I've picked up over the years to help you master taking screenshots on any Linux system.
Linux Screenshot Methods at a Glance
To help you get started, here's a quick summary table that matches different methods to their best use cases.
| Method | Best For | Key Feature | Ideal User |
|---|---|---|---|
| Desktop Shortcuts | Instant, no-fuss captures of the screen/area | Built-in, zero setup required | All users for quick, daily tasks |
| GUI Apps | Annotating, editing, and sharing screenshots | Rich editing and annotation toolsets | Content creators, support staff |
| CLI Tools | Scripting and automating captures | Lightweight and highly configurable | Developers, sysadmins, power users |
| Screenshot APIs | High-volume, programmatic website captures | Scalability, reliability, advanced options | Businesses, QA teams, data analysts |
Think of this table as your starting point. Now, let's dive into the specifics of each method.
Mastering Desktop Shortcuts and GUI Tools
For most of your daily screenshot needs, the quickest and easiest methods are already built right into your Linux desktop environment. Whether you're on GNOME, KDE Plasma, or XFCE, you've got powerful tools waiting for you, no installation required.
The simplest of all is the PrtSc (Print Screen) key. Just tap it. This instantly captures your entire screen—every monitor, every open window—and usually saves the image directly to your Pictures folder. Think of it as the big red button for grabbing everything in one go.
Unlocking Standard Keyboard Shortcuts
But let's be honest, you rarely need to capture everything. That's where a few simple key combinations give you much more control. While the specifics can vary a little, these are the standard shortcuts you'll find on most systems.
- Alt + PrtSc: This is your best friend for capturing just the active window. It’s smart enough to grab only the application you're currently focused on, saving you the hassle of cropping out background clutter later.
- Shift + PrtSc: This is arguably the most powerful of the three. It turns your cursor into a selection tool, letting you click and drag to draw a box around the exact area you want to capture. It's perfect for snagging a specific chart, a block of text, or a UI element.
Memorizing these three shortcuts will handle about 90% of your screenshot tasks. They’re fast, baked-in, and incredibly efficient for everyday use.
Exploring Native GUI Applications
When you need more options than a keyboard shortcut can offer, it's time to open the dedicated screenshot application for your desktop environment.
GNOME users have a straightforward tool called Screenshot (its command is gnome-screenshot). It gives you a simple UI to choose between full screen, a single window, or a custom area. Its killer feature is the built-in time delay. This is a lifesaver when you need to capture something that only appears on a mouse hover or after a click, like a dropdown menu.
Over in the KDE Plasma world, you'll find Spectacle. It’s just as user-friendly but packs in a few more handy features. You get the same capture modes, but Spectacle also lets you decide whether to include window borders and even the mouse pointer in the final shot.
Here's a real-world example: You're trying to document a software bug. You can set a 5-second delay in Spectacle, trigger the bug by opening a complex menu, and let the app capture the screen at the perfect moment—all without you fumbling with keys.
Powering Up with Third-Party Tools Like Flameshot
The built-in tools are great, but for anyone who needs to edit or annotate screenshots, a third-party app like Flameshot is a game-changer. It's a massive favorite in the Linux community because it combines capturing and editing into one seamless step.
The moment you select an area with Flameshot, a powerful editing overlay appears right on your screen. You can immediately:
- Draw arrows, lines, and shapes to highlight key items.
- Add text to provide context or instructions.
- Blur or pixelate sensitive information like names or account numbers.
- Use a highlighter tool to draw attention to important text.
- Add numbered steps to create a quick, impromptu tutorial.
This all-in-one workflow saves a ton of time. You're no longer capturing an image, opening it in GIMP, making your edits, and then saving it. With Flameshot, it all happens in a single, fluid motion. For creating documentation, reporting bugs, or just sharing clear visual information, it's an essential tool.
If you work across different operating systems or just want to see what else is out there, you can explore a comprehensive list of the best free screen capture software options that covers tools beyond the Linux-native ones we've discussed.
Capturing Screenshots from the Command Line
For speed and scripting, nothing beats the Linux command line. While GUI apps are great for a quick grab-and-annotate job, the terminal is where the real power lies for automation and building custom workflows.
If you're a developer or a sysadmin, this is your turf. You can write a script to take screenshots of an app's state every few minutes, document a complex deployment process automatically, or just bind a powerful screenshot command to a single key combo. It's all about control.
This gives you a good idea of the different ways you can approach a screen capture, whether you need the whole screen or just one part of it.

No matter what you're trying to capture, there's a command-line tool that can handle it.
Getting Started with Scrot: A Lightweight Classic
One of the oldest and most trusted tools for this job is scrot. The name is a mashup of "SCReen shOT," and its appeal is pure simplicity. It's incredibly light, fast, and almost certainly waiting for you in your distro's repositories (sudo apt install scrot or sudo dnf install scrot).
To grab your entire desktop, just pop open a terminal and run:
scrot
That's it. You'll get a timestamped PNG file right in your current directory. But scrot really starts to shine when you add a few flags.
scrot -sis interactive. It lets you click on a specific window or drag a box around the exact area you want.scrot -uinstantly grabs the currently focused window—no clicking required.scrot -d 5gives you a 5-second delay before the capture, which is perfect for opening menus or setting up a specific UI state.
You can even string them together. For example, scrot -s -d 3 my_capture.png starts a three-second countdown before letting you select a region, saving the output to my_capture.png.
Upgrading Your Workflow with Maim
As great as scrot is, maim (which stands for "makes pictures") is a more modern tool that fixes some of its predecessor's weak spots. The killer feature? It can pipe its output directly into other programs, which is a total game-changer for scripting.
For instance, you can send a screenshot straight to your clipboard instead of saving a file. You'll need xclip installed for this.
maim -s | xclip -selection clipboard -t image/png
This single line lets you select an area, and the image is immediately on your clipboard, ready to paste into a chat window or document. It’s an incredibly fast way to share things. maim also gives you more precise control, like selecting windows by their specific ID.
Leveraging ImageMagick for Advanced Control
If you're already doing image manipulation from the terminal, you probably have the ImageMagick suite installed. It comes with a powerful screenshot utility called import. While it has a slightly steeper learning curve, it plugs directly into a massive ecosystem of image processing tools.
Capturing your entire screen (the "root" window) is easy:
import -window root desktop.png
The real magic of import comes into play when you need to do more than just capture. You can resize, add a border, convert the format, or apply a filter all in one command. For complex automated tasks, it's a beast. Of course, while desktop captures are common, many professionals need to capture entire web pages. For those scenarios, it's often better to learn how to take a full screenshot of a website programmatically using specialized tools.
Navigating the Wayland and X11 Divide
Here's something you absolutely need to know: the classic X11 display server and the modern Wayland protocol are fundamentally different. Tools like scrot and maim were built for X11 and simply will not work on a default Wayland session, which is now the standard for Ubuntu, Fedora, and many other major distros.
Wayland's security model is much tighter. It intentionally prevents applications from snooping on each other's windows, which is a huge win for privacy but breaks traditional screen capture tools. If you run
scroton Wayland, you'll likely see a "cannot open display" error.
If you're on Wayland, you need to use native tools. The go-to command-line solution is actually a pair of utilities that work together:
grim: The tool that actually grabs the pixels from the screen.slurp: A slick little utility that lets you select a region with your mouse.
To capture a specific area on Wayland, you combine them in a single command:
grim -g "$(slurp)" wayland_capture.png
This command runs slurp first, which waits for you to select an area. Once you do, it prints the coordinates of your selection, which are then immediately passed to grim to take the actual screenshot. It’s the modern, secure way to do business on the Linux command line.
Taking Website Screenshots at Scale for Professional Workflows
When your job involves keeping an eye on dozens, hundreds, or even thousands of websites, grabbing screenshots manually just won't cut it. For developers, QA engineers, and SEO specialists, the game changes from capturing a single moment to building a reliable, automated system for visual data collection.
Manual captures are slow, tedious, and prone to human error. Automating the process, however, lets you monitor website changes, run visual regression tests, or archive web pages for compliance without lifting a finger. It transforms screenshotting from a simple utility into a powerful data-gathering tool baked right into your professional workflow.

The DIY Route: Headless Browsers
A common way to automate website captures is by firing up a headless browser. Think of it as a web browser without the visible window, controlled entirely through code. Libraries like Puppeteer (for Chrome) and Playwright (for Chrome, Firefox, and WebKit) are the usual suspects here.
With a bit of JavaScript or Python, you can write a script that tells the browser to visit a URL, wait for the page to load, and save a screenshot. This approach gives you incredible control—you can interact with elements, fill out forms, or wait for specific network requests to finish before you snap the picture.
But all that control comes with a cost. You're suddenly on the hook for:
- Infrastructure Management: You have to set up and maintain the browsers and all their dependencies on your own servers. This can get complicated fast.
- Handling Dynamic Content: Writing bulletproof code to wait for JavaScript-heavy pages to fully render is notoriously tricky and can lead to flaky results.
- Resource Drain: Headless browsers are memory and CPU hogs. Trying to run many at once can get expensive and bog down your system.
For a deeper dive into these powerful tools, this comparison of Puppeteer vs Playwright for web automation is a great resource.
The Smart Alternative: Screenshot APIs
A far more efficient and scalable solution is to use a dedicated screenshot API. These services handle all the messy parts of running headless browsers for you, giving you a simple endpoint that delivers a perfect screenshot every time.
Instead of wrestling with browser instances, you make a single, authenticated API call. The infrastructure headaches, ad-blocking logic, and cookie banner dismissals are all handled for you. This shift is a big reason the website screenshot software market, valued at $500 million, is expected to skyrocket to $1.2 billion by 2033. The demand for reliable, automated visual data is clear.
A dedicated API like ScreenshotEngine is built specifically to solve these common frustrations. It automatically deals with cookie pop-ups, blocks ads, and waits for pages to finish loading, ensuring your screenshots are clean and consistent without any extra effort on your part.
To see why so many developers are moving this way, check out our guide on the benefits of a screenshot as a service model.
The table below breaks down the key differences between managing your own headless browser setup and using a dedicated API.
Headless Browsers vs Screenshot APIs
| Feature | Headless Browser (Self-Managed) | ScreenshotEngine API |
|---|---|---|
| Setup & Maintenance | Requires server setup, browser installation, and ongoing maintenance. | Zero setup; ready to use with a single API key. |
| Scalability | Difficult and expensive to scale; requires managing resource pools. | Highly scalable; handles thousands of requests concurrently. |
| Handling Edge Cases | You write custom code for cookie banners, ads, and lazy loading. | Automatically handles common issues like ads and pop-ups. |
| Development Time | High; involves writing complex scripts for browser control. | Low; a single, simple API call does the job. |
| Cost | High infrastructure and developer time costs. | Predictable, pay-as-you-go pricing model. |
Ultimately, while the DIY approach offers granular control, an API provides a much faster, more reliable, and cost-effective path to getting the job done.
From Complex Code to a Single API Call
Let’s see just how different these two approaches are. Taking a full-page screenshot with Playwright requires setting up a browser, creating a page context, navigating, and then saving the file. With an API, you can do it all in one line.
Here's a simple curl command to capture an entire webpage using an API:
curl -X POST
-H "Authorization: Bearer YOUR_API_KEY"
-H "Content-Type: application/json"
-d '{"url": "https://example.com", "full_page": true}'
"https://api.screenshotengine.com/v1/screenshot"
--output example-full.png
That single command tells the service to render example.com and save a full-page PNG, with all the browser logic happening behind the scenes.
You can also get incredibly specific. What if you only need the hero section of a landing page? Just target its CSS selector.
import requests
api_key = 'YOUR_API_KEY' api_url = 'https://api.screenshotengine.com/v1/screenshot' headers = {'Authorization': f'Bearer {api_key}'}
payload = { 'url': 'https://screenshotengine.com', 'selector': '.hero-section' # Capture only the element with this class }
response = requests.post(api_url, headers=headers, json=payload)
if response.status_code == 200: with open('hero_section.png', 'wb') as f: f.write(response.content) else: print(f"Error: {response.status_code}")
The ability to specify elements, toggle dark mode, or change image formats to WebP or JPEG with simple parameters makes an API the practical choice for building solid applications that rely on high-quality, automated screenshots.
Troubleshooting Common Screenshot Issues
Sooner or later, every Linux user runs into a snag trying to grab a screenshot. It's frustrating when you hit the shortcut keys and get a black screen, or when the tool just won't copy your capture to the clipboard. These little hiccups can really throw a wrench in your workflow.
Fortunately, most of these problems are well-known and surprisingly easy to fix. We'll walk through the most common headaches—from Wayland quirks to clipboard failures—so you can get back to work.
The Dreaded Black Screen on Wayland
One of the most common complaints I hear comes from folks on modern distros like Fedora or newer versions of Ubuntu. They take a screenshot, but the saved image is just a solid black rectangle. If this sounds familiar, the culprit is almost certainly Wayland.
Wayland's security model is much stricter than the old X11 system. It's designed to prevent applications from snooping on each other, which means older screenshot tools like scrot simply can't see the screen content. This is a security feature, not a bug, but it means you have to use Wayland-native tools.
The go-to solution here is a combination of grim and slurp.
grimis the tool that actually captures the screen data.slurpis a neat little utility that lets you select a specific window or draw a rectangle on the screen.
When you use them together, you get a reliable workflow that just works on Wayland. For instance, to select a specific area, you can run grim -g "$(slurp)" my-capture.png. This command runs slurp first, waits for you to make a selection, and then feeds those coordinates directly to grim to perform the capture.
When Your Tool Grabs the Wrong Window
It’s happened to all of us: you try to capture a single application window, but the tool grabs the entire desktop instead. Or worse, it snags a completely different window. This usually happens with apps that have complex layouts, like floating toolbars or pop-up dialogs that confuse the screenshot utility.
The easiest fix is to switch from an automatic window-capture mode to an interactive one. Instead of relying on the tool to guess correctly, just tell it exactly what you want.
Tools like Flameshot (flameshot gui) or command-line options like maim -s are perfect for this. They give you a crosshair so you can manually draw a box around the precise area you need, completely bypassing any confusion over window IDs.
While you could use a tool like xwininfo on X11 to get a specific window ID and pass it to your script, for day-to-day use, a quick manual selection is almost always faster and more reliable.
With the global screen capture software market projected to hit $17.34 billion by 2029, user expectations for reliability are sky-high. When native Linux tools fail to capture overlays or crash, it can waste 15-25% of a QA engineer's time during visual testing. You can read the full research about screen capture software trends to see why dependable tools are becoming so important.
Fixing "Copy to Clipboard" Failures
You grab the perfect screenshot, hit Ctrl+V to paste it into a chat or document, and... nothing. Clipboard problems are incredibly disruptive. Nine times out of ten, this happens because a required helper utility is missing.
For command-line tools on X11, the magic ingredient is xclip. A command like maim -s | xclip -selection clipboard -t image/png will fail silently if xclip isn't installed. The modern equivalent on Wayland is wl-clipboard, used in commands like grim -g "$(slurp)" - | wl-copy.
Do yourself a favor and make sure both are installed now (sudo apt install xclip wl-clipboard on Debian/Ubuntu). It will save you a headache later.
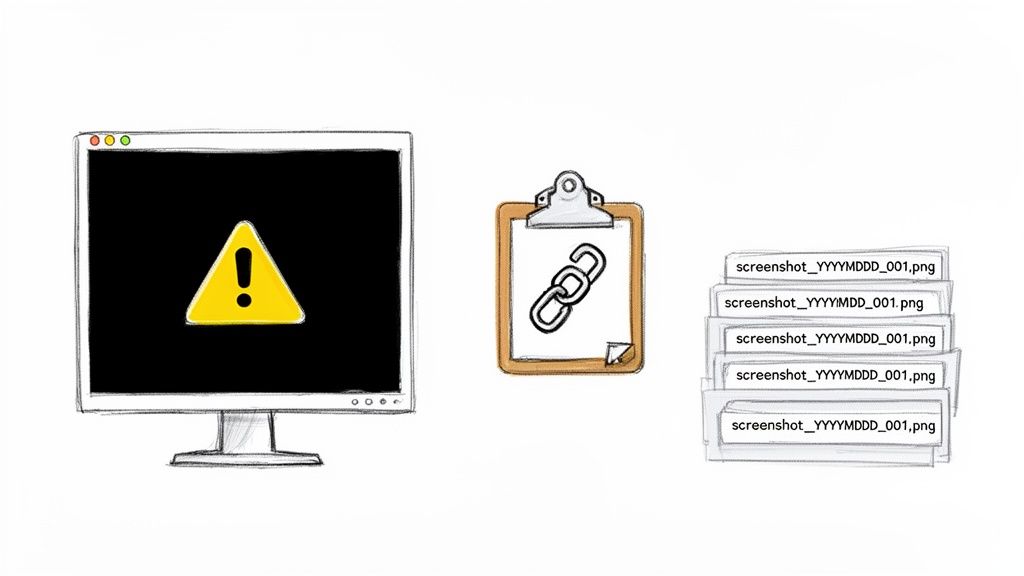
Keeping Your Screenshots Organized and Optimized
Once you’ve mastered the art of capturing, you’re left with the output. A desktop cluttered with hundreds of Screenshot-*.png files is a productivity killer. A few simple habits can make a world of difference.
Adopt a Naming Convention
Get out of the habit of letting your system name files for you. Instead of a folder full of Screenshot_2024-10-27_11-23-45.png, try a descriptive format like project-feature-version.png. A name like webapp-login-form-v2.png is instantly recognizable and much easier to find later.
Optimize Images for Sharing
Massive PNG files are great for quality, but they can slow down websites and clog up project management tools. Before you upload, run your screenshots through an optimizer like ImageMagick.
A simple command can dramatically reduce file size:
convert input.png -strip -quality 85 output.jpg
This command converts the image to a high-quality JPEG and strips out extra metadata. It's not uncommon to see a file size reduction of 70% or more with no noticeable loss in visual clarity. This is an essential step for anyone sharing screenshots online.
Frequently Asked Questions About Linux Screenshots
Jumping into screenshots on Linux can feel a bit like a maze, with so many tools, desktop environments, and even display servers to consider. Whether you're a developer trying to document a bug or a new user just trying to grab a quick image, you're bound to have questions. Here are some of the most common ones we see, answered.
How Can I Take a Screenshot of a Specific Area?
The quickest, most universal way is the Shift+PrtSc keyboard shortcut. Just about every major desktop environment—GNOME, KDE Plasma, XFCE—recognizes this. It immediately transforms your cursor into a selection tool, letting you click and drag to capture the exact region you need. It’s my go-to for anything quick and dirty.
If you need a bit more power, dedicated apps are the way to go.
- GUI Tools: Running
flameshot guiin your terminal launches an interactive overlay with built-in annotation tools, which is fantastic for marking things up on the fly. - Command Line: For scripting or pure terminal work, you can't beat
scrot -sormaim -s. Both give you the same interactive selection without ever leaving the command line.
Having these options means you can grab a quick snippet with a keypress or build a sophisticated capture into a shell script.
What Is the Best Tool for Annotating Screenshots?
For on-the-spot annotations, Flameshot is the hands-down winner for most Linux users. What makes it so great is the instant editing interface that pops up the moment you select an area. You can add arrows, text, boxes, and even blur sensitive information without ever opening a separate program.
Of course, if you need to do some heavy-duty image manipulation, you'll want to open your capture in a proper editor like GIMP. But for the 99% of cases where you just need to point something out, Flameshot’s integrated workflow is a massive time-saver.
Why Do Some Screenshot Tools Fail on Wayland?
Ah, the classic "black screen" problem. If you've run into this, you've discovered the major security difference between the traditional X11 display server and the modern Wayland protocol. Wayland is built with security in mind, which means it actively blocks one application from peeking at the contents of another. This is great for privacy, but it completely breaks old-school screen grabbers like scrot and maim.
To reliably take screenshots on Wayland, you have to use tools that are built for it.
- Modern GUI apps like Flameshot and Spectacle have been updated with Wayland support.
- The native command-line approach is a two-part solution:
grimhandles the capture, andslurplets you select the screen region or window.
The key thing to remember is this: on Wayland, your tools must be Wayland-native. Using compatible software like
grimandslurpensures your captures just work, every time.
How Do I Automate Taking Website Screenshots?
When you need to automate website captures for things like visual regression testing or tracking SEO changes, your desktop tools won't cut it. You're looking at two main paths here. The first is the DIY route: running your own headless browsers with libraries like Puppeteer or Playwright. This gives you ultimate control but saddles you with the headache of managing infrastructure, keeping browsers updated, and debugging tricky scripts.
The second, much simpler path is to use a dedicated screenshot API. A service like ScreenshotEngine handles all the backend complexity for you. Instead of wrestling with servers, you just make an API call with the URL and any options you need—like capturing a specific element or taking a full-page shot. The service returns a perfect image. For any professional or large-scale use, this is a far more scalable and cost-effective solution.
For developers who need a reliable, scalable way to capture website screenshots without the hassle of managing browsers, ScreenshotEngine provides a powerful and easy-to-use API. Get started for free and integrate high-quality, programmatic screenshots into your application in minutes. Learn more at https://www.screenshotengine.com.