Grabbing a screenshot of a website seems simple, right? You can do it instantly with your browser's built-in tools for a quick capture, or you can go programmatic with APIs for more automated, heavy-duty jobs. The best method really boils down to one question: do you need a quick, one-off image, or are you building a scalable, automated solution for something like site monitoring or QA testing?
Choosing the Right Website Screenshot Method
Deciding how to screenshot a website isn't just about speed; it's about matching the tool to your actual goal. Are you just trying to snag a visual for a presentation, or do you need to automate thousands of captures for visual regression testing? The path you choose here dictates the efficiency, cost, and reliability of your entire workflow.
This decision matters whether you're a marketer, a QA engineer, or a backend developer. Each of us has different needs, and getting a handle on the core techniques is the first step toward building a process that doesn't fall over. Think of this section as your strategic map—we'll compare methods on speed, reliability, and scalability to help you find the right tool for the job.
Finding Your Ideal Workflow
The right path almost always depends on the complexity and sheer volume of your task. For a simple, one-time capture, manual methods are perfect. But for anything at scale, you'll need to look at automation. The decision tree below gives you a good visual breakdown of the choices.
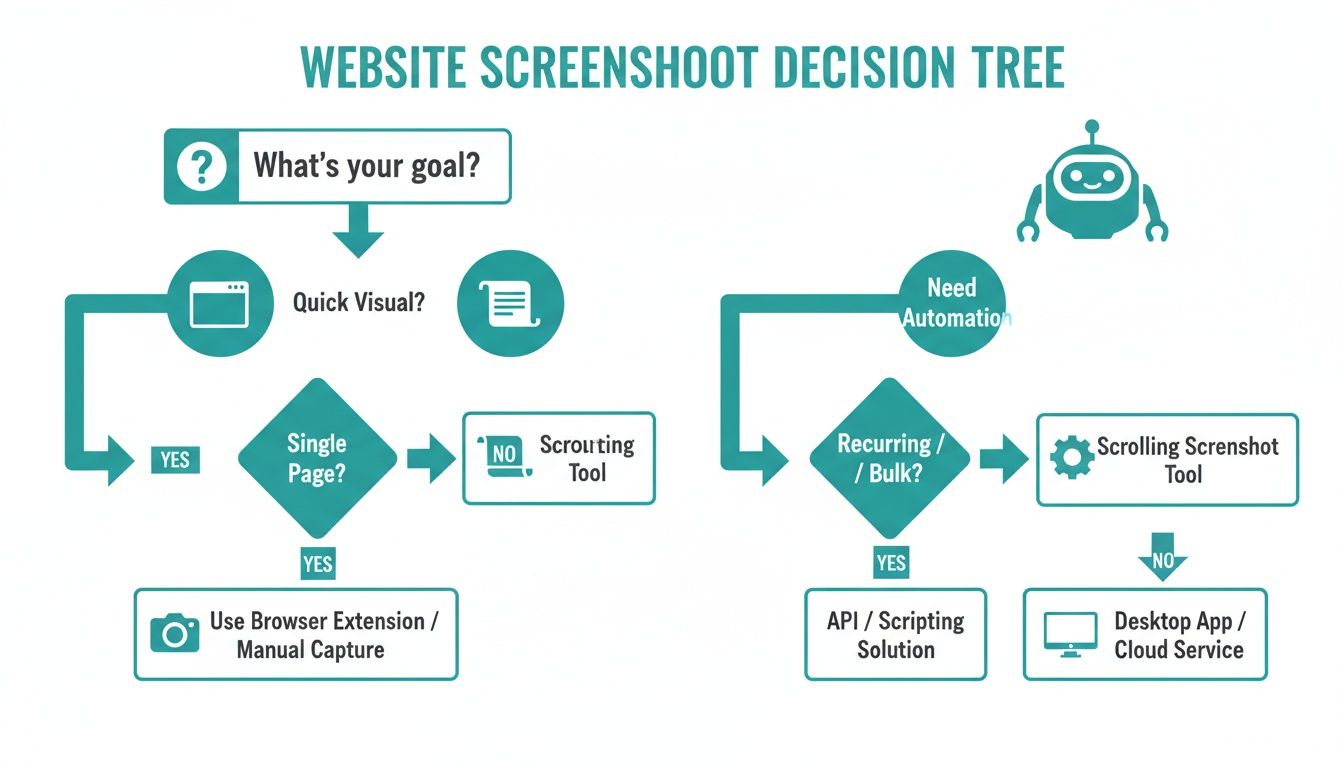
As you can see, quick, simple needs are easily met by browser tools. Once automation enters the picture, the real choice is between wrestling with self-hosted headless browsers or using a managed API service that handles the infrastructure for you.
To give you a clearer picture, here's a quick rundown of the main approaches.
Website Screenshot Methods at a Glance
This table breaks down the different methods, highlighting what they're best for and what kind of complexity and scale you can expect from each.
| Method | Best For | Complexity | Scalability |
|---|---|---|---|
| Browser Tools & Extensions | Quick, one-off captures of visible content. | Low | Not Scalable |
| Headless Browsers (Puppeteer/Playwright) | Automated, customized captures for developers. | High | Moderate (requires maintenance) |
| Screenshot APIs (like ScreenshotEngine) | Scalable, reliable, and automated captures without infrastructure management. | Low | High |
Choosing the right tool from the start saves a massive amount of headache down the line, especially as your needs grow.
The demand for automated tools is exploding. Valued at $0.6 billion in 2023, the website screenshot software market is on track to hit $1.5 billion by 2031. This isn't just a trend; it shows how essential reliable, automated visual captures have become in modern development and marketing.
Of course, beyond the basic browser options, there's a whole world of dedicated software with advanced features. You can explore some great free Snagit alternative tools if you need more than the basics but aren't ready for full automation. And if you just want a quick, no-fuss way to see what an API can do, feel free to play around with our free tool right here: https://www.screenshotengine.com/tools/free-website-screenshot.
Manual Captures with Your Browser's Toolkit
Before you even think about writing code or signing up for a service, it’s worth getting to know the powerful screenshot tools already baked into your browser. Honestly, for many one-off tasks—like grabbing a quick visual for a bug report or sharing a design mockup—these native features are often the fastest way to get the job done.
Modern browsers like Google Chrome and Mozilla Firefox pack a surprising punch in their Developer Tools. You don’t need to clutter up your browser with extensions to capture exactly what you need. It's the perfect solution for those moments when firing up an automated script would be total overkill.
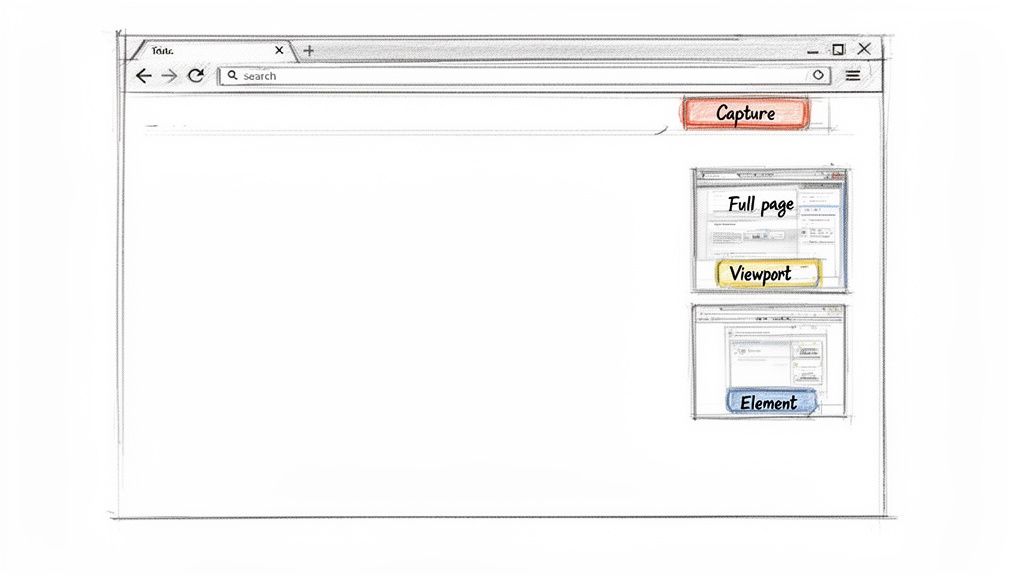
Finding the Screenshot Command Menu
Getting to these hidden gems is pretty simple. On most browsers, just hit F12 (on Windows) or Cmd+Option+I (on Mac) to pop open the Developer Tools. From there, you can access the command menu.
In Chrome, for example, the shortcut is Ctrl+Shift+P (or Cmd+Shift+P on a Mac). As soon as the menu pops up, just start typing "screenshot," and you'll see all the options laid out for you.
This little menu is your control center for manual captures. The key takeaway here is just how much you can do without leaving the browser—capturing the full page, a single element, or just what you see on the screen.
You can pick from a few different capture types, each one useful for a specific scenario:
- Capture full size screenshot: This is the one I use most often. It grabs the entire webpage from the very top to the very bottom, stitching together everything into one long, continuous image. It's perfect for archiving a whole page.
- Capture node screenshot: This is a lifesaver for developers and designers. You can select a specific HTML element—like a particular
<div>, an image, or a button—and capture only that piece. No more clumsy cropping. - Capture screenshot: This one does exactly what it sounds like. It just snaps a picture of whatever is currently visible in your browser window (the viewport).
My Go-To Tip: When you need a pixel-perfect shot of a single UI component for a presentation or a bug ticket, the "Capture node screenshot" is your best friend. Just right-click the element in the Elements panel, find "Capture node screenshot," and you're done. It's precise and saves a ton of time.
This manual approach is surprisingly reliable and requires zero setup. While you obviously wouldn't use it to capture hundreds of pages, it's an essential skill for anyone who needs a quick, accurate screenshot of a website.
Taking Screenshots Automatically with Headless Browsers
When you need to move beyond one-off manual captures, headless browsers are the go-to solution for developers. Think of them as real browsers like Chrome or Firefox, but running silently in the background without any visible window. You control everything through code, unlocking some serious automation power.
Frameworks like Puppeteer (for Chrome) and Playwright (which handles multiple browsers) are the big names here. They give you powerful tools to navigate to a page, poke around, and snap a picture. While a basic script is just a few lines of code, the real world throws a lot more at you.
Getting Past the Simple Stuff
Just loading a URL and taking a shot is rarely enough. Modern websites are dynamic beasts, constantly changing as different pieces load in.
To get a useful screenshot, your script needs to be smarter and handle common hurdles:
- Waiting for the Right Content: What if the chart you need to capture only appears after an API call finishes? Your script can't just guess. It needs to be told to wait for that specific network request to complete or for a particular element to show up.
- Handling Lazy-Loaded Images: Many sites don't load images at the bottom of the page until you scroll down. If your script doesn't mimic that scrolling, you'll end up with a screenshot full of blank spaces where those images should be.
- Closing Cookie Banners: Almost every site has one, and that giant overlay will ruin your shot. You have to program your script to find and click the "Accept" button, which is a surprisingly fragile task since website layouts change all the time.
This is where the maintenance headache comes in. The script you wrote today could easily break next week because a developer changed a CSS class. If you're weighing which framework to dive into, we've broken down the pros and cons in our https://www.screenshotengine.com/blog/playwright-vs-puppeteer comparison.
A common pitfall I see is not waiting for the right moment. Teams pull their hair out over flaky scripts that capture a screenshot just a few milliseconds too early, before a key piece of data has finished rendering. The fix isn't a random time delay; it's waiting for a specific event or element to be ready.
Thinking About Performance and Infrastructure
Running one headless browser is easy on your local machine. But what about scaling up to capture hundreds or thousands of pages? That's an entirely different ballgame. Each browser instance is a resource hog, eating up a ton of CPU and memory.
Suddenly, you're not just writing code; you're managing servers. You have to worry about allocating resources, making sure your system can handle the load, and even rotating IP addresses with proxies so you don't get blocked by sites with anti-bot measures.
Knowing how to control a browser with code is an incredibly useful skill. If you're looking to get your hands dirty, this complete guide to browser automation with Python is a fantastic starting point. Just remember that while the DIY approach gives you total control, it also comes with a real commitment to building and maintaining the infrastructure.
When DIY Automation Becomes a Headache, Use a Screenshot API
Building your own screenshot automation with a headless browser like Puppeteer gives you ultimate control, but it's a rabbit hole of complexity. You're suddenly responsible for managing browser instances, wrestling with dynamic content, and maintaining scripts that break at the slightest website change. It's practically a full-time job.
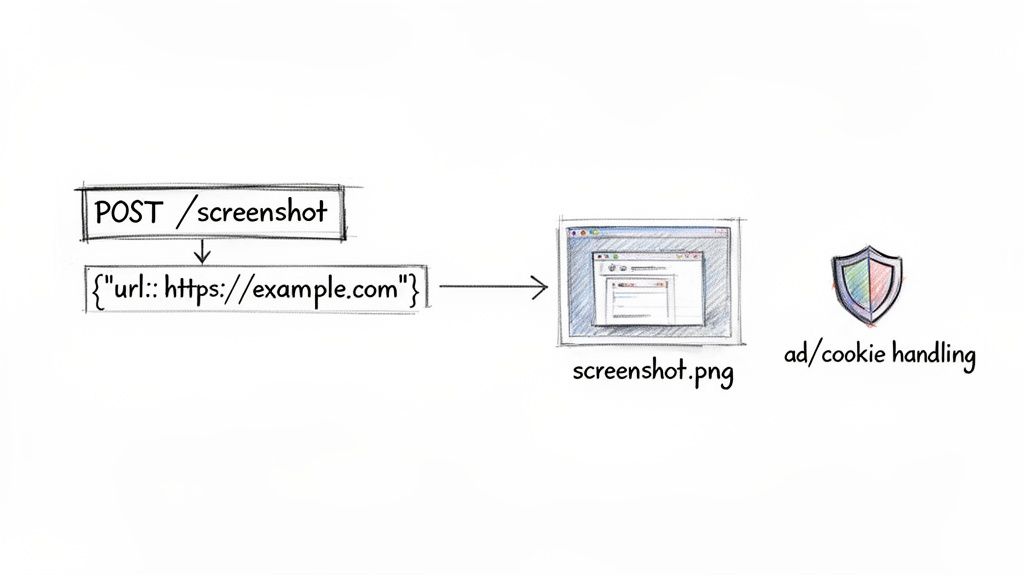
For anyone who needs reliable website screenshots without the infrastructure nightmare, a dedicated API is the way to go. It’s a classic "build vs. buy" decision, and for most, buying into a specialized service is a much smarter play.
This API-first approach lets you swap out potentially hundreds of lines of brittle automation code for one clean, simple API call. You get to offload all the messy parts—scaling, rendering challenges, and blocking annoying popups—to a service built specifically for that one job.
The Power of a Single API Call
Think about it: instead of writing scripts to launch a browser, navigate to a page, wait for it to fully load (good luck with that!), and handle all the potential errors, you just send an HTTP request. The API handles everything else and sends back a perfect screenshot.

The real magic here is abstraction. The API hides all the gritty details of browser management, freeing you up to focus on what to do with the final image in your application.
Practical API Examples for Common Tasks
So, how does this actually work? Let's look at some real-world code. With a service like ScreenshotEngine, you can pull off some pretty advanced captures with just a few simple parameters.
Here’s a basic example using Node.js to grab a full-page screenshot.
import fs from 'fs'; import { ScreenshotEngine } from 'screenshotone-api-sdk';
// Initialize the client with your access key const client = new ScreenshotEngine('YOUR_ACCESS_KEY');
// Define what you want to capture const options = { url: 'https://example.com', full_page: true, format: 'png' };
// Fire off the request and save the image client.take(options) .then(image => fs.writeFileSync('example-full-page.png', image)) .catch(error => console.error('An error occurred:', error));
See how clean that is? That one full_page parameter handles all the tricky scrolling and stitching that you'd otherwise have to code yourself.
What if you need to test a site's dark mode or capture just one specific piece of the page? It’s just as straightforward. If you want to dive deeper, you can explore the possibilities in our complete guide on using a screenshot API.
Pro Tip: One of the most powerful, and often overlooked, API features is capturing a specific element using a CSS selector. Instead of grabbing an entire page and then trying to crop it, you can just tell the API, "Give me a picture of the element with the ID
#main-chart." This is a game-changer for monitoring dashboards, grabbing user profile cards, or pulling product images.
APIs have completely changed how developers integrate this kind of functionality. We've seen demand skyrocket since 2022 as teams automate everything from social media link previews to generating portfolio thumbnails. The technology has matured to the point where real-time generation of thousands of screenshots via simple HTTP requests is now the norm. You can dig into more of these market trends in this Data Insights Market report.
Clean Screenshots, No Extra Code Required
Perhaps the biggest win of using a dedicated API is how it automatically deals with all the on-page noise. Most professional services are fine-tuned to block the common annoyances that would otherwise ruin your shots.
A good screenshot API will typically handle:
- Ad Blockers: Automatically strips out most display ads for a much cleaner image.
- Cookie Banners: Intelligently hides or accepts those "we value your privacy" popups.
- Subscription Popups: Blocks the newsletter sign-up modals and other overlays that get in the way.
This built-in intelligence means you don't have to write fragile, site-specific code to click buttons or hide elements. The result is a consistent, professional-looking screenshot of website every single time, making it the perfect tool for visual regression testing, generating marketing assets, or just getting high-quality images for your blog.
Making Your Screenshot Automation Truly Reliable
Anyone can write a script to take a single screenshot. That’s the easy part. The real test is building a system that can reliably capture thousands of screenshots without constant babysitting. A script that works most of the time is just a fragile toy; a production-ready workflow needs to be built for the chaotic reality of the web.
This is where you shift your mindset from simply scripting to engineering a robust, defensive system.
The foundation of a solid system is anticipating failure. Don't just hope for the best; code for the worst. Networks will drop, websites will hang, and layouts will break without warning. Your automation has to handle these hiccups gracefully instead of just crashing.
A great starting point is implementing smart retry logic for network errors and setting sensible timeouts. You can't let one sluggish website clog up your entire process. I've found a timeout of 15-20 seconds is a decent baseline, but you’ll want to adjust this based on the types of sites you're working with.
Get Your Viewport and Timing Right
One of the most common blunders I see is forgetting about the viewport. A site on a 1920x1080 desktop monitor looks completely different from how it renders on a 375x812 mobile screen. If you're doing any kind of visual comparison or testing, locking in a consistent viewport is an absolute must.
Beyond that, timing is everything. Modern sites are living, breathing things, with content popping in long after the initial page load event fires.
- Wait for Specific Elements: Don't just guess with a fixed delay. Tell your script to wait until a crucial element, like the main
#dashboard-chartor a.product-gallery, actually appears on the page. - Keep an Eye on the Network: For pages that pull in a lot of data, a smarter approach is to wait until network traffic dies down. This is a great signal that all the important data has loaded and the page is as complete as it's going to get.
I have a hard-and-fast rule: never, ever use arbitrary delays like
sleep(5). It’s a surefire way to create flaky, unreliable automation. Always wait for a concrete event—an element becoming visible, a network call completing, or a specific piece of text showing up.
Handling Logins and Ever-Changing Content
Trying to capture a page that’s behind a login wall introduces a whole new layer of complexity. You need to automate the login flow first, then figure out how to manage the session. This usually means grabbing the session cookies after a successful login and injecting them into all future requests. It's tricky and requires you to handle sensitive credentials securely.
Another headache is dynamic content—think image carousels, auto-playing videos, and CSS animations. Before you snap your screenshot of a website, you often need to inject a bit of JavaScript to pause these elements. If you don't, you'll get a different image every time, which is a nightmare for visual testing. For example, if you're capturing product pages, you need to ensure the image carousel is always frozen on the first slide.
Finally, think about caching. If your workflow involves capturing the same URL repeatedly in a short timeframe, caching the image can be a massive performance win. It saves time, bandwidth, and processing power by avoiding redundant work. This is particularly useful for high-frequency monitoring jobs where the content isn't changing every single minute.
Common Questions About Website Screenshots
Once you start capturing websites, you quickly realize it's not always a straightforward process. A few common questions seem to pop up for everyone, whether you're trying to debug a script or just get that one perfect image.
Getting a clean screenshot of a website means wrestling with dynamic content, interactive elements, and user-specific states like being logged in. Let's walk through some of the most frequent hurdles developers and QA engineers face and how to clear them.
How Can I Screenshot a Specific Element on a Page?
This is one of the most common requests. You don't always need the entire webpage; sometimes, you just want to grab a specific chart, a user profile card, or a product image. Luckily, you have a few great ways to do this.
For a quick, one-off grab, the browser's developer tools are your best friend. Just inspect the page, find the HTML node you want in the Elements panel, right-click it, and choose "Capture node screenshot." It's fast, easy, and requires no setup.
When you need to do this programmatically, you can turn to headless browsers or a dedicated API.
- Headless Browsers (Playwright/Puppeteer): You can write a script that pinpoints the element using a CSS selector, like
#main-chartor.user-profile-card. Once your script has a handle on that element, you simply call the screenshot function on it. The result is a perfectly cropped image of just that piece of the page. - Screenshot APIs: This is often the path of least resistance. A service like ScreenshotEngine lets you pass the CSS selector as a parameter in your API call. The service does all the heavy lifting—finding, rendering, and cropping the element—and sends back the precise image you asked for.
What Is the Best Way to Handle Cookie Banners and Popups?
Ah, the classic problem. Cookie banners, GDPR notices, and "subscribe to our newsletter" popups are the nemesis of clean automated screenshots. They block the content you actually need, making your captures worthless.
If you’re using a headless browser, you have to write custom logic to find and click the "accept" or "close" button. I've been down this road, and it's a fragile solution. The moment a developer changes a button's class name or ID, your script breaks. It becomes a constant maintenance headache.
The most reliable fix is to use a screenshot API that handles this for you. Good services automatically block most of these common overlays by default. This means you get a clean shot every time without writing a single line of code to dismiss popups.
This kind of built-in intelligence can save you a massive amount of development and upkeep time.
Can I Screenshot a Website That Requires a Login?
Absolutely. Capturing content behind a login screen is a common requirement, but it requires you to manage the user session properly.
With a headless browser script, your code needs to perform the full login sequence. This means navigating to the login page, programmatically typing the username and password into the correct fields, and then clicking the submit button.
After a successful login, the key is to manage the session cookies. Your script has to grab these cookies and inject them into the headers of all future requests to stay authenticated.
Some screenshot APIs also support this. They might let you pass session cookies directly in the API request, or even allow you to run a custom script to perform the login steps before the screenshot is taken.
Ready to stop wrestling with headless browsers and get clean, reliable screenshots with a single API call? ScreenshotEngine handles all the complexity of rendering, ad blocking, and scaling for you. Get started for free and make your first API call in minutes.