Grabbing a quick screenshot of a web page seems simple enough, right? Most of us know the basic keyboard shortcuts by heart—Windows + Shift + S on a PC or Command + Shift + 4 on a Mac. These are perfect for quickly snagging a piece of what you see on your screen.
But what happens when "good enough" isn't good enough?
Why Taking the Right Screenshot Is a Superpower
In a professional setting, knowing how to capture a web page properly is more than just a neat trick; it's a core skill for clear communication and solid documentation. Think about it. Developers need to pinpoint visual bugs, marketers build training guides, and QA teams have to document every step of a test. In all these cases, a crisp, well-framed screenshot says more than a paragraph of text ever could.
Getting this right is a huge part of creating effective documentation. It's one of the key ways to boost product adoption with interactive SOPs, where visual clarity is everything.
Moving Beyond the Basics
The real skill comes from knowing which screenshot method to use for the job at hand. Your needs will change depending on whether you're doing a one-off capture or building an automated system that needs to snap thousands of images a day. A simple screen grab just won't cut it when you run into these common hurdles:
- You need the whole page, not just the visible part. Standard shortcuts can't see anything "below the fold."
- You only need one specific element. Isolating a single button, chart, or form field cleanly is a pain to do manually.
- You're running visual regression tests. Taking hundreds of screenshots by hand to spot design flaws is a recipe for mistakes and wasted time.
- You have to archive websites for compliance. This requires a reliable, programmatic way to capture full pages at scale.
This is where you need to decide between a quick manual approach and a more robust, automated solution. The flowchart below breaks down that initial decision.
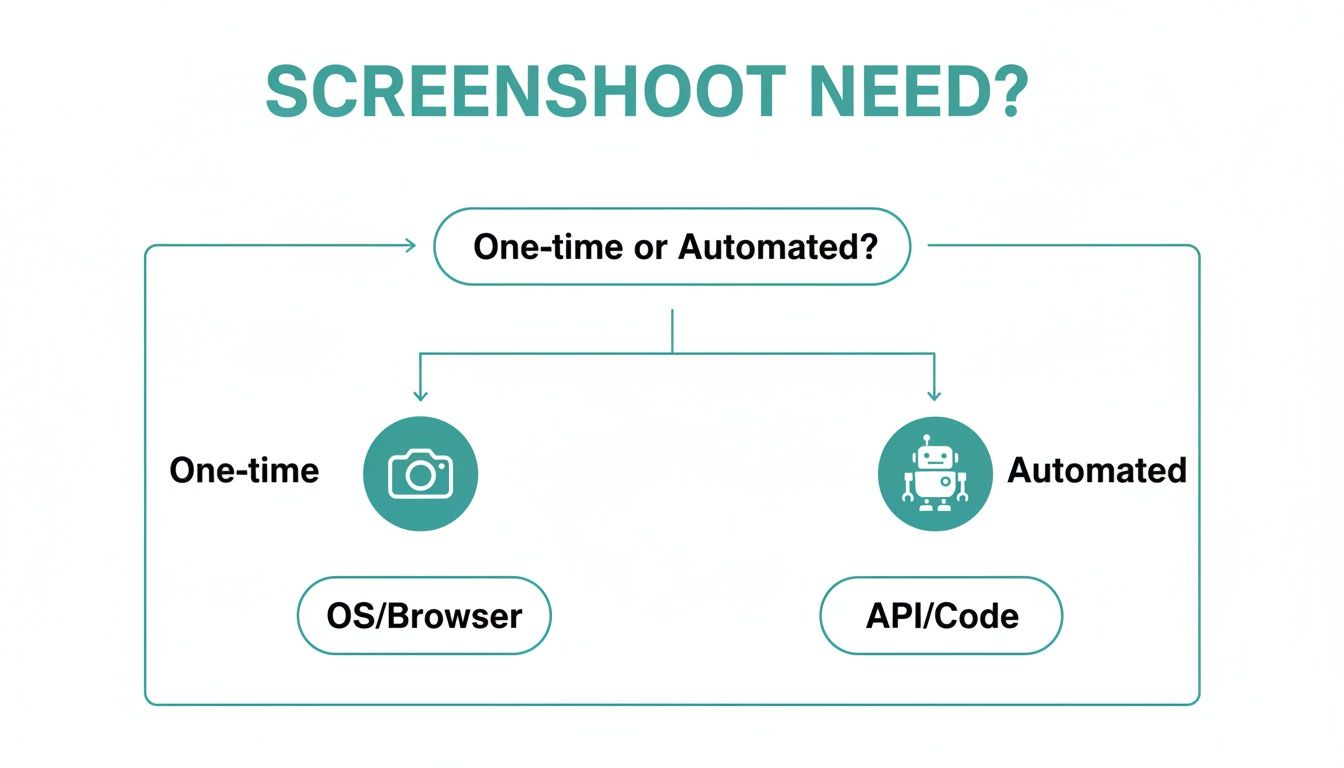
As you can see, the path is pretty clear. For one-time tasks, stick with the tools built into your OS or browser. But if you need automation and scale, you’re looking at an API or a code-based library. This very distinction is fueling a massive industry, with the global website screenshot software market valued at around $700 million in 2024 and expected to climb to $1.2 billion by 2033.
Web Page Screenshot Methods at a Glance
To help you decide which path to take, here’s a quick breakdown of the most common methods, what they’re good for, and how much effort they require.
| Method | Best For | Ease of Use | Scalability |
|---|---|---|---|
| OS/Browser Shortcuts | Quick, one-off captures of the visible screen. | Very Easy | Low |
| Browser DevTools | Full-page or specific element captures for developers. | Easy | Low |
| Browser Extensions | Full-page captures, annotations, and screen recordings. | Very Easy | Low |
| Code (Puppeteer/Playwright) | Automated, customizable captures for testing and scraping. | Advanced | High |
| APIs (ScreenshotEngine) | High-volume, reliable captures without managing infrastructure. | Moderate | Very High |
This table should give you a good starting point. Simple tools are great for occasional use, but as soon as your needs become more complex or repetitive, you'll want to look at more powerful, scalable solutions like coding libraries or a dedicated API.
Sometimes, the simplest tool is the right one for the job. Before you start looking at complex software or APIs, it's worth getting really good with the screenshot tools already built into your operating system and web browser. They're often the quickest way to get what you need.
I use them all the time for things like flagging a bug for a colleague, snapping a picture for documentation, or just grabbing a specific UI element to drop into a presentation.
Fast Captures on Your Desktop
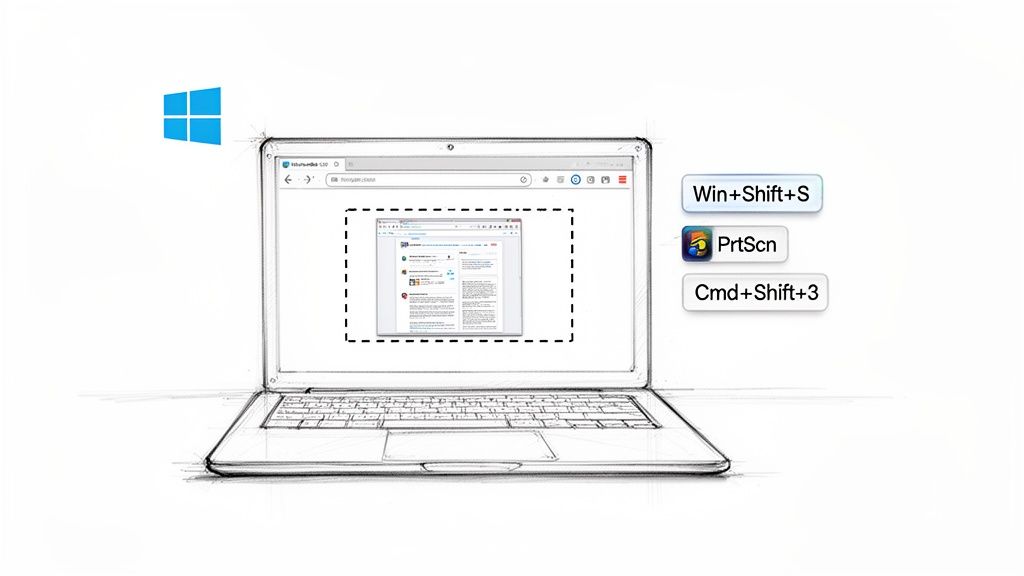
If you're on a Windows machine, you have a few go-to keyboard shortcuts. The classic Print Screen (PrtScn) key is still around; it copies your entire screen to the clipboard, ready to paste. For a bit more focus, Alt + PrtScn will grab only the active window you're working in.
My personal favorite, though, is Win + Shift + S. This brings up the Snipping Tool overlay, which is incredibly versatile. You can grab a clean rectangle, draw a free-form shape, isolate a single window, or just capture the whole screen.
For anyone on a Mac, there's a similar set of powerful shortcuts and tools. If you're not familiar with them, this guide on how to take a screenshot on a MacBook is a fantastic resource to get you up to speed.
Going Beyond the Basics with Browser Tools
The one major drawback of standard OS tools? They can only see what's visible on your screen. They're useless for anything "below the fold." That's where your web browser's own features come into play.
Modern browsers like Chrome and Firefox have some seriously powerful, and often hidden, full-page screenshot commands built right into their developer tools. These are perfect for capturing an entire landing page or a long article in one seamless image, saving you the headache of manually stitching multiple shots together.
In web development, being able to communicate clearly and quickly is everything. Whether you're a frontend or backend developer, knowing these manual capture methods is crucial for documenting browser quirks. It's surprising how often rendering issues pop up—they can affect up to 53% of unoptimized banners and other page elements.
For a developer, a clean, high-fidelity screenshot is non-negotiable. Whether you’re trying to debug a tricky responsive layout or just adding a visual to a pull request, the quality of your screenshot directly reflects the quality of your communication.
Of course, these manual methods aren't always perfect. They're great for quick, one-off tasks, but they can fall short when you need more precision, like isolating a single chart from a dashboard. For those moments, a dedicated free website screenshot tool can be a real time-saver, letting you target specific elements with pinpoint accuracy.
Here’s a perfect example of a standard, no-frills screenshot—in this case, the Wikipedia article on the topic itself.
See how it captures everything? You get the web page content, but you also get all the surrounding clutter like my browser tabs and the operating system's taskbar. This "what you see is what you get" approach can be helpful, but it often includes distracting UI that more advanced tools are designed to crop out automatically.
Advanced Captures with Browser DevTools and Extensions
Sometimes a standard screen grab just doesn't cut it. When you need more precision, the developer tools built right into browsers like Chrome, Firefox, and Edge are your best friend. These are the tools I and other developers live in all day, and they offer some surprisingly powerful ways to capture exactly what you need.
The biggest win? No more manually scrolling and stitching images together to capture a long page. DevTools can grab the entire scrolling length of a page in one go, giving you a single, clean, high-resolution image. This is a total game-changer for documenting long-form articles or archiving complex landing pages.
Tapping into the Command Menu
The quickest way to get to these powerful screenshot options is through the Command Menu in Chrome's DevTools. First, you'll need to open DevTools itself. Just right-click anywhere on the page and hit "Inspect," or use the keyboard shortcut: Cmd + Option + I on a Mac or Ctrl + Shift + I on Windows.
With the DevTools panel open, bring up the Command Menu with Cmd + Shift + P (Mac) or Ctrl + Shift + P (Windows). This pops up a search bar. All you have to do is start typing "screenshot," and you'll see all the built-in commands.
Here’s what you’ll find:
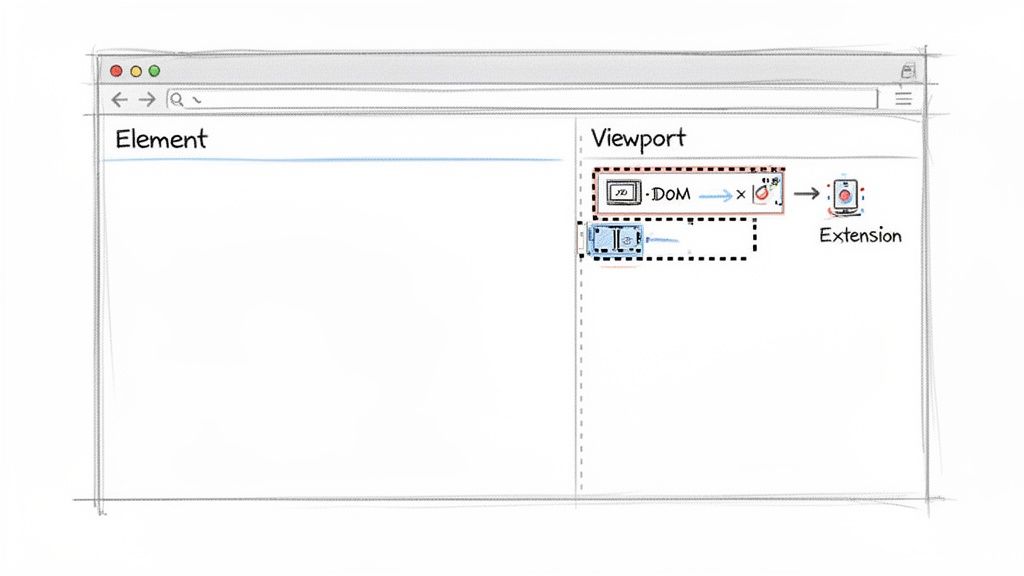
- Capture full size screenshot: This is the one you’re looking for to save the entire page, top to bottom.
- Capture node screenshot: This is incredibly useful. It lets you select a specific HTML element—like a single button, a product image, or an entire navigation bar—and capture just that piece.
- Capture screenshot: This option just grabs the visible portion of the webpage, similar to an OS shortcut but without capturing your browser's address bar or tabs.
DevTools turns screenshotting into a precision tool for debugging and documentation. The ability to isolate a single DOM node for a screenshot is invaluable when you're trying to report a visual bug on a specific component without any distracting clutter.
Leveling Up with Browser Extensions
While DevTools are fantastic, especially for technical work, browser extensions can offer a more polished, user-friendly experience with some handy extra features. These are perfect if you aren't a developer or just need to do more with your screenshots, like adding notes or hiding sensitive info.
Popular extensions like GoFullPage or Awesome Screenshot take the core concept of a full-page capture and add convenient layers on top. You can often annotate your captures with arrows, text, and blurs right in the browser before you even save the file. This is ideal for creating quick tutorials or giving clear visual feedback to your team.
The need for high-quality captures is driving major growth in this space. The web scraping industry, which relies heavily on screenshotting, is expected to hit $3.5 billion by 2026. This makes sense when you consider that 56% of users look at product images before even reading the text, making pixel-perfect captures more important than ever. You can learn more about this trend in the website screenshot software market report.
Automating Screenshots with Headless Browsers
When taking one or two screenshots, a simple keyboard shortcut does the job. But what if you need to capture a hundred? A thousand? That's when manual methods break down completely, and you have to turn to automation.
The secret weapon for this kind of work is the headless browser. Think of it as a full-featured browser like Chrome or Firefox, but without any of the visible windows or buttons. It runs invisibly in the background, controlled entirely by code. For developers, this is the gold standard for tasks like visual regression testing, where you're programmatically capturing web pages to catch any unintended UI changes. It's also the engine behind massive data collection projects, from archiving web content to tracking competitor pricing.
This kind of tool gives you programmatic access to all the browser's inner workings—from the DOM (Document Object Model) to the viewport—allowing you to script any action a real person could perform.
Choosing Your Automation Library
In the world of headless automation, two names stand out: Google's Puppeteer and Microsoft's Playwright. Both are excellent Node.js libraries that let you write scripts to launch a browser, visit a URL, and snap a screenshot. They just go about it a bit differently.
- Puppeteer is the veteran. It’s been around longer, has a massive community, and focuses exclusively on controlling Chrome and Chromium-based browsers through the Chrome DevTools Protocol.
- Playwright is the newer, cross-browser powerhouse. It supports Chromium, Firefox, and WebKit (the engine behind Safari), and its API is often praised for being more modern and feature-rich out of the box.
So, which one is right for you? It really depends on your needs. If you only care about Chrome and want the stability of a mature project, Puppeteer is a solid bet. If you need to test across multiple browsers or want a slightly more streamlined API, Playwright is probably the way to go.
Puppeteer vs Playwright Feature Comparison
To help you decide, let's look at a quick head-to-head comparison of these two leading libraries. This table breaks down their core differences in browser support, API design, and community backing.
| Feature | Puppeteer | Playwright |
|---|---|---|
| Browser Support | Chrome, Chromium, Firefox (experimental) | Chromium, Firefox, WebKit (Safari) |
| API Design | Promise-based, powerful and flexible | Async/await-native, built-in auto-waits, modern syntax |
| Auto-Waits | Requires manual waits for elements | Built-in, automatically waits for elements to be ready |
| Primary Maintainer | Microsoft | |
| Community | Larger, more established, extensive resources | Growing rapidly, very active development, strong support |
While both can get the job done, Playwright's built-in auto-waits and first-class support for all major browser engines often give it an edge for complex, cross-browser testing scenarios. For a more detailed breakdown, this Playwright vs Puppeteer comparison goes much deeper.
Getting Started with a Code Example
Let's see this in action. Here’s a simple JavaScript snippet using Playwright to launch a browser, go to a website, and save a full-page screenshot as a PNG file.
const { chromium } = require('playwright');
(async () => { const browser = await chromium.launch(); const page = await browser.newPage(); await page.goto('https://example.com'); await page.screenshot({ path: 'example-screenshot.png', fullPage: true }); await browser.close(); })();
To run this, you'd just need Node.js and the Playwright library installed. The key here is the fullPage: true option—that’s what tells the browser to capture everything on the page, not just what's visible in the initial viewport.
A headless browser script is like having a digital robot that can perfectly replicate user actions. It doesn't get tired, it doesn't make typos, and it can execute thousands of screenshot tasks with perfect consistency, making it essential for any serious testing pipeline.
Navigating Common Automation Hurdles
As powerful as this approach is, it's not exactly a walk in the park. Running headless browsers at scale chews through server resources like CPU, RAM, and network bandwidth. You'll also inevitably run into tricky scenarios that require some clever coding to solve.
Here are a few obstacles you're likely to encounter:
- Handling lazy-loaded content: You need to script your browser to scroll down the page to trigger images or other elements that only load when they enter the viewport.
- Navigating complex logins: Managing cookies, sessions, and multi-factor authentication programmatically can be a real headache.
- Dealing with dynamic elements: How do you capture a page when the content shifts, animates, or appears after a delay? You have to build in logic to wait for the right moment.
These issues add layers of complexity and create a constant need for maintenance. While headless browsers give you the ultimate control, they come with a steep learning curve and the responsibility of managing all the underlying infrastructure. It’s an amazing solution, but one best suited for experienced development teams with the resources to support it.
The Ultimate Screenshot Solution: A Dedicated API
While headless browsers give you a ton of control, they come with a hefty price tag in terms of complexity and upkeep. You’ll find yourself wrestling with server resources, figuring out how to handle lazy-loaded content, and navigating tricky login forms. For most teams, that’s a major distraction from what they should be focused on: their core product.
This is where a dedicated screenshot API really shines. Instead of building and maintaining your own screenshot infrastructure from scratch, you can simply hand off the entire process to a service built for that exact purpose. It's the difference between building your own power plant and just plugging into the grid.
Why an API Is a Smarter Approach
A good screenshot API takes care of all the messy, behind-the-scenes work of running headless browsers at scale. It manages server clusters, keeps browser instances updated, and fine-tunes the rendering process for maximum speed and reliability. Your job is suddenly a whole lot simpler—instead of managing a complex system, you’re just making a single, straightforward API call.
What you get is a production-ready solution right out of the box. You can get back to integrating screenshots into your application, not debugging why a Chrome instance decided to crash on your server at 3 AM.
For developers, time is the most valuable resource. A dedicated API like ScreenshotEngine reclaims countless hours that would otherwise be spent on infrastructure management, letting you focus on building features that deliver direct value to your users.
The real magic is how it abstracts away all that complexity. You no longer have to worry about the underlying browser engine, memory leaks, or network timeouts. You just send a URL and a few parameters, and the API hands back a perfect image, every single time. This kind of consistency is a game-changer for automated workflows like visual testing or compliance archiving.
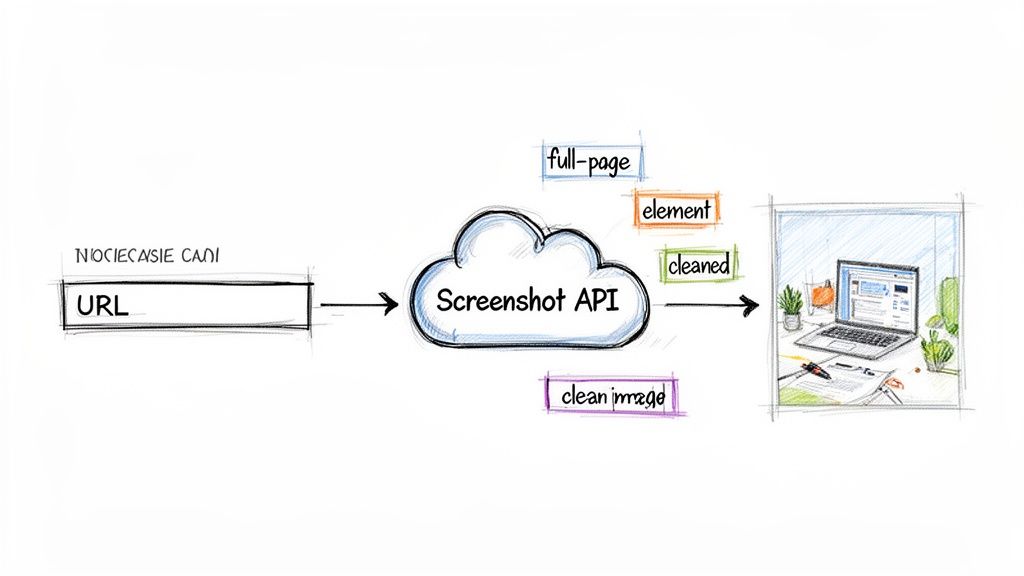
Putting ScreenshotEngine to Work
So, how does this actually look in practice with ScreenshotEngine? A basic request is as simple as sending a URL to the API endpoint. In return, you get a high-quality image. The real power, though, is in the parameters that let you customize the final result.
You can tweak your request to get exactly the shot you need. Some of the most common options include:
full_page: Just set this totrueto capture the entire scrolling length of a page.element: Got a specific part of the page in mind? Provide a CSS selector like#main-chartor.product-galleryto capture just that element.- Output Formats: Easily specify whether you need a PNG, JPEG, or a modern WebP file.
One of the best built-in features is the automatic cleanup of web pages. ScreenshotEngine is designed to block common annoyances like cookie banners, subscription popups, and ads. This means your final images are clean and professional right away, with no need for post-processing. To see what else is possible, check out this guide on what makes a great website screenshot API.
This snapshot of the ScreenshotEngine API playground shows just how easy it is to experiment with different parameters and see the results instantly.
The playground lets you tweak settings like viewport size, output format, and full-page capture, then generates a ready-to-use API URL on the fly.
Real-World Code Examples
Integrating the API is a breeze. For example, if you're setting up a visual regression testing pipeline in a Node.js app, you could write a simple script. It would capture a baseline image of a key page and then, after each deployment, take a new screenshot to compare against it, flagging any visual differences.
Or imagine a digital marketing team using a Python script to track search engine results pages (SERPs). The script could periodically send a list of keywords to the API, capturing the Google search results for each one. This creates a powerful visual record of ranking changes and competitor ad placements over time.
For anyone who needs to programmatically screenshot web pages, an API-driven approach is hands-down the most scalable and reliable method. It completely removes the operational headaches of managing headless browsers, giving you a simple, powerful, and cost-effective solution that just works.
Common Questions When Capturing Web Pages
As you start taking screenshots of web pages, you’ll quickly run into a few common roadblocks, especially with today's complex, interactive sites. Let's walk through some of the most frequent questions I get and how to solve them.
One of the biggest headaches is capturing content that's tucked away behind a login wall. If you're doing it by hand, you just log in first. But for automated tools, it's a different ballgame. A programmatic solution like Playwright or a dedicated screenshot API needs to handle that authentication. This usually means either injecting session cookies into the request or scripting the entire login flow from start to finish.
How Do You Handle Dynamic Content?
Another classic problem is trying to capture a page with dynamic or lazy-loaded content. You know the kind—where images, charts, or data pop in after a delay or as you scroll down. If you snap the screenshot too early, you end up with a half-empty page.
The trick is to teach your capture tool to be patient.
- Wait for network silence: You can configure your tool to hold off until all the initial network requests have finished. This is a good sign that the page has loaded its primary resources.
- Wait for a specific element: A much more reliable method is to target a key element. Tell the tool to wait until a selector like
#final-resultsor.user-dashboardis visible before it takes the shot. - Use a fixed delay: Sometimes, the simplest solution is best. Just add a delay of a few seconds to give everything on the page time to settle and render.
The secret to capturing dynamic pages isn't just about when you take the shot, but what you wait for. Don't just point your tool at a URL and hope for the best. Instruct it to capture the page only after it has reached a stable, fully rendered state.
In the end, these tricky edge cases are exactly where automated solutions, especially screenshot APIs, really shine. They've already built all this complex timing and authentication logic right into their service, saving you the trouble.
Ready to stop wrestling with headless browsers and get perfect screenshots with a single API call? Get started with ScreenshotEngine for free and see how simple programmatic captures can be. Start your free trial today!